


Step by Step: ProxySQL HA with BGP ECMP Anycast
In our previous blog post ProxySQL HA with BGP ECMP Anycast, we established why we would want to use BGP ECMP as a strategy for making our ProxySQL cluster highly available. Now let’s look at how to implement it technically.
For this scenario we assume that we have:
- an OPNsense instance as our BGP Router with the IP address
10.5.8.251 - Two ProxySQL nodes (proxysql-01 with IP
10.5.20.4and proxysql-02 with IP10.5.20.5) 10.5.200.1as the anycast IP we want both ProxySQL nodes to accept connections on
Setup on the router
Enable BGP on OPNsense
The out-of-the-box installation of OPNsense does not come with BGP support. To add it, install the FRRouting package first (os-frr), which will enable available protocols for dynamic routing.
Install the os-frr plugin in System -> Firmware -> Plugins.

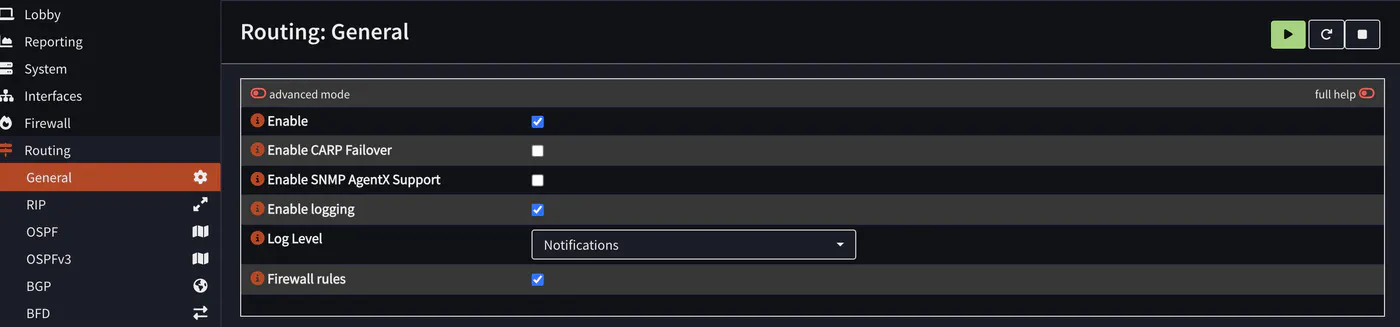
We need to activate the routing service on our OPNsense host.
- In Routing -> General check “enable”
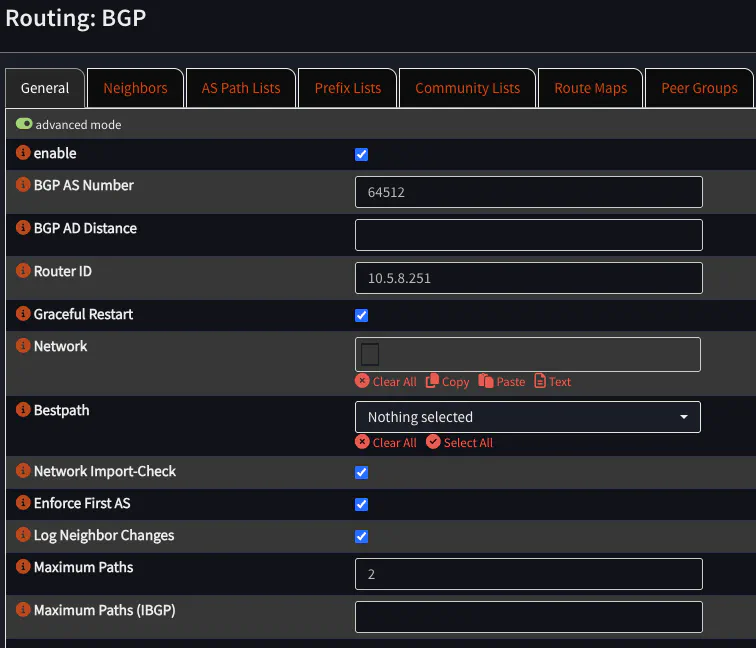
Next, assign an Autonomous System (AS) number to the OPNsense BGP peer. An AS number identifies a network, or a group of routers, under a single administrative domain. Choose a private AS number from the range 64512-65534.
In Routing -> BGP (advanced mode):
- check “enable”.
- set the chosen AS number (in this example we use
64512). - set Maximum Paths to 2 to match the number of ProxySQL nodes that we have.
Maximum Paths configures OPNsense to perform Equal-Cost Multi-Path (ECMP) load balancing across the two paths. Any additional paths are kept as backups and only used if an active route is withdrawn.
Create a firewall rule for BGP traffic
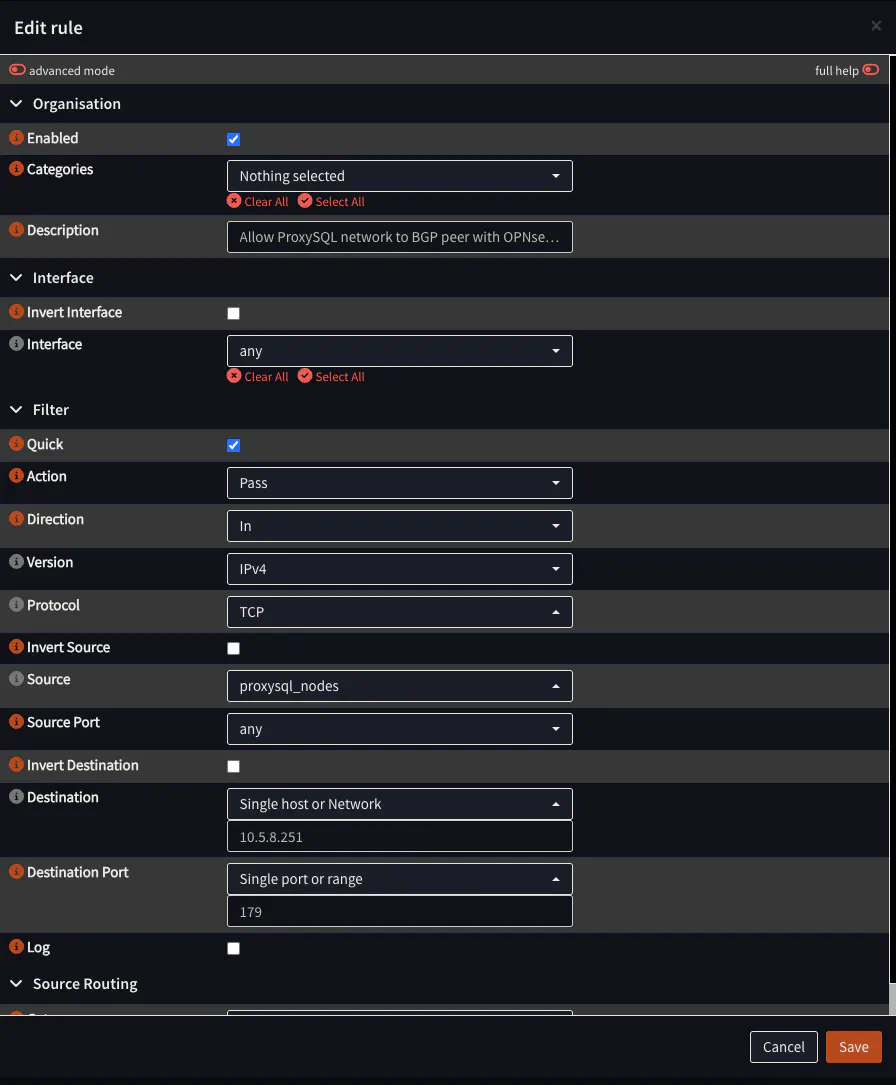
BGP exchanges routing information through a TCP connection on port 179. Our ProxySQL nodes will establish this connection towards OPNsense, so we need a firewall rule to allow this traffic.
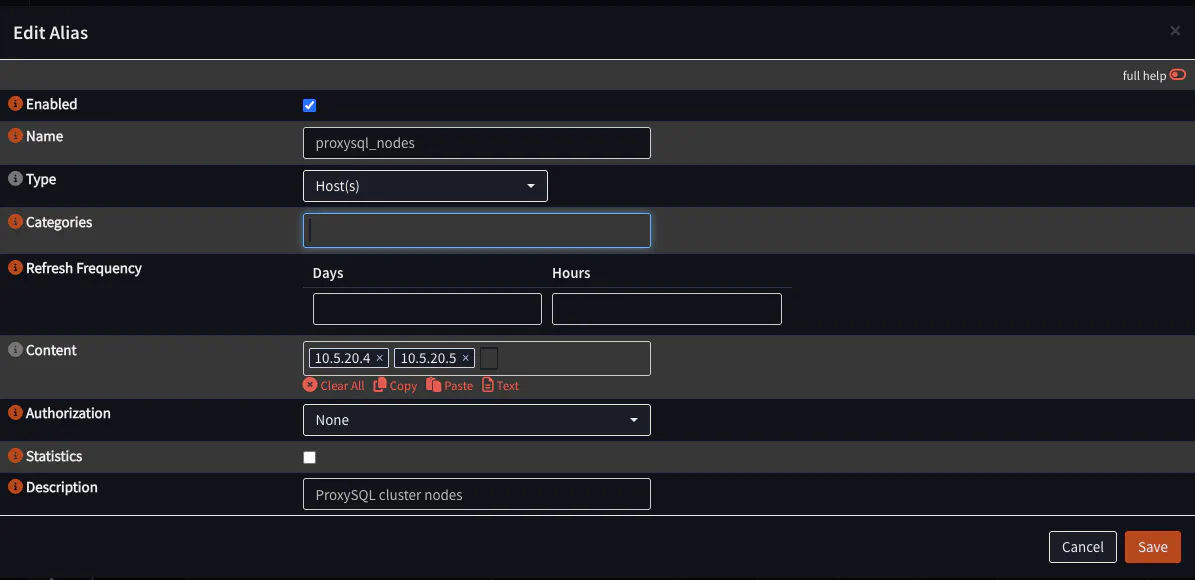
First, we will create an alias for the ProxySQL nodes. This keeps the firewall rule readable, and new nodes only need to be added in one place.
In Firewall -> Aliases, add:
- Name:
proxysql_nodes - Type: Host(s)
- Content:
10.5.20.4,10.5.20.5(The IP addresses of our ProxySQL nodes)
With the Alias in place, we can now continue to define the actual Firewall rule:
Navigate to Firewall -> Rules and create a new rule:
- Description: Allow ProxySQL network to BGP peer with OPNsense
- Interface: Select the interface the ProxySQL nodes are in.
- Action: Pass
- Direction: in
- Version: IPv4
- Protocol: TCP
- Source:
proxysql_nodes(the alias we created in the previous step) - Source port: any
- Destination: the OPNsense address the ProxySQL nodes peer with (
10.5.8.251) - Destination port: BGP (179)
Note, here we do not explicitly enable logging. It may be helpful to enable logging that if you need to debug the BGP peering.
Set up route filtering with a prefix list
We need to set up an inbound filter using a prefix list. The prefix list defines the networks that OPNsense will accept routes for, and should be as narrow as possible to prevent a misbehaving peer from advertising routes that could re-route sensitive traffic through it.
Prefix lists are configured in Routing -> BGP -> Prefix Lists. Create the prefix list:
- Description:
ProxySQL Anycast IP - Name:
ANYCAST-PROXYSQL-IN - IP Version: IPV4
- Sequence Number: for this example we use
10. Sequence numbers are used in order to set the order with which to apply the rules, in case you would have multiple rules for the same prefix list. We only need to create one entry for the ProxySQL Anycast IP. - Action:
Permit, as we want to allow the ProxySQL Anycast IP. - Network:
10.5.200.1/32, the Anycast IP of our ProxySQL nodes.
Tip: Click the ⓘ icon next to a field in the OPNsense UI for more information.
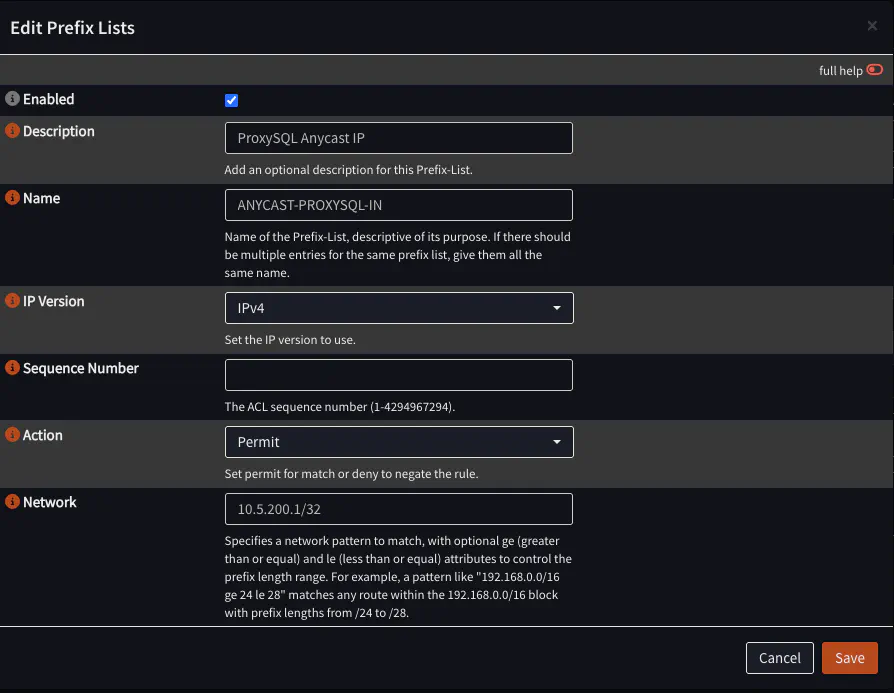
Configure BGP neighbors
In this step we will configure OPNsense to know about our ProxySQL servers and their intent to peer. Neighbor configuration defines which IPs are allowed to speak the BGP protocol with OPNsense. In our case, we need to define a neighbor for both of our ProxySQL hosts:
Choose a unique AS number for the cluster. All ProxySQL nodes belonging to this cluster will share this AS number, whilst separate clusters must use different, dedicated AS numbers.
Ensure that the cluster AS number is distinct from the one configured for OPNsense.
For this example we choose the AS number 64513.
Navigate to Routing -> BGP -> Neighbors and add a new one.
- Description: ProxySQL-01
- Peer-IP: 10.5.20.4
- Remote AS: 64513
- Local AS: 64512
- Prefix-List In: ANYCAST-PROXYSQL-IN:10
Make sure you repeat this for the second ProxySQL.
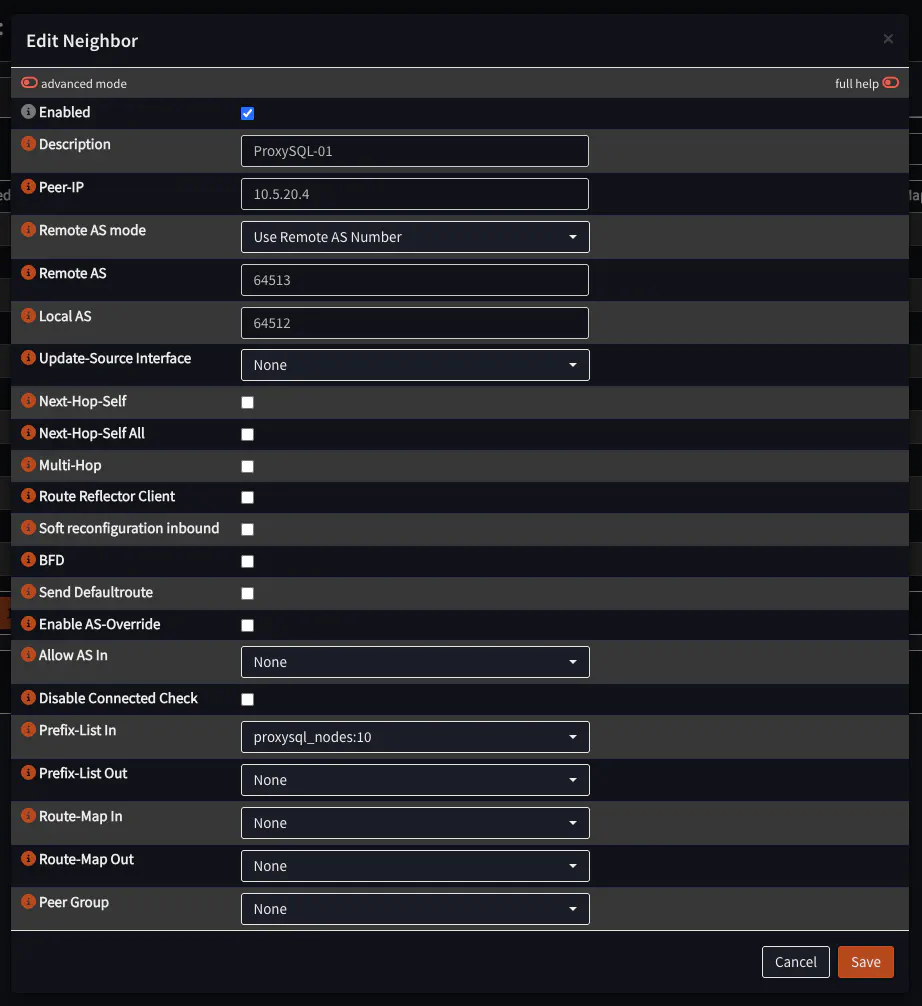
All configurable BGP options can be found in the OPNsense documentation.
Setup on the ProxySQL nodes
Next, assign the anycast virtual IP (10.5.200.1) to the loopback interface of each ProxySQL node, so that the node accepts traffic intended for that IP address.
# Add the Anycast VIP to the loopback interface
sudo ip addr add 10.5.200.1/32 dev lo
Make the address persistent across reboots by adding it to netplan, systemd-networkd or /etc/network/interfaces.
Install ExaBGP
ExaBGP is a tool that can speak the BGP protocol with OPNsense and is able to announce / withdraw routes.
Install ExaBGP on the ProxySQL hosts with:
sudo apt-get update
sudo apt-get install exabgp
For information on installing ExaBGP on other distributions, you can check the ExaBGP wiki here.
Note that BIRD (BIRD Internet Routing Daemon) or FRR can be used as alternative tools to ExaBGP, but in this example we will go with ExaBGP.
Create the health check
As we only want to route traffic to a ProxySQL host when the ProxySQL process is running, we need a way to tell ExaBGP when to announce the route and when to withdraw it. We will write a health check script that ExaBGP can execute to determine the state of our ProxySQL process. If this health check fails, ExaBGP withdraws the node’s route from OPNsense. OPNsense removes that node as an anycast next hop, and routes the traffic to the remaining healthy nodes.
In our example, we will use a simple bash script that uses mysqladmin to send a PING to ProxySQL:
#!/usr/bin/env bash

ANYCAST_IP="10.5.200.1/32"
FAILED=1

while true; do
    # Execute the health check command and depending on the return code
    # announce or withdraw the route.
    mysqladmin --defaults-extra-file=/etc/exabgp/proxysql-monitor.cnf --connect-timeout=2 ping &> /dev/null
    STATUS=$?

    if [ $STATUS -eq 0 ]; then
        if [ $FAILED -ne 0 ]; then
            # Recovered: Announce route
            echo "announce route $ANYCAST_IP next-hop self"
            FAILED=0
        fi
    else
        if [ $FAILED -eq 0 ]; then
            # Health check failed: Withdraw route
            echo "withdraw route $ANYCAST_IP next-hop self"
            FAILED=1
        fi
    fi
    sleep 2
done
Save the health check file as /etc/exabgp/healthcheck-proxysql, and make it executable with chmod +x /etc/exabgp/healthcheck-proxysql.
To avoid passwords in the check script, we tell mysqladmin to load them from a separate file. Create that file (/etc/exabgp/proxysql-monitor.cnf) with the credentials that you want the check to use to connect to ProxySQL:
[client]
user=user
password=password
host=127.0.0.1
port=6033
Ensure that you replace “user” and “password” with your actual user credentials. Restrict the file permissions with:
sudo chown exabgp:exabgp /etc/exabgp/proxysql-monitor.cnf
sudo chmod 600 /etc/exabgp/proxysql-monitor.cnf
In our example, the script only checks if connecting to ProxySQL succeeds, and not whether ProxySQL can reach any backend servers.
The checks you come up with should ideally only test the readiness of the ProxySQL process, regardless of the health of the MySQL nodes behind it. Otherwise you might get unwanted side effects. For example:
you could write a check to verify whether there are hosts with status ONLINE in the runtime_mysql_servers table. At first it might sound like a good idea, as a misconfigured ProxySQL server would be taken offline.
BUT: In case your MySQL cluster is experiencing a downtime, ALL ProxySQLs will withdraw their routes, causing clients to see timeouts instead of potentially helpful error messages. Define your health checks carefully based on your specific architecture.
Configuring ExaBGP
ExaBGP configuration lives in the /etc/exabgp/exabgp.conf file. You can find full details on what can be configured there in the ExaBGP documentation.
For the purpose of this blog post, we will define three blocks.
- The
processblock defines the path to the health check script. - The
templateblock defines the BGP settings and which health check process to run. - Each
neighborblock defines the router we want ExaBGP to peer with.
# -------------------------------------------------------------------
# Process Definitions
# -------------------------------------------------------------------
process proxysql-healthcheck {
    run "/etc/exabgp/healthcheck-proxysql";
    encoder text;
}

# -------------------------------------------------------------------
# Neighbor Templates
# -------------------------------------------------------------------
template {
    neighbor opnsense-nodes {
        router-id 10.5.20.4;
        local-as 64513;
        peer-as 64512;

        api {
            processes [ proxysql-healthcheck ];
        }
    }
}

# -------------------------------------------------------------------
# OPNsense nodes
# -------------------------------------------------------------------
neighbor 10.5.8.251 {
    inherit opnsense-nodes;
    local-address 10.5.20.4;
}
Create the file on proxysql-01 and proxysql-02, but make sure to update the neighbor and template block. The router-id and local-address should be set to 10.5.20.5 on proxysql-02.
Once you have created this file, restart ExaBGP.
systemctl restart exabgpYou can check the status of ExaBGP by running exabgpcli show neighbor summary on the ProxySQL hosts.
An overview of the workflow for a healthy ProxySQL node
- ExaBGP starts the health check script that we configured in exabgp.conf
- The script sees that ProxySQL is running, and outputs
announce route 10.5.200.1/32 next-hop self. - ExaBGP receives this output and sends a BGP UPDATE message to OPNsense.
- OPNsense adds the ProxySQL node as potential “next hop” to its routing table for 10.5.200.1.
If the health checks detects that ProxySQL is not running, it will output withdraw route 10.5.200.1/32 next-hop self, which tells ExaBGP to send a BGP update for OPNsense to remove that route from its routing table.
The traffic is redistributed to the remaining healthy ProxySQL node.
Check BGP ECMP is configured correctly
Check the firewall
Ensure that the firewall is not blocking traffic by navigating to Firewall -> Log Files -> Live View. Make sure you have enabled logging in the firewall rule you created. Filter for “address” “is” “10.5.200.1” and check that the connections are not blocked.
Check ExaBGP on the ProxySQL
Run the health check on the ProxySQL to confirm that the ProxySQL reports that it is healthy, and announces the route.
sudo -u exabgp /etc/exabgp/healthcheck-proxysqlYou should see output like:
announce route 10.5.200.1/32 next-hop selfCheck that ExaBGP announces the route with:
exabgpcli show adj-rib outYou should see output like:
neighbor 10.5.8.251 ipv4 unicast 10.5.200.1/32 next-hop selfCheck that ExaBGP has an established BGP session to OPNsense with:
exabgpcli show neighbor summaryYou want to see that the state is established. State active means “ready to connect”, but no connection is actually made.
Peer            AS        up/down state       |     #sent     #recvd
10.5.8.251      64512     0:00:57 established           2          6
Verify the BGP connections and routes on OPNsense.
Navigate to Routing -> Diagnostics -> BGP to check the routing status.
The Anycast IP should appear twice, one entry for each ProxySQL. Both entries should be marked valid.
The path should show the AS number 64513.
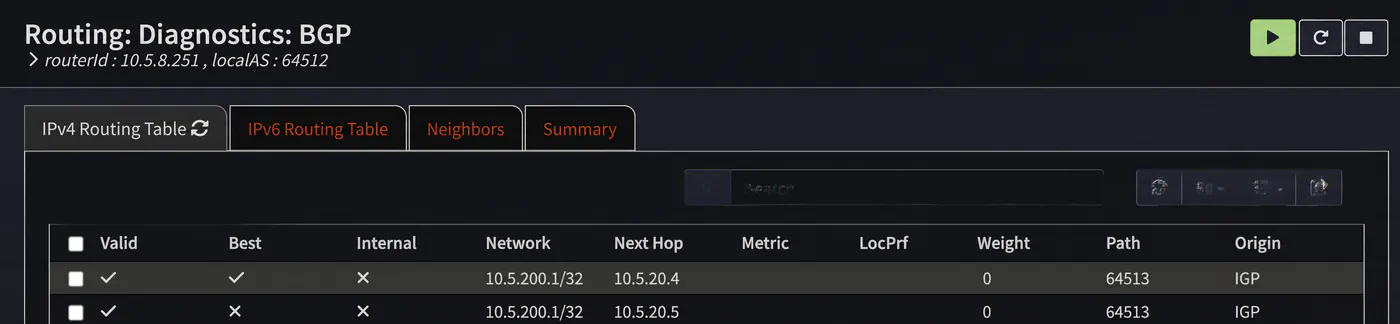
BGP always selects a single best path. With Maximum Paths set, the other equal-cost paths are also installed in the routing table and are flagged as multipath.
You can also run vtysh on the OPNsense CLI to check this:
vtysh -c "show ip route 10.5.200.1/32"You should see an entry like:
Routing entry for 10.5.200.1/32
  Known via "bgp", distance 20, metric 0, best
  Last update 00:05:12 ago
  Flags: Selected
  Status: Installed
  * 10.5.20.4, via vtnet1, weight 1
  * 10.5.20.5, via vtnet1, weight 1
The * next to each result shows that this is an active next-hop path.
Because the two results share the same weight (1), ECMP is active, and OPNsense will load balance the tcp connections equally across the two routes.
Summary
In this blog post we stepped through an example setup of BGP ECMP Anycast for ProxySQL. We configured OPNsense to accept anycast routes from our ProxySQL nodes and load-balance across them. On each node, ExaBGP announces the route whilst ProxySQL is healthy and withdraws the route when ProxySQL fails. To scale the cluster, add the new node to the proxysql_nodes alias, create a BGP neighbor for it, and raise Maximum Paths to match the new node count.
This post is part of the Percona Community Writers Program. ∎



Discussion
We invite you to our forum for discussion. You are welcome to use the widget below.