
Let’s install and try out a new package for PostgreSQL — PG_TDE by Percona. This extension adds Transparent Data Encryption (TDE), a mechanism that allows data to be encrypted at the storage level without affecting application behavior.
TDE protects data in case of disk, dump, or backup compromise: everything stored at the file system level is encrypted. Meanwhile, the application continues to work with the data as usual — encryption and decryption happen transparently, without changes to SQL queries or logic.
In this post, we’ll deploy PostgreSQL with PG_TDE in Docker, configure keys, create an encrypted table, and verify that the data is truly protected — even if someone gains direct access to the files. Other installation methods are available in the documentation.
For simplicity and speed of testing, we’ll use a key provider with a keyring file (for dev/test only) — the easiest way to get started with PG_TDE. This approach is convenient for local development and demos, as it doesn’t require additional dependencies or infrastructure.
Installing PostgreSQL with PG_TDE via Docker
PG_TDE is part of the Percona Distribution for PostgreSQL — an enhanced PostgreSQL distribution that includes tools for monitoring, auditing, replication, and of course, Transparent Data Encryption. We’ll use the official Docker image, which already contains everything needed to run PG_TDE.
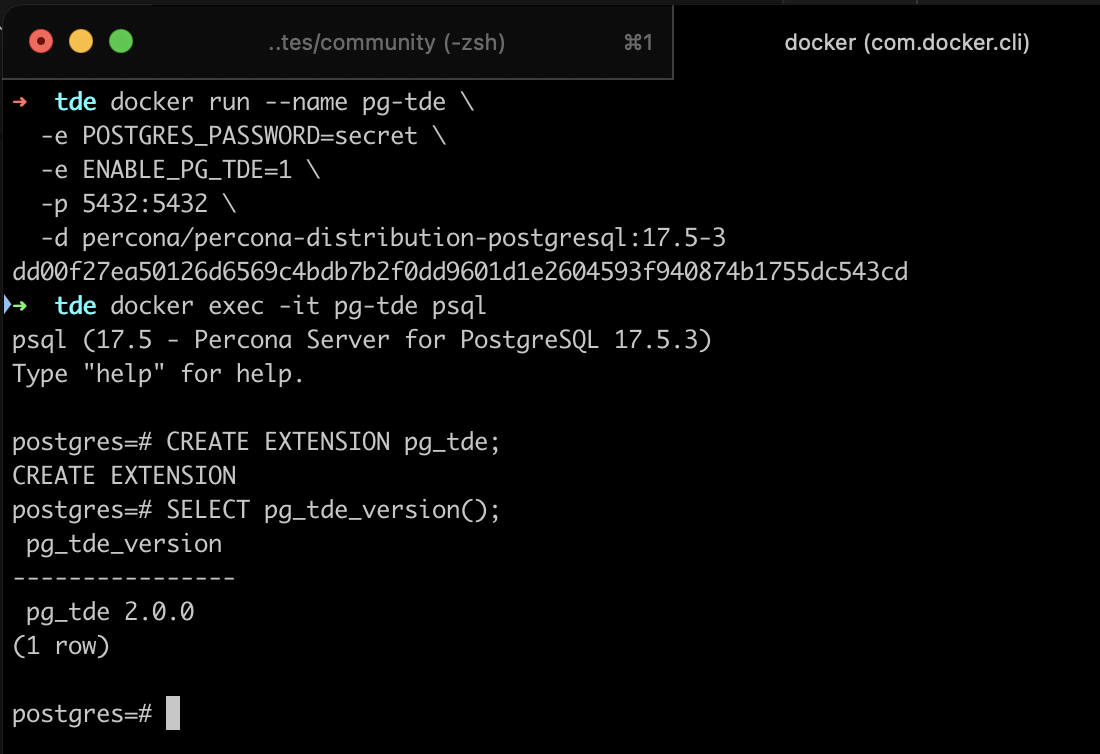
Let’s start by launching the container:
docker run --name pg-tde \
  -e POSTGRES_PASSWORD=secret \
  -e ENABLE_PG_TDE=1 \
  -p 5432:5432 \
  -d percona/percona-distribution-postgresql:17.5-3
Here:
POSTGRES_PASSWORD=secret— sets the superuser passwordENABLE_PG_TDE=1— enables Transparent Data Encryption supportPort 5432 — standard for PostgreSQL
After launching, connect to PostgreSQL inside the container:
docker exec -it pg-tde psqlAnd activate the PG_TDE extension:
CREATE EXTENSION pg_tde;Verify that PG_TDE is enabled and check its version using the SQL function:
SELECT pg_tde_version();Here’s the result at the time of writing — I’m using PG_TDE 2.0
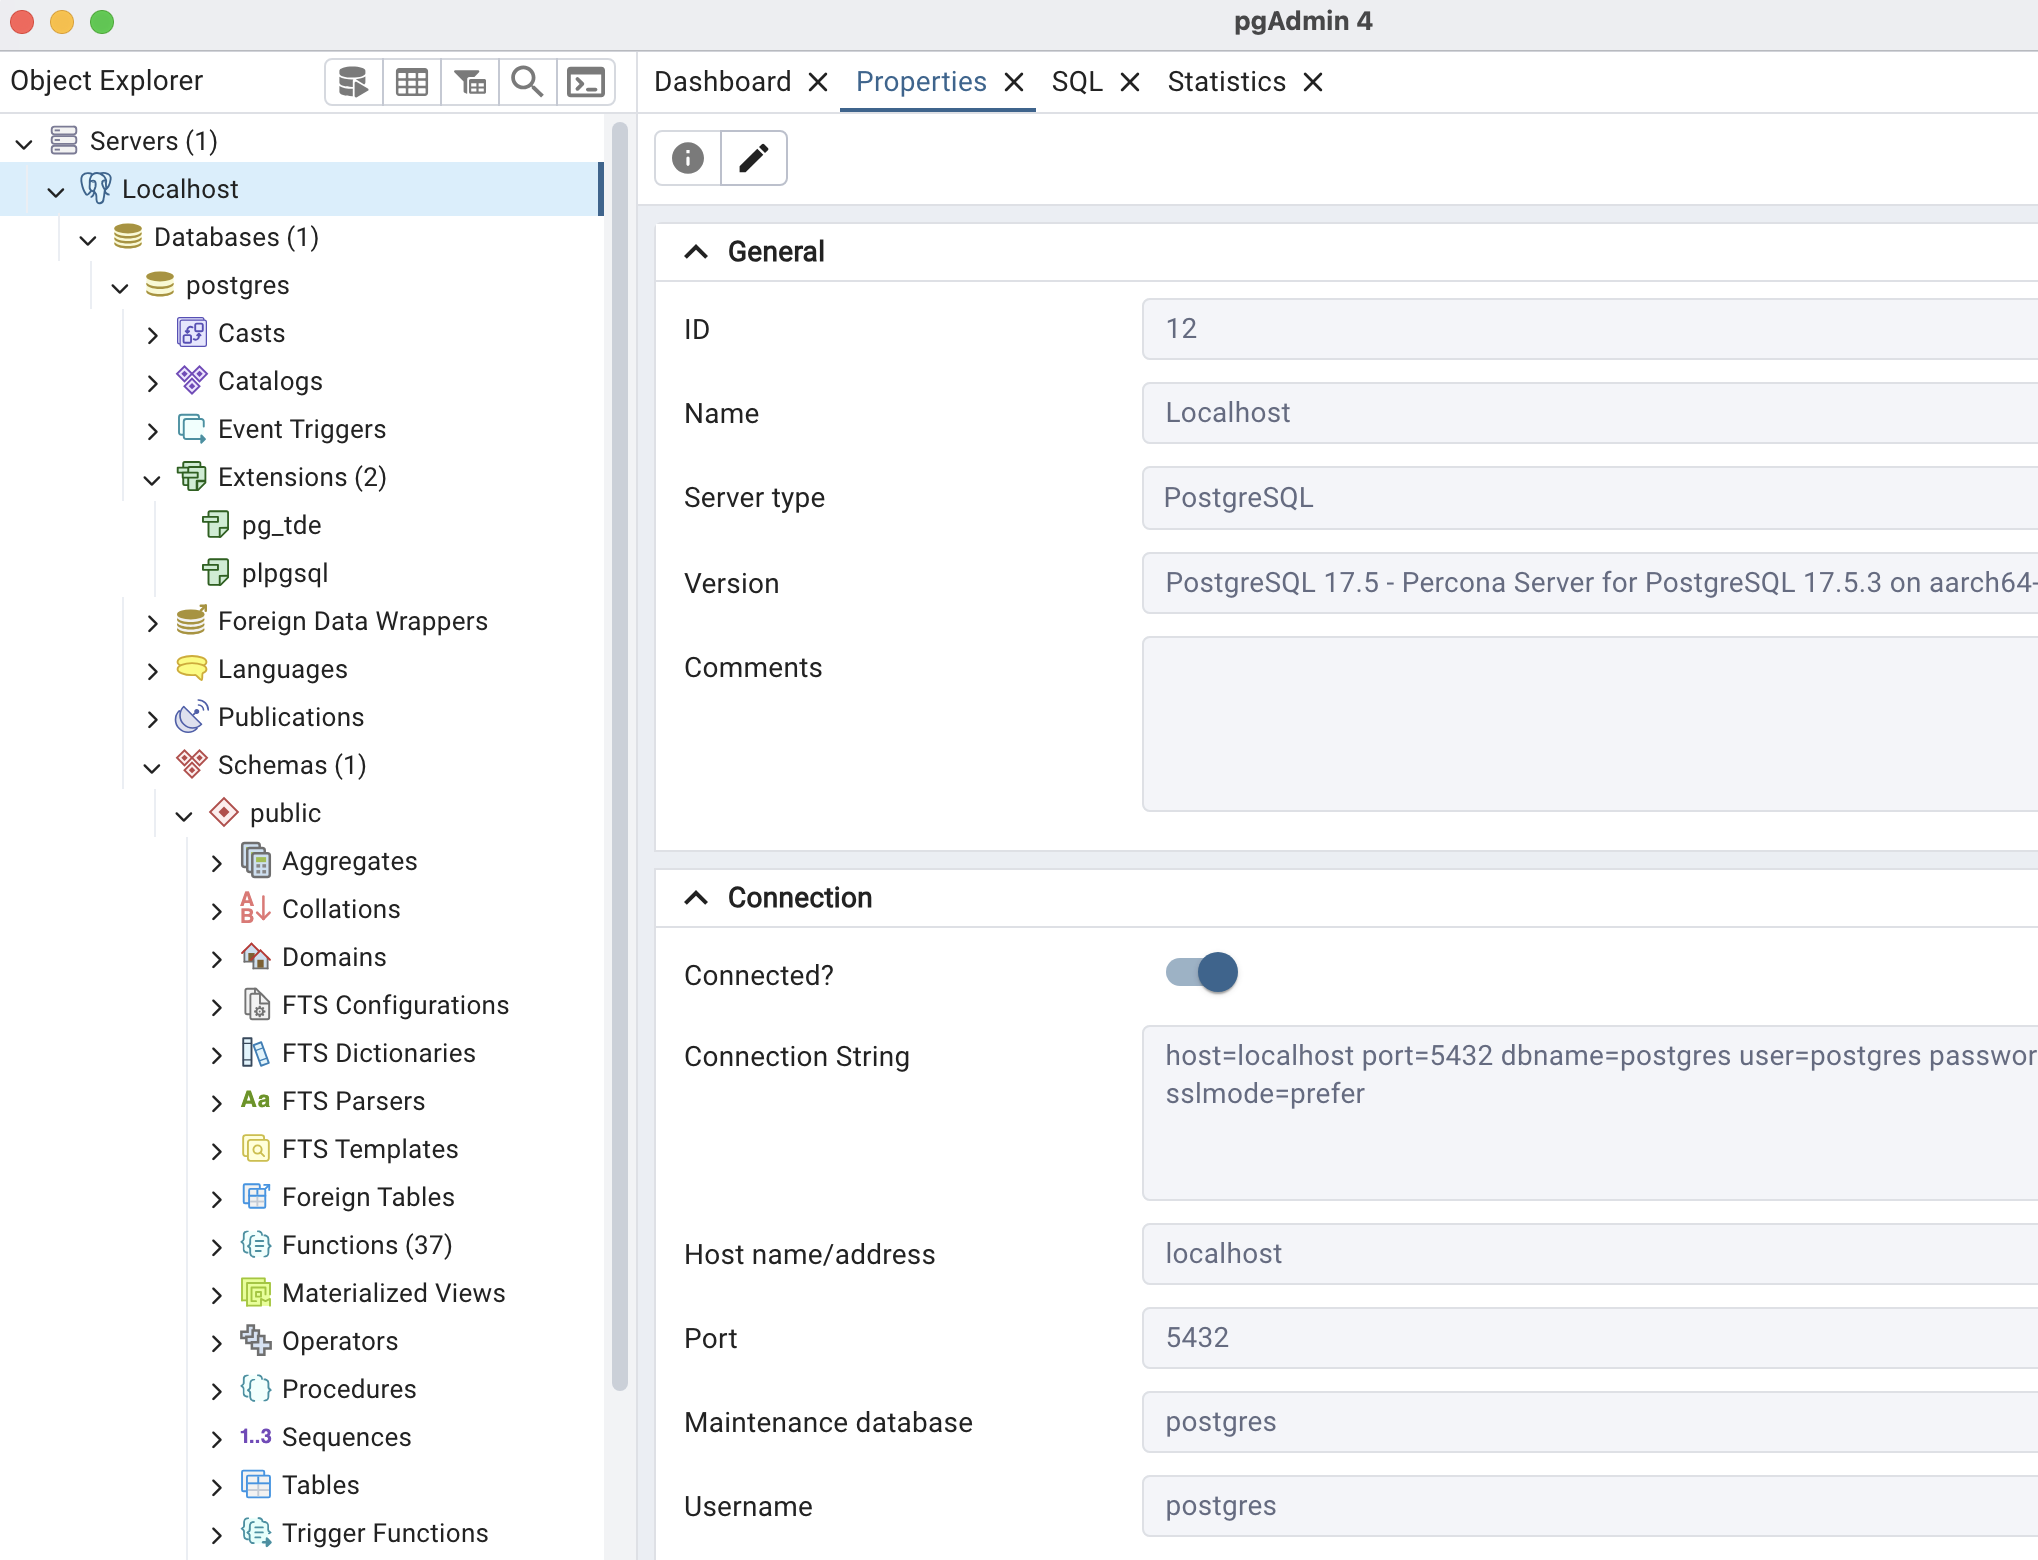
I also connected to PostgreSQL using pgAdmin, accessing via localhost, user postgres, and the password from POSTGRES_PASSWORD.
pgAdmin is very convenient for exploring the database via UI.
Now TDE is ready — we can create encrypted tables, manage keys, and verify how data is protected at the storage level.
Configuring Encryption Keys with PG_TDE
After installing and activating the pg_tde extension, the next step is to configure the keys that will be used for data encryption. In this example, we’re using a key provider based on a keyring file — a simple and fast way to start working with PG_TDE in development mode.
Important: The keyring file stores keys in unencrypted form and is intended for testing and development only. For production, it’s recommended to use an external key store such as HashiCorp Vault — we’ll cover that in the next post.
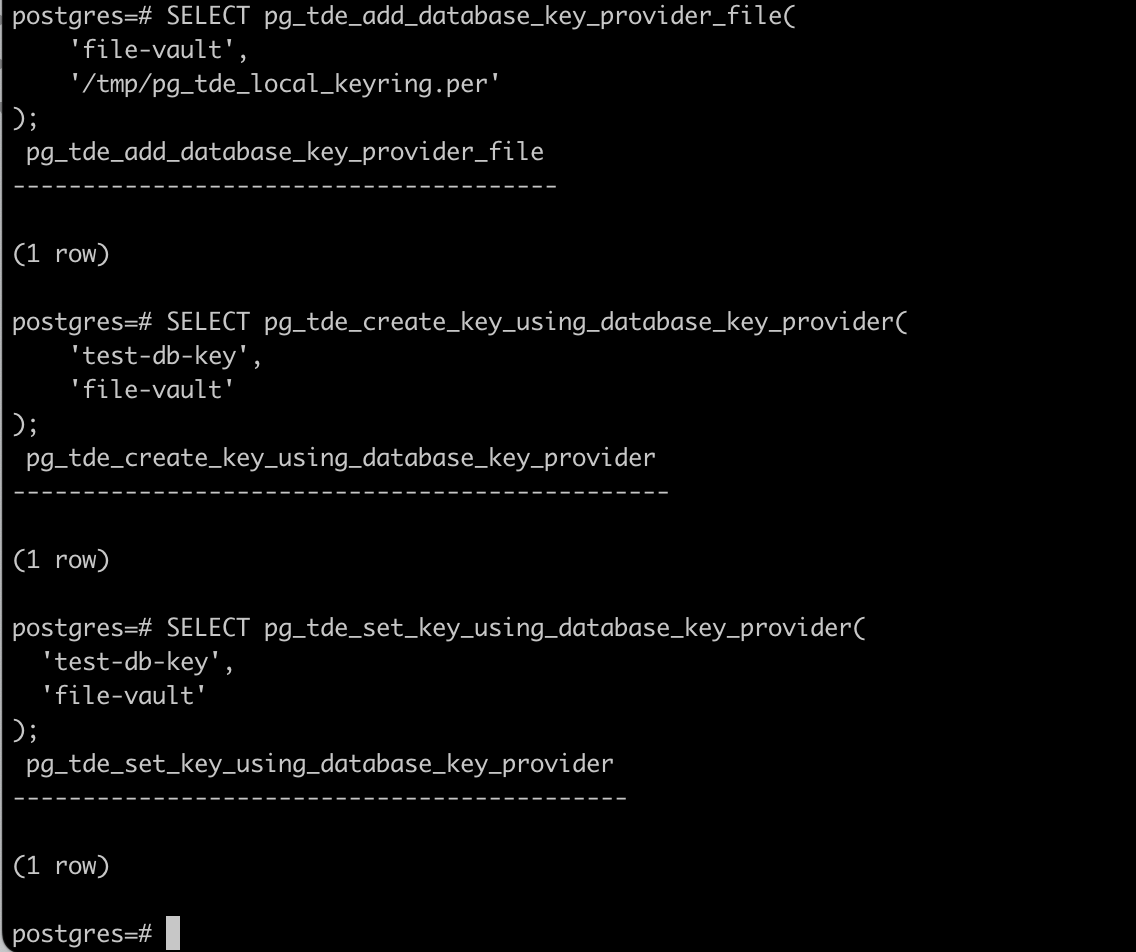
Add the key provider:
SELECT pg_tde_add_database_key_provider_file(
    'file-vault',
    '/tmp/pg_tde_local_keyring.per'
);
This command:
Registers a key provider named ‘file-vault’
Specifies that keys will be stored in the file located at
/tmp/pg_tde_local_keyring.perThe file path can be anything — you can use a different location or filename, as long as PostgreSQL has access to it. If the file doesn’t exist, it will be created when the first key is generated
It’s important not to lose this file — it contains the encryption keys. If needed, it can be placed in a local folder and mounted into the container via Docker, but for this task, using a path inside the container is perfectly fine.
Create the key:
SELECT pg_tde_create_key_using_database_key_provider(
    'test-db-key',
    'file-vault'
);
We’re creating a key named test-db-key inside the specified key provider. This key will be used to encrypt tables.
Set the active key:
SELECT pg_tde_set_key_using_database_key_provider(
  'test-db-key',
  'file-vault'
);
This command sets test-db-key as the current active key, which will be used when creating new encrypted tables.
Let’s verify.
Retrieve key information using the command:
SELECT pg_tde_key_info();Result:
postgres=# SELECT pg_tde_key_info();
                      pg_tde_key_info
------------------------------------------------------------
 (test-db-key,file-vault,1,"2025-09-04 07:16:04.420629+00")
(1 row)
Check the contents of the keyring file — just for experimentation.
In a separate terminal tab, connect to the container:
docker exec -it pg-tde bashUse hexdump to read the file since it contains binary data:
hexdump -C /tmp/pg_tde_local_keyring.per | headThis will output the first bytes of the file in hex format, allowing you to confirm that the file is not empty and the key is indeed recorded.
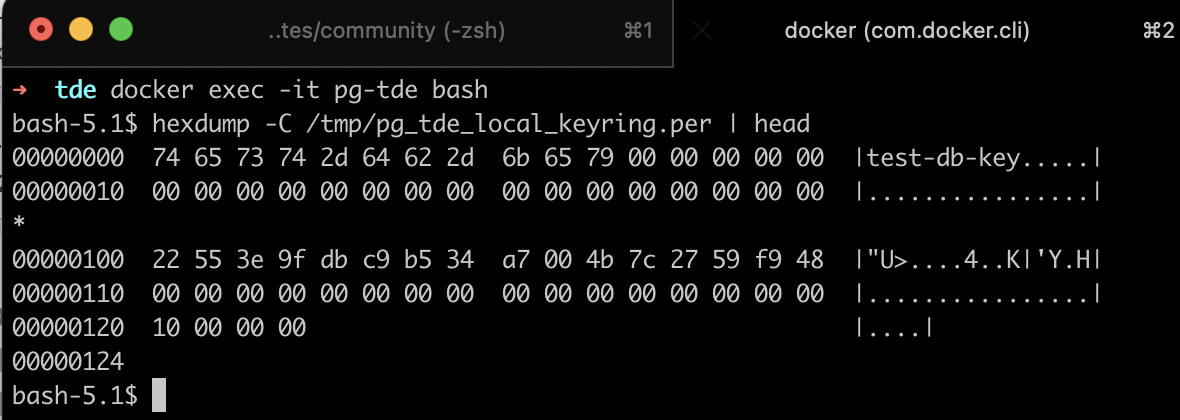
If the file is empty or unchanged — the key may not have been created or written.
Creating Tables with Data
Now that the encryption key is set, let’s create two tables: one with encryption enabled, and one regular. This will help visually demonstrate how PG_TDE works and how data storage differs.
Create the encrypted table by specifying USING tde_heap:
CREATE TABLE secure_data (
  id SERIAL PRIMARY KEY,
  secret TEXT,
  created_at DATE
) USING tde_heap;
Add a few rows:
INSERT INTO secure_data (secret, created_at) VALUES
  ('The launch code is hidden in plain sight.', '2025-09-01'),
  ('Trust no one. The truth is encrypted.', '2025-09-02'),
  ('The treasure lies beneath the third stone by the old oak.', '2025-09-03');
Create a similar table without encryption:
CREATE TABLE plain_data (
  id SERIAL PRIMARY KEY,
  secret TEXT,
  created_at DATE
);
Insert the same data:
INSERT INTO plain_data (secret, created_at) VALUES
  ('The launch code is hidden in plain sight.', '2025-09-01'),
  ('Trust no one. The truth is encrypted.', '2025-09-02'),
  ('The treasure lies beneath the third stone by the old oak.', '2025-09-03');
Now both tables contain identical rows, but one stores the data in encrypted form.
Let’s check the encryption status using PG_TDE.
Use the built-in function pg_tde_is_encrypted, which returns true (t) if the table uses encryption, and false (f) if not:
postgres=# SELECT pg_tde_is_encrypted('secure_data');
 pg_tde_is_encrypted
---------------------
 t
(1 row)

postgres=# SELECT pg_tde_is_encrypted('plain_data');
 pg_tde_is_encrypted
---------------------
 f
(1 row)
Excellent, now we can move on to comparison: let’s see how the data looks inside PostgreSQL — and how it’s stored on disk. This will help confirm that PG_TDE truly protects content, even if someone gains direct access to the files.
Comparing Tables: Encrypted vs Unencrypted
At the SQL query level, both tables — secure_data (encrypted) and plain_data (unencrypted) — look absolutely identical. This is important: PG_TDE does not affect SQL interface behavior, and the application continues to work with the data as usual.
postgres=# SELECT * FROM secure_data;
 id |                          secret                           | created_at
----+-----------------------------------------------------------+------------
  1 | The launch code is hidden in plain sight.                 | 2025-09-01
  2 | Trust no one. The truth is encrypted.                     | 2025-09-02
  3 | The treasure lies beneath the third stone by the old oak. | 2025-09-03
(3 rows)

postgres=# SELECT * FROM plain_data;
 id |                          secret                           | created_at
----+-----------------------------------------------------------+------------
  1 | The launch code is hidden in plain sight.                 | 2025-09-01
  2 | Trust no one. The truth is encrypted.                     | 2025-09-02
  3 | The treasure lies beneath the third stone by the old oak. | 2025-09-03
(3 rows)
Display in the application using pgAdmin
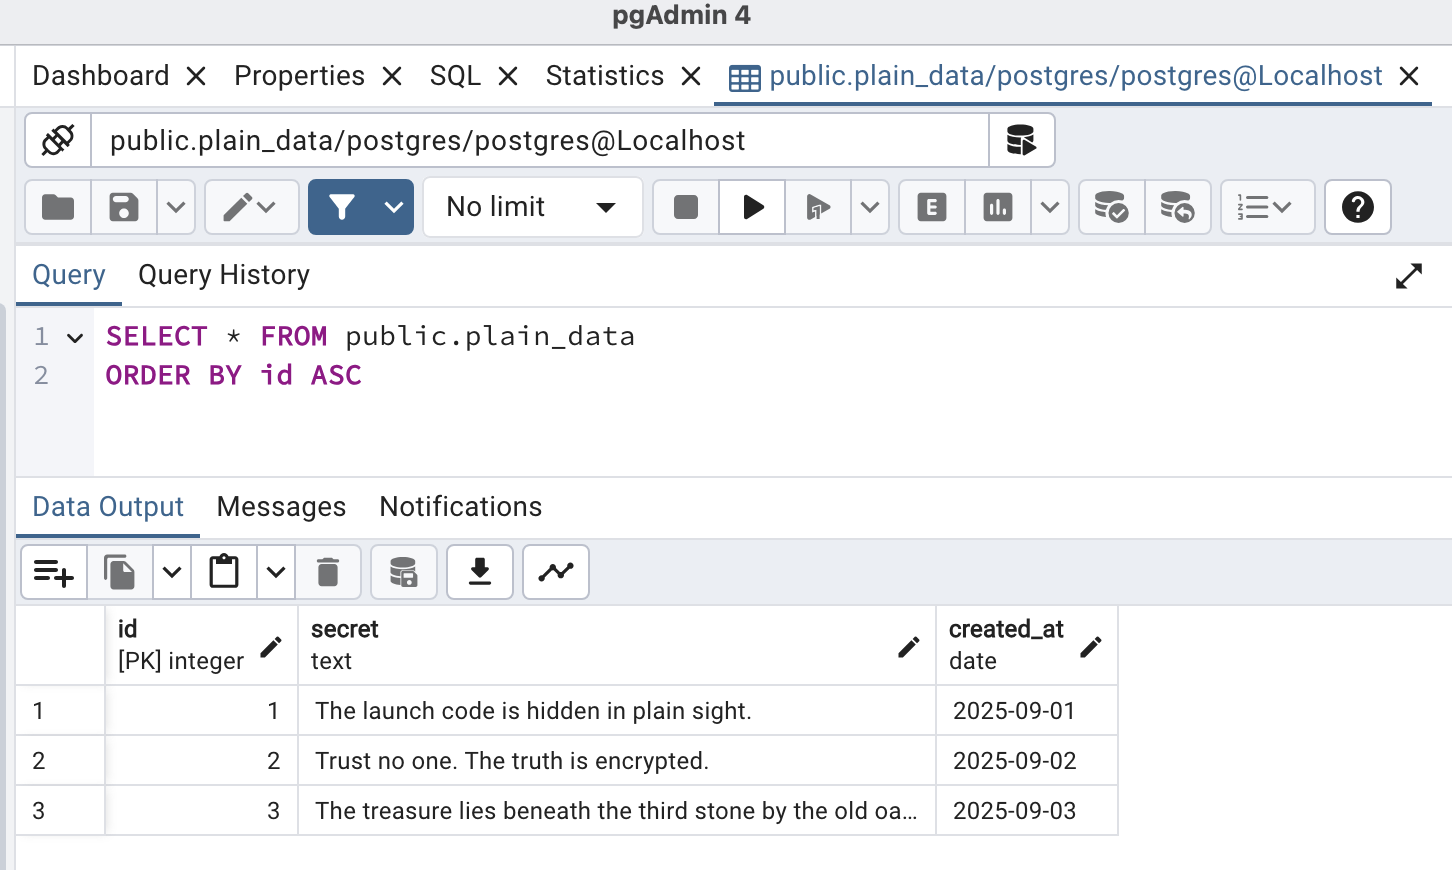
Data from the plain_data table:
Data from the encrypted table secure_data:
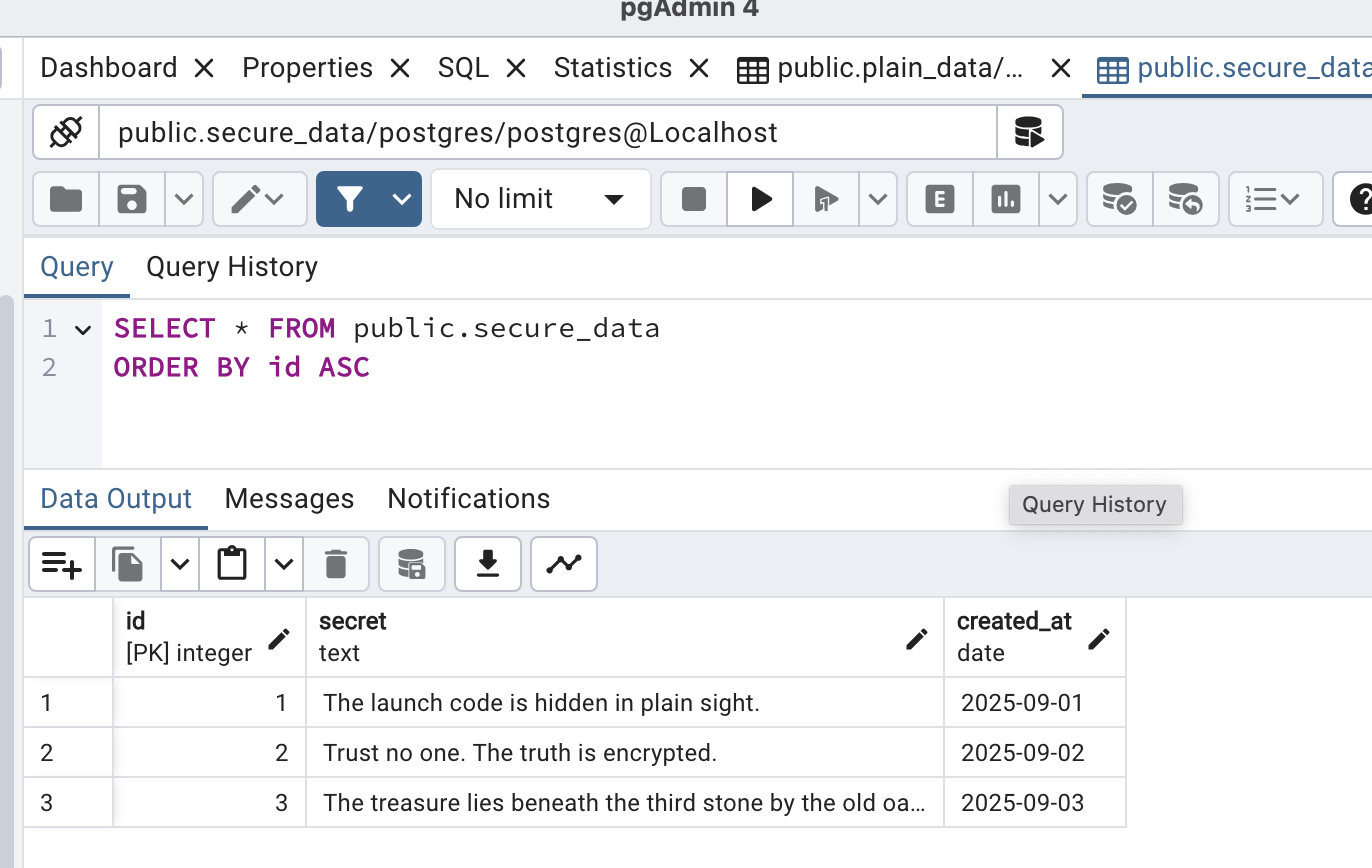
The pgAdmin screenshots also show no differences: data is displayed in readable form, regardless of whether the table is encrypted. This confirms that PG_TDE operates at the storage level, without affecting data handling logic.
As you can see, the result is identical: encryption is transparent to the user and application.
Comparing Table File Contents
Now let’s verify that PG_TDE truly encrypts data at the storage level. To do this, we’ll locate the physical table files and compare their contents using hexdump.
In PostgreSQL, each table is physically stored as one or more files in the base directory, inside the folder corresponding to the database. The file path looks like $PGDATA/base/<database_oid>/<relfilenode>
database_oid— unique database identifier (OID), retrieved from pg_databaserelfilenode— table file identifier, retrieved from pg_class
Step 1: Retrieve Identifiers
Get the OID of the current database:
postgres=# SELECT oid, datname FROM pg_database WHERE datname = current_database();
 oid | datname
-----+----------
   5 | postgres
(1 row)
Get the relfilenode of the tables:
postgres=# SELECT relname, relfilenode FROM pg_class WHERE relname IN ('secure_data', 'plain_data');
   relname   | relfilenode
-------------+-------------
 secure_data |       16433
 plain_data  |       16442
(2 rows)
Now, knowing oid = 5 and the relfilenode of the tables, we can locate the table files at:
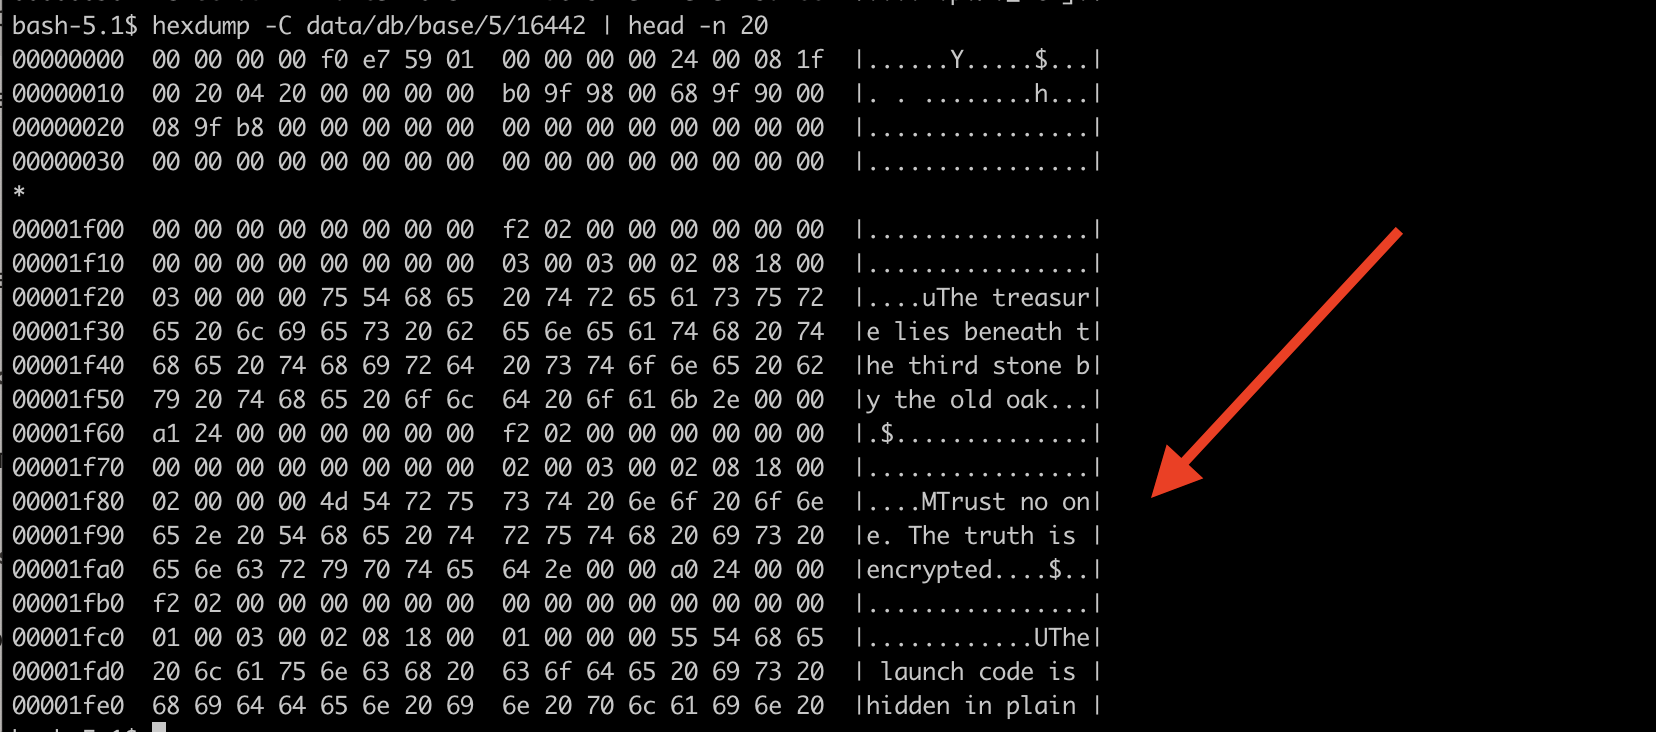
data/db/base/5/16433— encrypted table secure_datadata/db/base/5/16442— unencrypted table plain_data
Step 2: Read Table Files
Open a terminal and connect to the PostgreSQL container for bash commands:
docker exec -it pg-tde bashRead data from the unencrypted table (plain_data):
hexdump -C data/db/base/5/16442 | head -n 20The output shows that the data is readable directly from the file:
Read data from the encrypted table (secure_data):
hexdump -C data/db/base/5/16433 | head -n 20The output shows that the contents are fully encrypted:
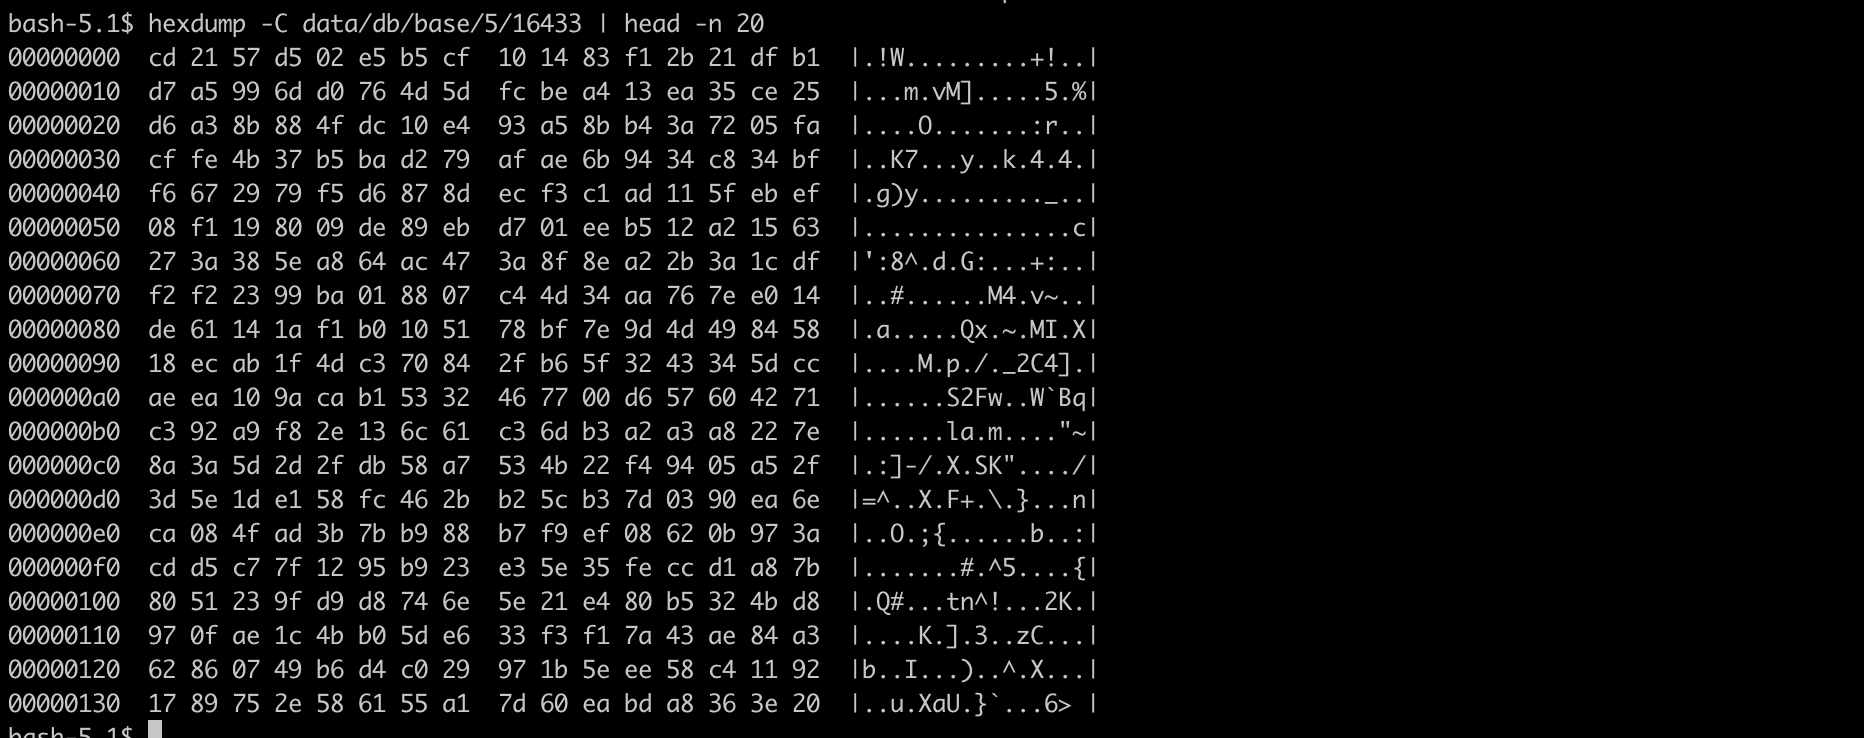
No readable strings — PG_TDE reliably encrypts data at the file system level.
Conclusion
In this post, we installed PostgreSQL with Transparent Data Encryption (PG_TDE) by Percona, created keys, encrypted a table, and verified that the data is truly protected during physical storage. PG_TDE by Percona provides transparent encryption: the application continues to work with the data as usual, while security is enforced at the file system level.
If you’re working with PostgreSQL and looking to strengthen your data protection, PG_TDE offers a great starting point. I invite you to experiment:
Create encrypted tables and perform a backup. Try restoring it on a different installation and see how key access is enforced.
Explore key rotation, switching the active key, or integrating alternative key providers.
Test how PG_TDE behaves in real-world scenarios: migration, failover, CI/CD pipelines
If you’ve already tried PG_TDE or plan to — share your experience and insights by posting in this blog or on the forum
In the next post, we’ll explore a more robust option — integrating PG_TDE with HashiCorp Vault, which enables centralized key management, rotation, and access control. ∎


Discussion
We invite you to our forum for discussion. You are welcome to use the widget below.