%22%3E%3Cpath%20d=%22M352.016%20109.322h-18.62v33.317H308.887V31.542h45.54c26.587.0%2042.669%2015.7006%2042.669%2038.4065V70.2514c0%2025.715-20.051%2039.0416-45.051%2039.0416L352.016%20109.322v0zm20.207-38.885C372.223%2059.4847%20364.589%2053.6128%20352.32%2053.6128H333.367V87.5641H352.78c12.27.0%2019.414-7.3081%2019.414-16.8242V70.437H372.223z%22%20fill=%22%23fff%22/%3E%3Cpath%20d=%22M410.776%20142.648V31.542H494.84V53.3001H435.139V75.8497h52.527V97.6078H435.139V120.949h60.494v21.758H410.776V142.648v0z%22%20fill=%22%23fff%22/%3E%3Cpath%20d=%22M582.46%20142.648%20558.588%20107.104H539.331v35.544H514.822V31.542h50.939c26.284.0%2042.032%2013.815%2042.032%2036.6674V68.5123c0%2017.9282-9.702%2029.2128-23.872%2034.4497L611.145%20142.639H582.451L582.46%20142.648zM582.95%2069.4893C582.95%2059.0255%20575.62%2053.603%20563.694%2053.603H539.341V85.5026h24.843C576.12%2085.5026%20582.95%2079.1422%20582.95%2069.8019V69.4991%2069.4893z%22%20fill=%22%23fff%22/%3E%3Cpath%20d=%22M678.058%20145.618c-33.221.0-57.907-25.568-57.907-57.9171V87.3882C620.151%2055.3812%20644.337%2029.1678%20679.048%2029.1678c21.285.0%2034.055%207.0639%2044.54%2017.3616L707.781%2064.6922C699.059%2056.7979%20690.21%2051.9909%20678.891%2051.9909c-19.021.0-32.761%2015.7593-32.761%2035.0652V87.3687c0%2019.3063%2013.397%2035.3683%2032.761%2035.3683C691.788%20122.737%20699.706%20117.588%20708.585%20109.537l15.807%2015.916C712.76%20137.851%20699.863%20145.56%20678.088%20145.56L678.058%20145.618z%22%20fill=%22%23fff%22/%3E%3Cpath%20d=%22M789.963%20145.618c-34.858.0-59.858-25.9-59.858-57.9171V87.3882c0-32.007%2025.333-58.2204%2060.162-58.2204%2034.829.0%2059.858%2025.9007%2059.858%2057.9176V87.398c0%2032.007-25.333%2058.22-60.162%2058.22zm34.212-58.22C824.175%2068.0922%20809.975%2052.03%20789.963%2052.03%20769.952%2052.03%20756.095%2067.7893%20756.095%2087.0951V87.4078C756.095%20106.714%20770.295%20122.776%20790.306%20122.776%20810.318%20122.776%20824.175%20107.017%20824.175%2087.7107V87.398v0z%22%20fill=%22%23fff%22/%3E%3Cpath%20d=%22M985.089%20142.736%201039.93%2029.1678%201094.77%20142.746h-27.5L1039.93%2086.2256l-27.24%2056.5204H985.089V142.736z%22%20fill=%22%23fff%22/%3E%3Cpath%20d=%22M974.936%2031.5811V145.628L891.304%2078.0968V142.551H865.285V29.1678L948.917%2096.4354V31.5811h26.019z%22%20fill=%22%23fff%22/%3E%3C/g%3E%3Cpath%20d=%22M219.315%20146.829c28.718-18.788%2038.114-57.1102%2020.735-87.2301-8.708-15.108-22.784-25.9277-39.624-30.4456-15.602-4.1923-31.898-2.478-46.241%204.7743L134.603.0%2093.9541%2070.4613.0%20233.311H269.206l-49.891-86.482zM195.821%2046.4134c12.241%203.263%2022.427%2011.1294%2028.771%2022.0826%2012.47%2021.5912%205.993%2048.977-14.23%2062.808L163.128%2049.4361c10.176-4.8971%2021.653-5.9652%2032.693-3.0227zM134.603%2035.7593%20238.247%20215.426H177.605L104.268%2088.3409l30.329-52.5762L134.603%2035.7593zM30.9588%20215.426l62.99-109.168L156.939%20215.426H30.9588z%22%20fill=%22url(%23paint0_linear_1391_11470)%22/%3E%3Cpath%20d=%22M306.655%20202.335C306.655%20196.555%20307.958%20191.37%20310.565%20186.78%20313.172%20182.133%20316.713%20178.507%20321.19%20175.9%20325.723%20173.293%20330.738%20171.99%20336.235%20171.99%20342.695%20171.99%20348.333%20173.548%20353.15%20176.665%20357.967%20179.782%20361.48%20184.202%20363.69%20189.925H354.425C352.782%20186.355%20350.402%20183.607%20347.285%20181.68%20344.225%20179.753%20340.542%20178.79%20336.235%20178.79%20332.098%20178.79%20328.387%20179.753%20325.1%20181.68%20321.813%20183.607%20319.235%20186.355%20317.365%20189.925%20315.495%20193.438%20314.56%20197.575%20314.56%20202.335%20314.56%20207.038%20315.495%20211.175%20317.365%20214.745%20319.235%20218.258%20321.813%20220.978%20325.1%20222.905%20328.387%20224.832%20332.098%20225.795%20336.235%20225.795%20340.542%20225.795%20344.225%20224.86%20347.285%20222.99%20350.402%20221.063%20352.782%20218.315%20354.425%20214.745H363.69C361.48%20220.412%20357.967%20224.803%20353.15%20227.92%20348.333%20230.98%20342.695%20232.51%20336.235%20232.51%20330.738%20232.51%20325.723%20231.235%20321.19%20228.685%20316.713%20226.078%20313.172%20222.48%20310.565%20217.89%20307.958%20213.3%20306.655%20208.115%20306.655%20202.335zm130.259%2030.26C431.418%20232.595%20426.403%20231.32%20421.869%20228.77%20417.336%20226.163%20413.738%20222.565%20411.074%20217.975%20408.468%20213.328%20407.164%20208.115%20407.164%20202.335S408.468%20191.37%20411.074%20186.78C413.738%20182.133%20417.336%20178.535%20421.869%20175.985%20426.403%20173.378%20431.418%20172.075%20436.914%20172.075%20442.468%20172.075%20447.511%20173.378%20452.044%20175.985%20456.578%20178.535%20460.148%20182.105%20462.754%20186.695%20465.361%20191.285%20466.664%20196.498%20466.664%20202.335%20466.664%20208.172%20465.361%20213.385%20462.754%20217.975%20460.148%20222.565%20456.578%20226.163%20452.044%20228.77%20447.511%20231.32%20442.468%20232.595%20436.914%20232.595zm0-6.715C441.051%20225.88%20444.763%20224.917%20448.049%20222.99%20451.393%20221.063%20453.999%20218.315%20455.869%20214.745%20457.796%20211.175%20458.759%20207.038%20458.759%20202.335%20458.759%20197.575%20457.796%20193.438%20455.869%20189.925%20453.999%20186.355%20451.421%20183.607%20448.134%20181.68%20444.848%20179.753%20441.108%20178.79%20436.914%20178.79%20432.721%20178.79%20428.981%20179.753%20425.694%20181.68%20422.408%20183.607%20419.801%20186.355%20417.874%20189.925%20416.004%20193.438%20415.069%20197.575%20415.069%20202.335%20415.069%20207.038%20416.004%20211.175%20417.874%20214.745%20419.801%20218.315%20422.408%20221.063%20425.694%20222.99%20429.038%20224.917%20432.778%20225.88%20436.914%20225.88zm134.906-52.7V232H564.085V188.14L544.535%20232H539.095L519.46%20188.055V232H511.725V173.18H520.055L541.815%20221.8l21.76-48.62H571.82zm108.063.0V232H672.148V188.14L652.598%20232H647.158l-19.635-43.945V232H619.788V173.18H628.118l21.76%2048.62%2021.76-48.62H679.883zM735.416%20172.755V210.24C735.416%20215.51%20736.691%20219.42%20739.241%20221.97%20741.848%20224.52%20745.446%20225.795%20750.036%20225.795%20754.57%20225.795%20758.111%20224.52%20760.661%20221.97%20763.268%20219.42%20764.571%20215.51%20764.571%20210.24V172.755H772.306v37.4C772.306%20215.085%20771.315%20219.25%20769.331%20222.65%20767.348%20225.993%20764.656%20228.487%20761.256%20230.13%20757.913%20231.773%20754.145%20232.595%20749.951%20232.595%20745.758%20232.595%20741.961%20231.773%20738.561%20230.13%20735.218%20228.487%20732.555%20225.993%20730.571%20222.65%20728.645%20219.25%20727.681%20215.085%20727.681%20210.155v-37.4H735.416zM866.64%20232H858.905l-31.11-47.175V232H820.06V172.67H827.795l31.11%2047.09V172.67H866.64V232zm55.77-59.245V232H914.675V172.755H922.41zm84.5.0V179.045H990.758V232H983.023V179.045H966.788V172.755h40.122zm85.85.0-19.3%2036.89V232H1065.73V209.645L1046.35%20172.755H1054.93L1069.55%20202.76%201084.17%20172.755H1092.76z%22%20fill=%22%23fff%22/%3E%3Cdefs%3E%3ClinearGradient%20id=%22paint0_linear_1391_11470%22%20x1=%2230.363%22%20y1=%22238.463%22%20x2=%22230.327%22%20y2=%2238.6685%22%20gradientUnits=%22userSpaceOnUse%22%3E%3Cstop%20stop-color=%22%23FC3519%22/%3E%3Cstop%20offset=%221%22%20stop-color=%22%23F0D136%22/%3E%3C/linearGradient%3E%3CclipPath%20id=%22clip0_1391_11470%22%3E%3Crect%20width=%22962.614%22%20height=%22116.656%22%20fill=%22%23fff%22%20transform=%22translate(132.155%2028.9724)%22/%3E%3C/clipPath%3E%3C/defs%3E%3C/svg%3E)
We’re now ready to deploy PostgreSQL 17 using GitOps — with ArgoCD, GitHub, and the Percona Operator for PostgreSQL.
If you’re a DBA, developer, DevOps engineer, or engineering manager, this part focuses on GitOps in action: deploying and managing a real database cluster using declarative infrastructure.
In Part 1, we set up the Kubernetes environment and installed ArgoCD.
Now it’s time to define and launch the PostgreSQL cluster — fully versioned and synced through Git.
We’ll follow the official Percona Operator documentation and reference the GitHub repository to build out a production-grade setup.
Preparing the Environment
There are multiple ways to install the Percona Operator and create a PostgreSQL cluster.
We’ll use the simplest and most GitOps-friendly approach:
Deploy the operator using
deploy/bundle.yamlDeploy the cluster using
deploy/cr.yaml
Source files:
https://github.com/percona/percona-postgresql-operator/blob/main/deploy/bundle.yamlhttps://github.com/percona/percona-postgresql-operator/blob/main/deploy/cr.yaml
Project Structure
Repository structure can vary depending on your services and infrastructure scale.
For this series, we’ll use:
postgres/→ Contains all manifests related to PostgreSQL: the operator, clusters, backupsapps/→ Contains ArgoCD application manifests that track changes in the repository
You’re free to choose a different structure. Just ensure all paths are correctly referenced in ArgoCD.
Creating the Postgres Directory and Saving Manifests
You can manually download the files from GitHub or automate it via CLI:
mkdir postgrescurl -o postgres/bundle.yaml https://raw.githubusercontent.com/percona/percona-postgresql-operator/v2.7.0/deploy/bundle.yamlcurl -o postgres/cr.yaml https://raw.githubusercontent.com/percona/percona-postgresql-operator/v2.7.0/deploy/cr.yamlYou can also separately clone the operator repository and grab the necessary files from there.
Creating the ArgoCD Application Manifest
This ArgoCD application will track the postgres/ directory and automatically sync changes from GitHub.
Create the file: apps/argocd-postgres.yaml
Content:
apiVersion: argoproj.io/v1alpha1
kind: Application
metadata:
  name: postgres
  namespace: argocd
spec:
  project: default
  source:
    repoURL: https://github.com/dbazhenov/percona-argocd-pg-coroot.git
    targetRevision: main
    path: postgres
  destination:
    server: https://kubernetes.default.svc
    namespace: postgres-operator
  syncPolicy:
    automated:
      prune: true
      selfHeal: true
    syncOptions:
      - CreateNamespace=true
      - ServerSideApply=true
You can also create this app manually via the ArgoCD UI or CLI, but using a manifest aligns better with GitOps principles.
Double-check your:
repoURL→ matches your GitHub repositorypath→ corresponds to your PostgreSQL manifest directorynamespace→ targets the correct namespace for operator and cluster
Managing ArgoCD Sync Order with Waves
ArgoCD applies manifests based on sync-wave annotations.
- The operator (
bundle.yaml) should be applied first - The cluster (
cr.yaml) comes second
Add these annotations:
In bundle.yaml:
metadata:
  annotations:
    argocd.argoproj.io/sync-wave: "1"
In cr.yaml:
metadata:
  name: cluster1
  annotations:
    argocd.argoproj.io/sync-wave: "5"
This ensures a stable deployment sequence.
Later in the series (e.g. when installing Coroot), we’ll use a more advanced method: defining sync order via kustomization.yaml.
Reviewing Cluster Configuration
Before applying the manifests, review and adjust your cluster settings in cr.yaml.
Key defaults:
name: cluster1→ Cluster namepostgresVersion: 17→ PostgreSQL version
To keep the cluster lightweight and test horizontal scaling later, reduce replicas to 1:
instances:
  - name: instance1
replicas: 1proxy:
pgBouncer:
replicas: 1You can also configure resource limits, disk sizes, backups, and users in this file.
Publishing the Configuration to GitHub
Verify your repo status:
git statusAdd files:
git add .Review staged files:
git statusExpected result:
➜  percona-argocd-pg-coroot git:(main) ✗ git status
On branch main
Your branch is up to date with 'origin/main'.

Untracked files:
  (use "git add <file>..." to include in what will be committed)
    apps/
    postgres/

nothing added to commit but untracked files present (use "git add" to track)
➜  percona-argocd-pg-coroot git:(main) ✗ git add .
➜  percona-argocd-pg-coroot git:(main) ✗ git status
On branch main
Your branch is up to date with 'origin/main'.

Changes to be committed:
  (use "git restore --staged <file>..." to unstage)
    new file:   apps/argocd-postgres.yaml
    new file:   postgres/bundle.yaml
    new file:   postgres/cr.yaml
Commit:
git commit -m "Initial configuration of a Postgres cluster using Percona Operator for Postgres and ArgoCD"Push to GitHub:
git push origin mainVerify files are published correctly in the repository.
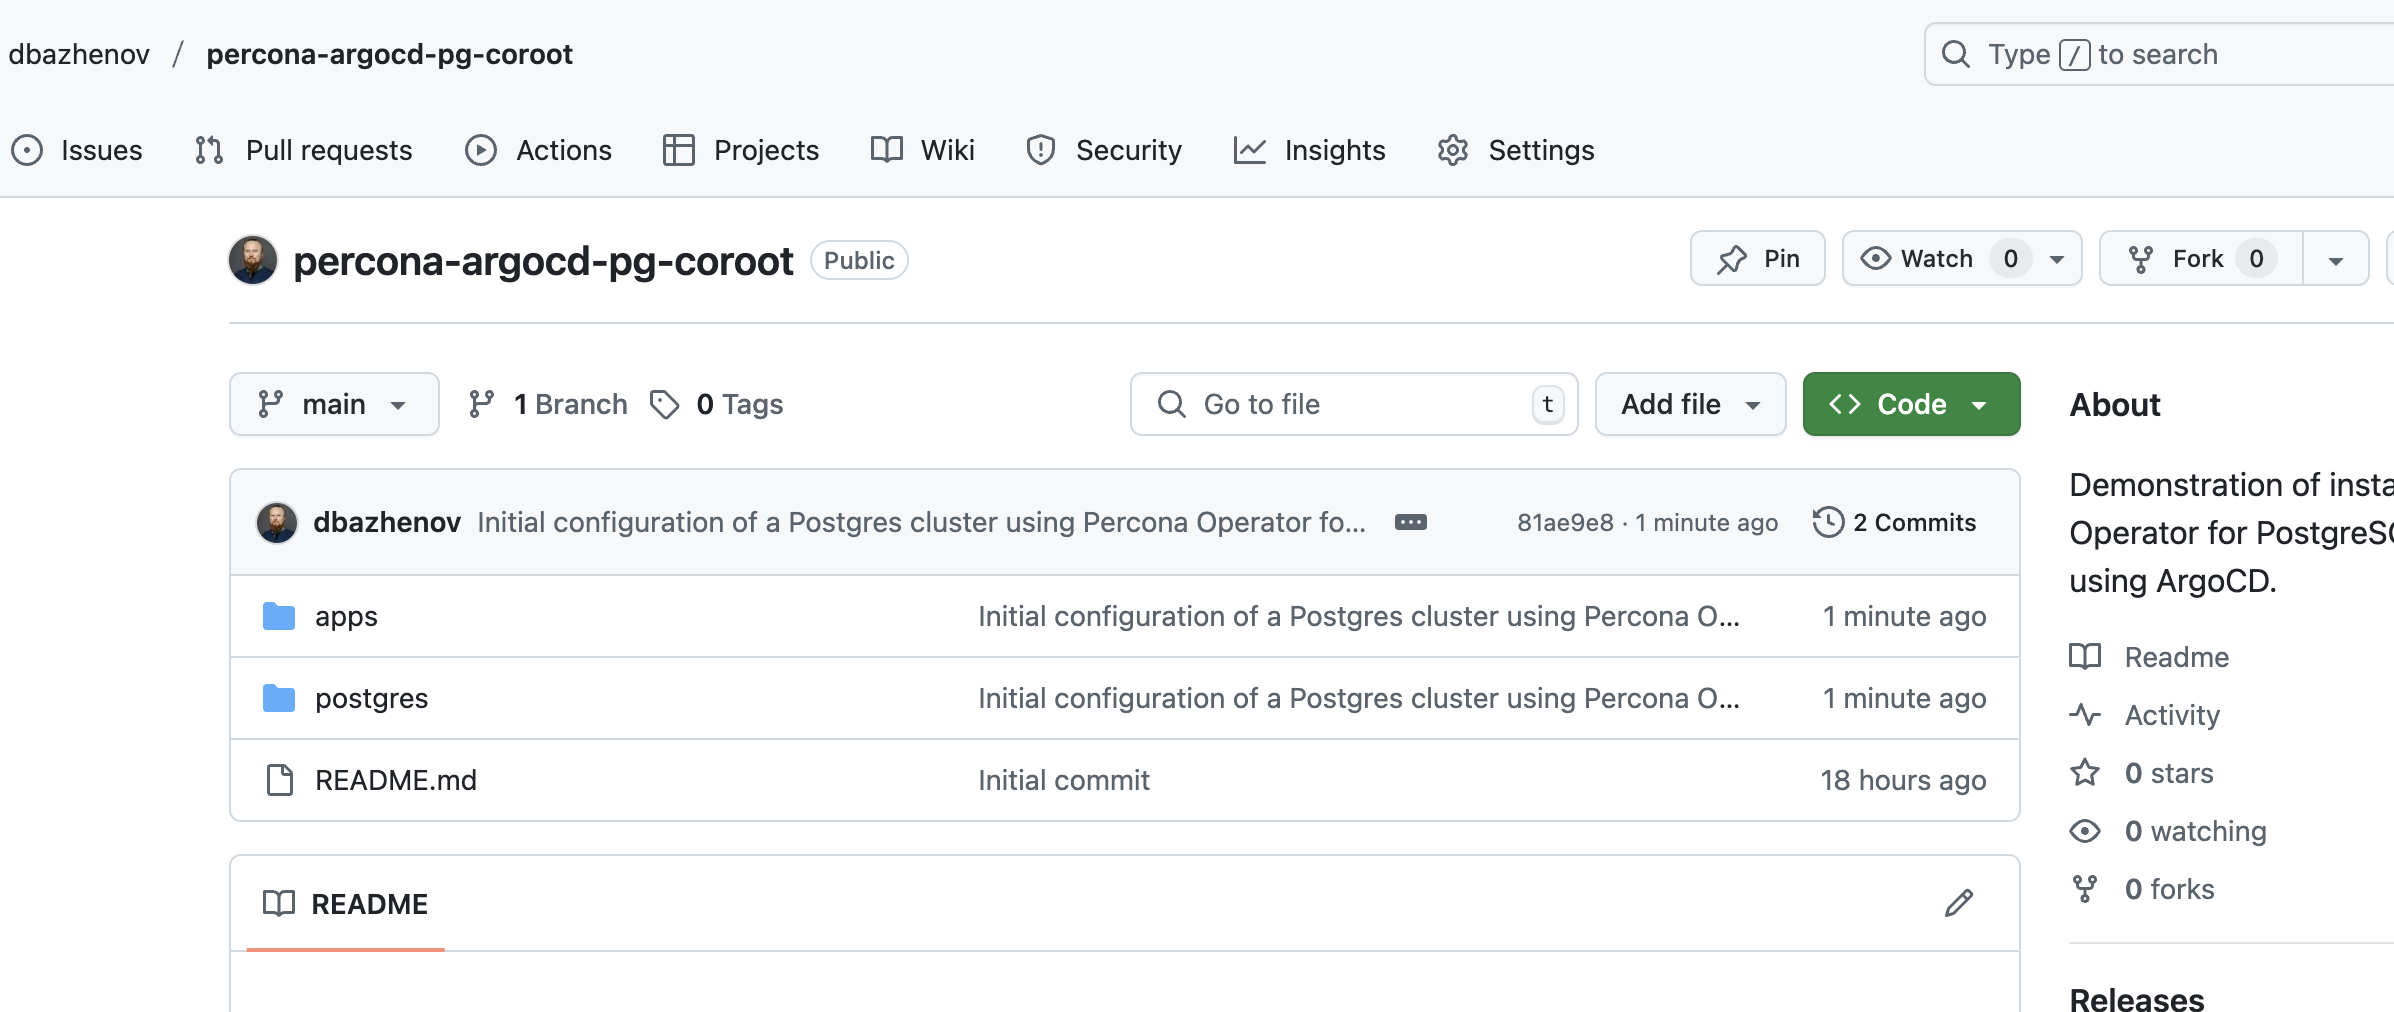
Applying the ArgoCD App Manifest
To initiate the deployment, apply the previously created manifest:
kubectl apply -f apps/argocd-postgres.yaml -n argocdAfter a minute or two, the ArgoCD dashboard should display the synced PostgreSQL application and the deployed cluster.
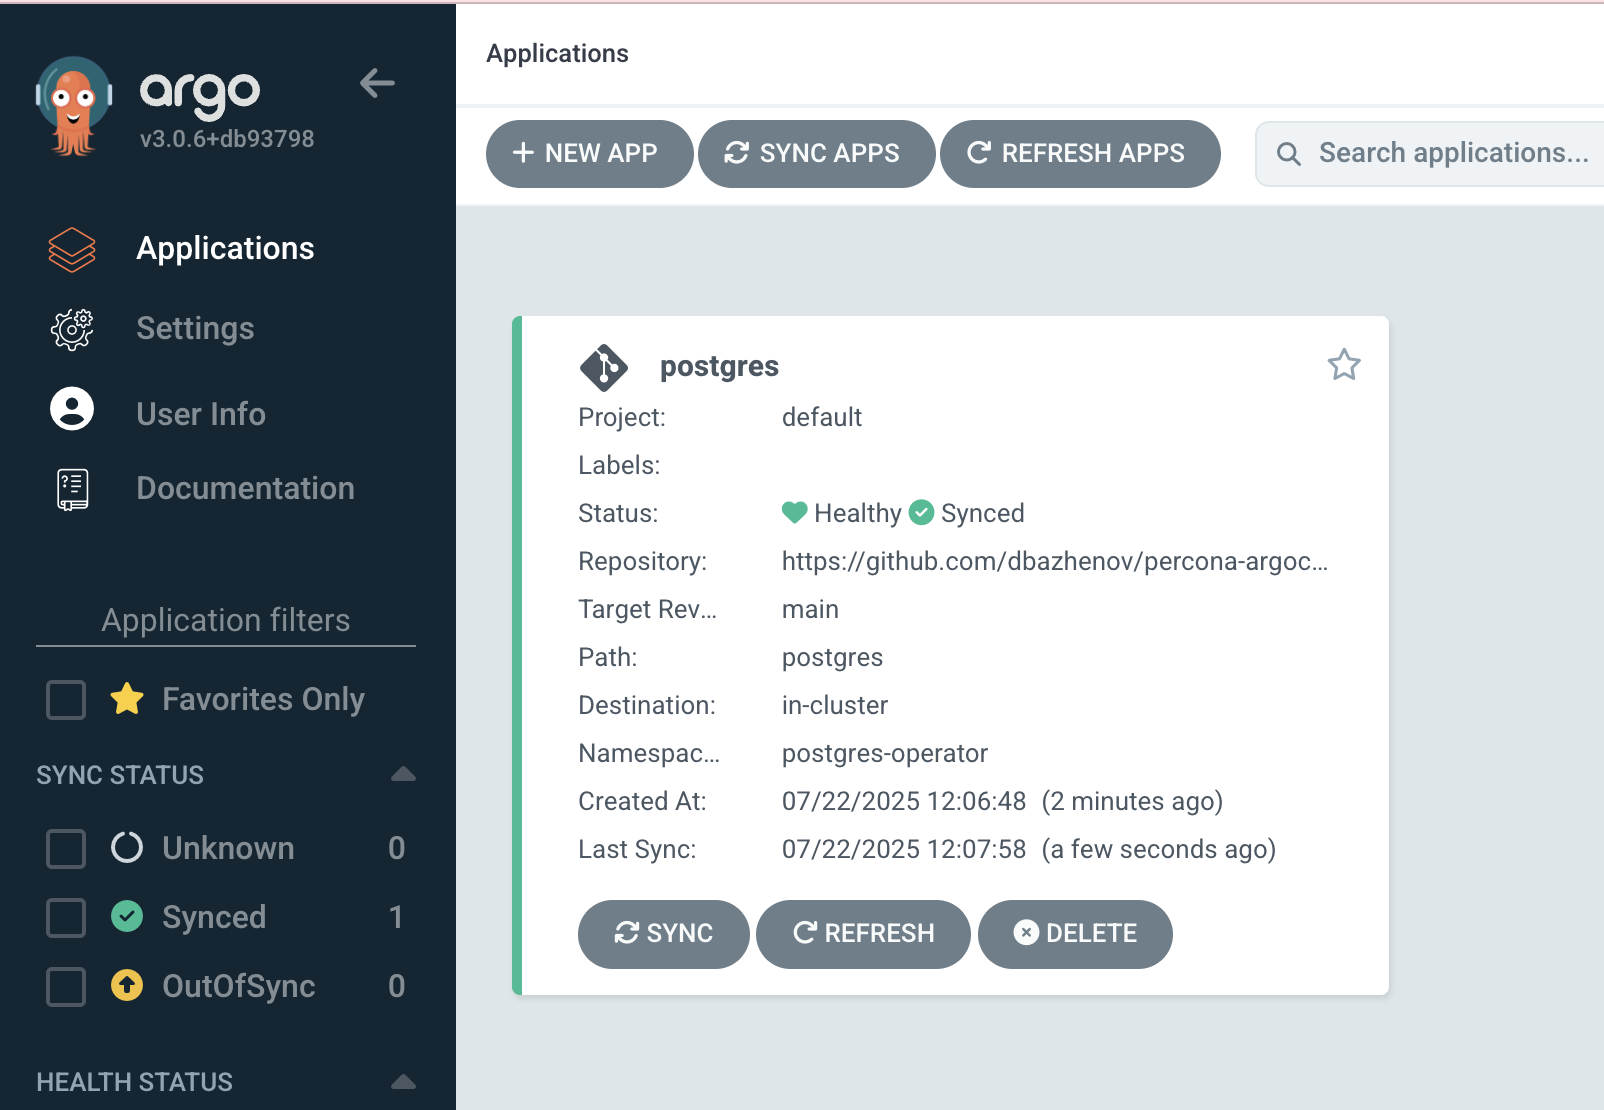
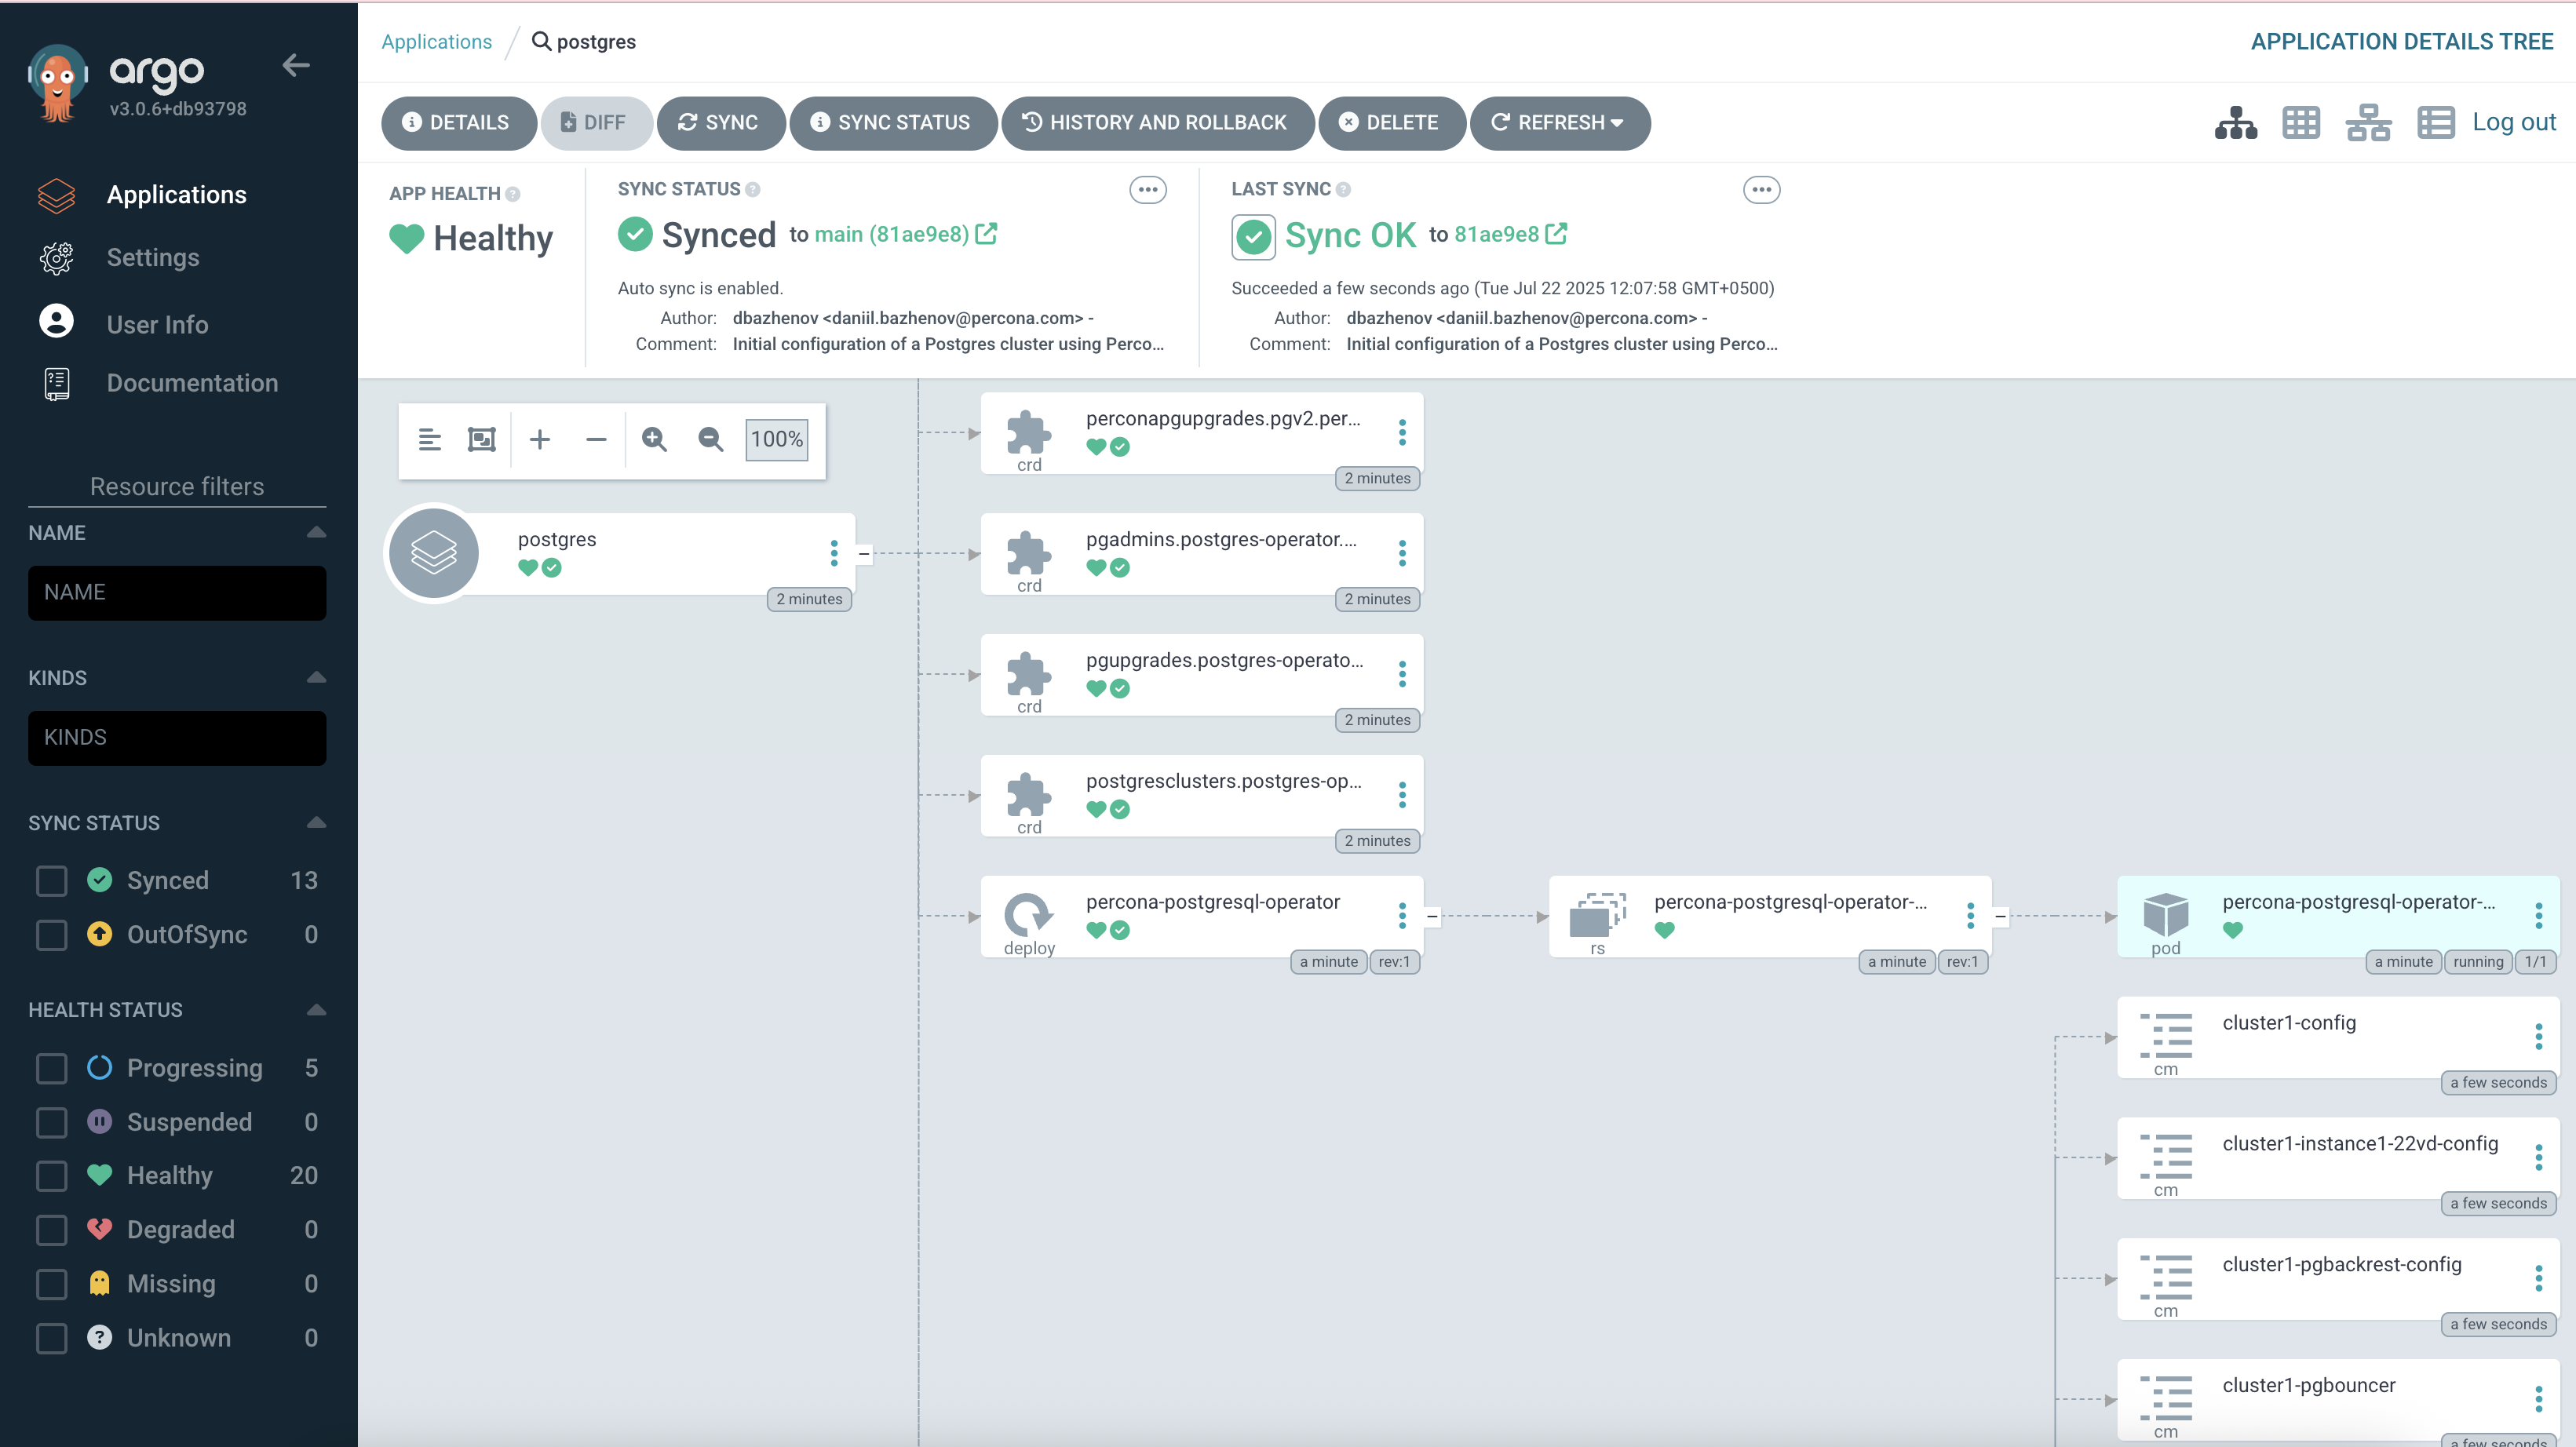
Verifying Cluster Status
Check the running pods:
kubectl get pods -n postgres-operatorExpected results:
- One PostgreSQL instance pod
- One pgBouncer pod
➜  percona-argocd-pg-coroot git:(main) kubectl get pods -n postgres-operator
NAME                                           READY   STATUS      RESTARTS   AGE
cluster1-backup-5g98-5b29w                     0/1     Completed   0          27m
cluster1-instance1-22vd-0                      4/4     Running     0          28m
cluster1-pgbouncer-649b7cf845-fgs9l            2/2     Running     0          28m
cluster1-repo-host-0                           2/2     Running     0          28m
percona-postgresql-operator-79f75d5f76-xjndr   1/1     Running     0          29m
Scaling the Cluster via GitOps
Let’s test the GitOps model by updating the cluster configuration to increase replicas to 3.
Edit postgres/cr.yaml:
  instances:
  - name: instance1
replicas: 3 proxy:
pgBouncer:
replicas: 3Save the changes and push them:
git statusgit add . git commit -m "Postgres cluster: Horizontal scaling from 1 replica to 3" git push origin mainArgoCD will automatically detect and apply this update.
Expected results:
➜  percona-argocd-pg-coroot git:(main) git status
On branch main
Your branch is up to date with 'origin/main'.

Changes not staged for commit:
  (use "git add <file>..." to update what will be committed)
  (use "git restore <file>..." to discard changes in working directory)
    modified:   postgres/cr.yaml

no changes added to commit (use "git add" and/or "git commit -a")
➜  percona-argocd-pg-coroot git:(main) ✗ git add .
➜  percona-argocd-pg-coroot git:(main) ✗ git commit -m "Postgres cluster: Horizontal scaling from 1 replica to 3"
[main 6b2dc98] Postgres cluster: Horizontal scaling from 1 replica to 3
 1 file changed, 2 insertions(+), 2 deletions(-)
➜  percona-argocd-pg-coroot git:(main) git push origin main
Enumerating objects: 7, done.
Counting objects: 100% (7/7), done.
Delta compression using up to 10 threads
Compressing objects: 100% (4/4), done.
Writing objects: 100% (4/4), 435 bytes | 435.00 KiB/s, done.
Total 4 (delta 2), reused 0 (delta 0), pack-reused 0
remote: Resolving deltas: 100% (2/2), completed with 2 local objects.
To github.com:dbazhenov/percona-argocd-pg-coroot.git
   81ae9e8..6b2dc98  main -> main
➜  percona-argocd-pg-coroot git:(main)
Expected results on GitHub Repo:
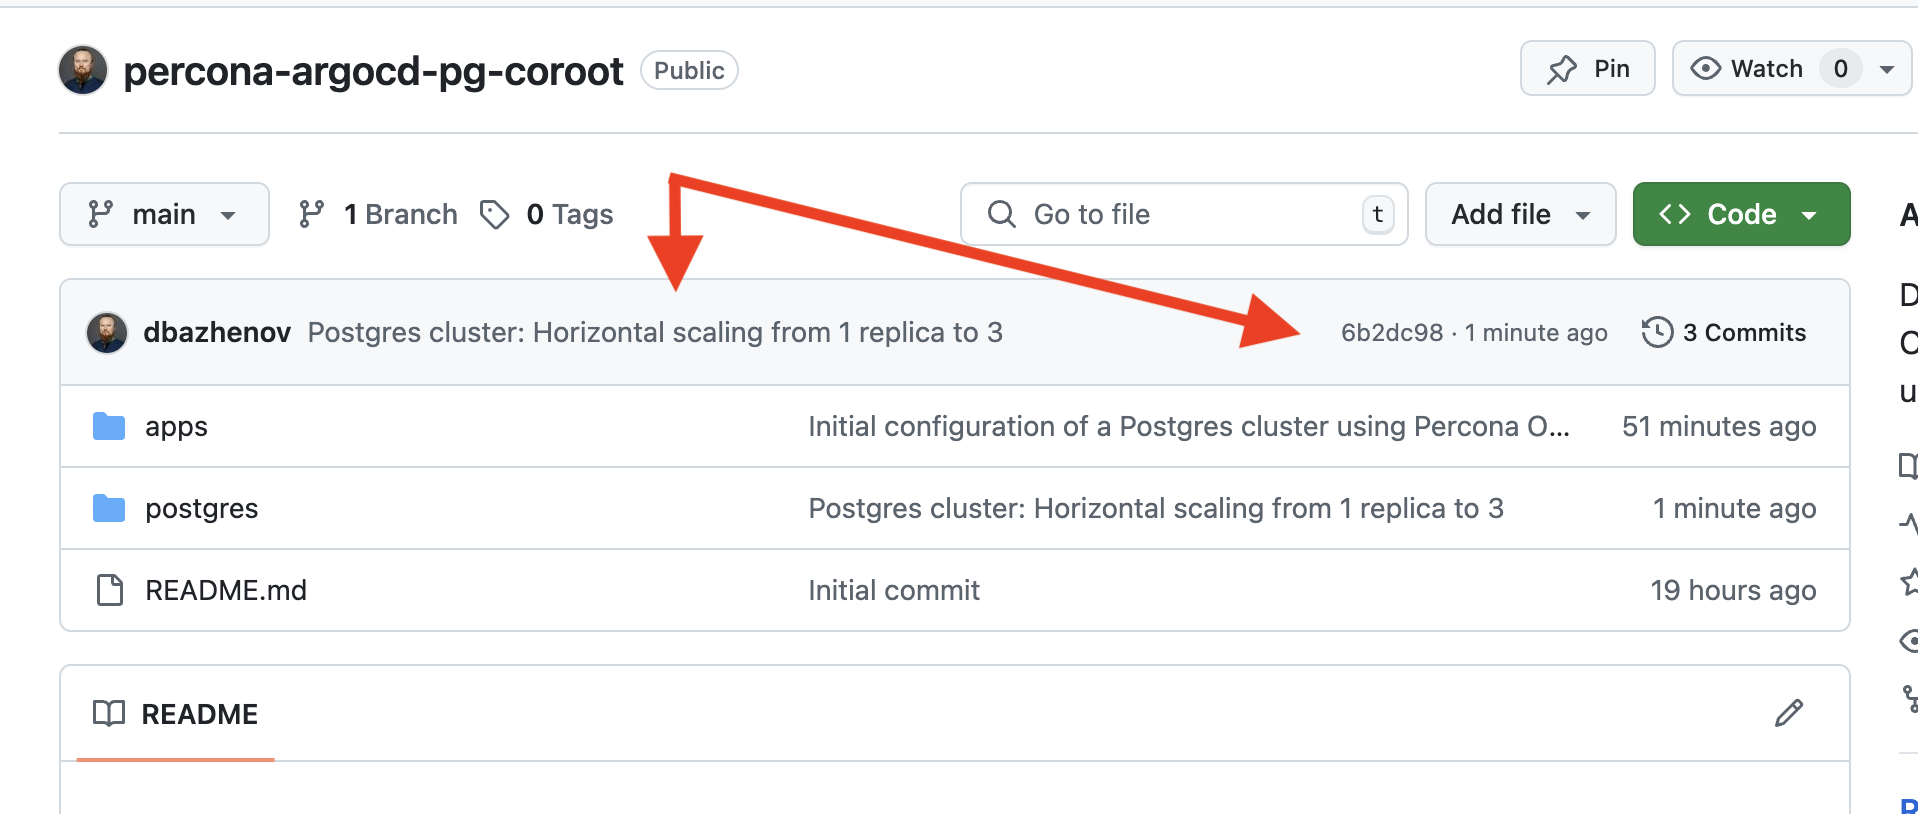
Confirming the Update in ArgoCD
In the ArgoCD UI, you should now see the application synced to the latest commit with the updated replica count.
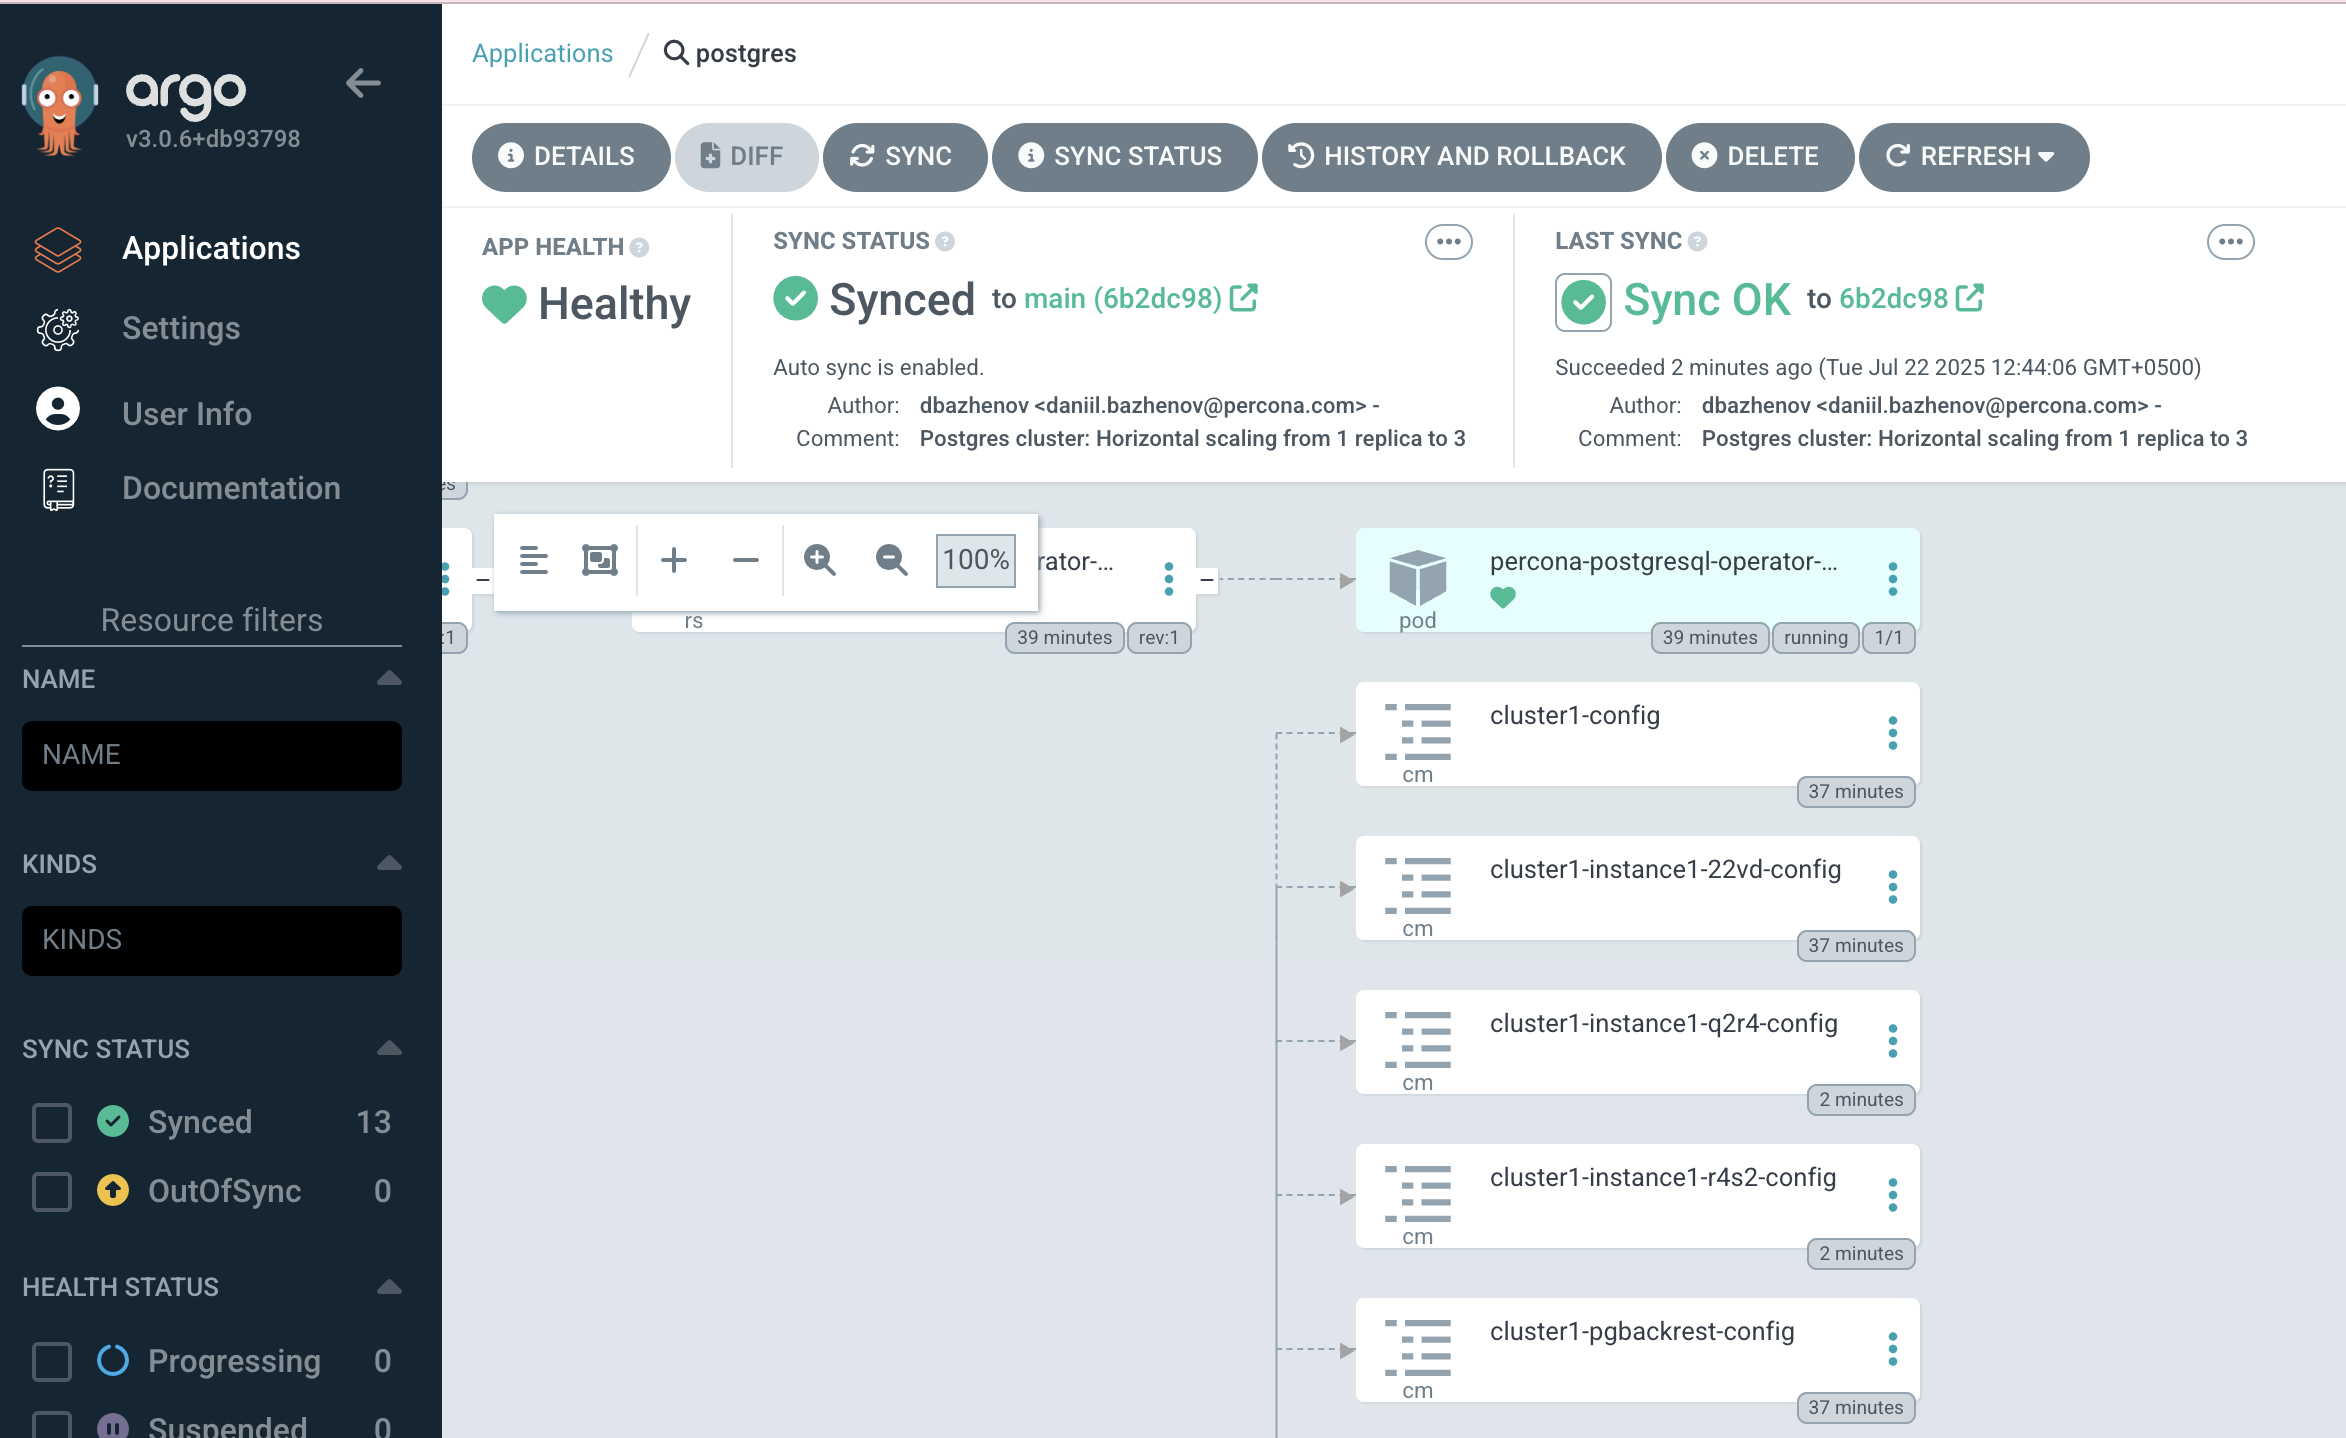
Verify pods:
kubectl get pods -n postgres-operatorExpected result — 3 PostgreSQL pods and 3 pgBouncer pods.
➜  percona-argocd-pg-coroot git:(main) kubectl get pods -n postgres-operator
NAME                                           READY   STATUS      RESTARTS   AGE
cluster1-backup-5g98-5b29w                     0/1     Completed   0          38m
cluster1-instance1-22vd-0                      4/4     Running     0          39m
cluster1-instance1-q2r4-0                      4/4     Running     0          3m38s
cluster1-instance1-r4s2-0                      4/4     Running     0          3m39s
cluster1-pgbouncer-649b7cf845-9cppx            2/2     Running     0          3m37s
cluster1-pgbouncer-649b7cf845-fgs9l            2/2     Running     0          39m
cluster1-pgbouncer-649b7cf845-tkf9z            2/2     Running     0          3m36s
cluster1-repo-host-0                           2/2     Running     0          39m
percona-postgresql-operator-79f75d5f76-xjndr   1/1     Running     0          40m
What’s Next
We’ve successfully installed the Percona Operator for PostgreSQL and deployed a cluster using GitHub and ArgoCD.
We also verified GitOps functionality by scaling the cluster through Git-controlled configuration.
All changes are tracked, versioned, and declarative — a solid foundation for modern infrastructure management.
To continue experimenting:
- Connect to the Cluster
- Manage Users. Note: the default user does not have SUPERUSER privileges. If your app requires creating databases, you’ll need to configure appropriate roles.
- Expose the Cluster. So you can connect from external clients or apps.
We’ll do exactly that in the next part — by deploying a demo application and connecting it to the database using GitOps. ∎


Discussion
We invite you to our forum for discussion. You are welcome to use the widget below.