%22%3E%3Cpath%20d=%22M352.016%20109.322h-18.62v33.317H308.887V31.542h45.54c26.587.0%2042.669%2015.7006%2042.669%2038.4065V70.2514c0%2025.715-20.051%2039.0416-45.051%2039.0416L352.016%20109.322v0zm20.207-38.885C372.223%2059.4847%20364.589%2053.6128%20352.32%2053.6128H333.367V87.5641H352.78c12.27.0%2019.414-7.3081%2019.414-16.8242V70.437H372.223z%22%20fill=%22%23fff%22/%3E%3Cpath%20d=%22M410.776%20142.648V31.542H494.84V53.3001H435.139V75.8497h52.527V97.6078H435.139V120.949h60.494v21.758H410.776V142.648v0z%22%20fill=%22%23fff%22/%3E%3Cpath%20d=%22M582.46%20142.648%20558.588%20107.104H539.331v35.544H514.822V31.542h50.939c26.284.0%2042.032%2013.815%2042.032%2036.6674V68.5123c0%2017.9282-9.702%2029.2128-23.872%2034.4497L611.145%20142.639H582.451L582.46%20142.648zM582.95%2069.4893C582.95%2059.0255%20575.62%2053.603%20563.694%2053.603H539.341V85.5026h24.843C576.12%2085.5026%20582.95%2079.1422%20582.95%2069.8019V69.4991%2069.4893z%22%20fill=%22%23fff%22/%3E%3Cpath%20d=%22M678.058%20145.618c-33.221.0-57.907-25.568-57.907-57.9171V87.3882C620.151%2055.3812%20644.337%2029.1678%20679.048%2029.1678c21.285.0%2034.055%207.0639%2044.54%2017.3616L707.781%2064.6922C699.059%2056.7979%20690.21%2051.9909%20678.891%2051.9909c-19.021.0-32.761%2015.7593-32.761%2035.0652V87.3687c0%2019.3063%2013.397%2035.3683%2032.761%2035.3683C691.788%20122.737%20699.706%20117.588%20708.585%20109.537l15.807%2015.916C712.76%20137.851%20699.863%20145.56%20678.088%20145.56L678.058%20145.618z%22%20fill=%22%23fff%22/%3E%3Cpath%20d=%22M789.963%20145.618c-34.858.0-59.858-25.9-59.858-57.9171V87.3882c0-32.007%2025.333-58.2204%2060.162-58.2204%2034.829.0%2059.858%2025.9007%2059.858%2057.9176V87.398c0%2032.007-25.333%2058.22-60.162%2058.22zm34.212-58.22C824.175%2068.0922%20809.975%2052.03%20789.963%2052.03%20769.952%2052.03%20756.095%2067.7893%20756.095%2087.0951V87.4078C756.095%20106.714%20770.295%20122.776%20790.306%20122.776%20810.318%20122.776%20824.175%20107.017%20824.175%2087.7107V87.398v0z%22%20fill=%22%23fff%22/%3E%3Cpath%20d=%22M985.089%20142.736%201039.93%2029.1678%201094.77%20142.746h-27.5L1039.93%2086.2256l-27.24%2056.5204H985.089V142.736z%22%20fill=%22%23fff%22/%3E%3Cpath%20d=%22M974.936%2031.5811V145.628L891.304%2078.0968V142.551H865.285V29.1678L948.917%2096.4354V31.5811h26.019z%22%20fill=%22%23fff%22/%3E%3C/g%3E%3Cpath%20d=%22M219.315%20146.829c28.718-18.788%2038.114-57.1102%2020.735-87.2301-8.708-15.108-22.784-25.9277-39.624-30.4456-15.602-4.1923-31.898-2.478-46.241%204.7743L134.603.0%2093.9541%2070.4613.0%20233.311H269.206l-49.891-86.482zM195.821%2046.4134c12.241%203.263%2022.427%2011.1294%2028.771%2022.0826%2012.47%2021.5912%205.993%2048.977-14.23%2062.808L163.128%2049.4361c10.176-4.8971%2021.653-5.9652%2032.693-3.0227zM134.603%2035.7593%20238.247%20215.426H177.605L104.268%2088.3409l30.329-52.5762L134.603%2035.7593zM30.9588%20215.426l62.99-109.168L156.939%20215.426H30.9588z%22%20fill=%22url(%23paint0_linear_1391_11470)%22/%3E%3Cpath%20d=%22M306.655%20202.335C306.655%20196.555%20307.958%20191.37%20310.565%20186.78%20313.172%20182.133%20316.713%20178.507%20321.19%20175.9%20325.723%20173.293%20330.738%20171.99%20336.235%20171.99%20342.695%20171.99%20348.333%20173.548%20353.15%20176.665%20357.967%20179.782%20361.48%20184.202%20363.69%20189.925H354.425C352.782%20186.355%20350.402%20183.607%20347.285%20181.68%20344.225%20179.753%20340.542%20178.79%20336.235%20178.79%20332.098%20178.79%20328.387%20179.753%20325.1%20181.68%20321.813%20183.607%20319.235%20186.355%20317.365%20189.925%20315.495%20193.438%20314.56%20197.575%20314.56%20202.335%20314.56%20207.038%20315.495%20211.175%20317.365%20214.745%20319.235%20218.258%20321.813%20220.978%20325.1%20222.905%20328.387%20224.832%20332.098%20225.795%20336.235%20225.795%20340.542%20225.795%20344.225%20224.86%20347.285%20222.99%20350.402%20221.063%20352.782%20218.315%20354.425%20214.745H363.69C361.48%20220.412%20357.967%20224.803%20353.15%20227.92%20348.333%20230.98%20342.695%20232.51%20336.235%20232.51%20330.738%20232.51%20325.723%20231.235%20321.19%20228.685%20316.713%20226.078%20313.172%20222.48%20310.565%20217.89%20307.958%20213.3%20306.655%20208.115%20306.655%20202.335zm130.259%2030.26C431.418%20232.595%20426.403%20231.32%20421.869%20228.77%20417.336%20226.163%20413.738%20222.565%20411.074%20217.975%20408.468%20213.328%20407.164%20208.115%20407.164%20202.335S408.468%20191.37%20411.074%20186.78C413.738%20182.133%20417.336%20178.535%20421.869%20175.985%20426.403%20173.378%20431.418%20172.075%20436.914%20172.075%20442.468%20172.075%20447.511%20173.378%20452.044%20175.985%20456.578%20178.535%20460.148%20182.105%20462.754%20186.695%20465.361%20191.285%20466.664%20196.498%20466.664%20202.335%20466.664%20208.172%20465.361%20213.385%20462.754%20217.975%20460.148%20222.565%20456.578%20226.163%20452.044%20228.77%20447.511%20231.32%20442.468%20232.595%20436.914%20232.595zm0-6.715C441.051%20225.88%20444.763%20224.917%20448.049%20222.99%20451.393%20221.063%20453.999%20218.315%20455.869%20214.745%20457.796%20211.175%20458.759%20207.038%20458.759%20202.335%20458.759%20197.575%20457.796%20193.438%20455.869%20189.925%20453.999%20186.355%20451.421%20183.607%20448.134%20181.68%20444.848%20179.753%20441.108%20178.79%20436.914%20178.79%20432.721%20178.79%20428.981%20179.753%20425.694%20181.68%20422.408%20183.607%20419.801%20186.355%20417.874%20189.925%20416.004%20193.438%20415.069%20197.575%20415.069%20202.335%20415.069%20207.038%20416.004%20211.175%20417.874%20214.745%20419.801%20218.315%20422.408%20221.063%20425.694%20222.99%20429.038%20224.917%20432.778%20225.88%20436.914%20225.88zm134.906-52.7V232H564.085V188.14L544.535%20232H539.095L519.46%20188.055V232H511.725V173.18H520.055L541.815%20221.8l21.76-48.62H571.82zm108.063.0V232H672.148V188.14L652.598%20232H647.158l-19.635-43.945V232H619.788V173.18H628.118l21.76%2048.62%2021.76-48.62H679.883zM735.416%20172.755V210.24C735.416%20215.51%20736.691%20219.42%20739.241%20221.97%20741.848%20224.52%20745.446%20225.795%20750.036%20225.795%20754.57%20225.795%20758.111%20224.52%20760.661%20221.97%20763.268%20219.42%20764.571%20215.51%20764.571%20210.24V172.755H772.306v37.4C772.306%20215.085%20771.315%20219.25%20769.331%20222.65%20767.348%20225.993%20764.656%20228.487%20761.256%20230.13%20757.913%20231.773%20754.145%20232.595%20749.951%20232.595%20745.758%20232.595%20741.961%20231.773%20738.561%20230.13%20735.218%20228.487%20732.555%20225.993%20730.571%20222.65%20728.645%20219.25%20727.681%20215.085%20727.681%20210.155v-37.4H735.416zM866.64%20232H858.905l-31.11-47.175V232H820.06V172.67H827.795l31.11%2047.09V172.67H866.64V232zm55.77-59.245V232H914.675V172.755H922.41zm84.5.0V179.045H990.758V232H983.023V179.045H966.788V172.755h40.122zm85.85.0-19.3%2036.89V232H1065.73V209.645L1046.35%20172.755H1054.93L1069.55%20202.76%201084.17%20172.755H1092.76z%22%20fill=%22%23fff%22/%3E%3Cdefs%3E%3ClinearGradient%20id=%22paint0_linear_1391_11470%22%20x1=%2230.363%22%20y1=%22238.463%22%20x2=%22230.327%22%20y2=%2238.6685%22%20gradientUnits=%22userSpaceOnUse%22%3E%3Cstop%20stop-color=%22%23FC3519%22/%3E%3Cstop%20offset=%221%22%20stop-color=%22%23F0D136%22/%3E%3C/linearGradient%3E%3CclipPath%20id=%22clip0_1391_11470%22%3E%3Crect%20width=%22962.614%22%20height=%22116.656%22%20fill=%22%23fff%22%20transform=%22translate(132.155%2028.9724)%22/%3E%3C/clipPath%3E%3C/defs%3E%3C/svg%3E)
This guide explains how to set up a MongoDB 8 Replica Set and monitor it using PMM 3, all within Docker. We’ll guide you through the steps to create a local environment, configure the necessary components, and connect them for effective monitoring and management.
The guide is written in detail for beginners. In the conclusion section there are ready configurations for the experienced.
The recent release of Percona Monitoring and Management 3 introduces several new features:
Upgraded Grafana version for an improved user experience.
Rootless containers for enhanced security.
ARM support for the pmm-client.
Monitoring capabilities for MongoDB 8, along with new dashboards.
This article is intended for developers and DBAs who want to experiment with these tools locally using Docker. We will cover the following steps to set everything up and test the functionality:
Launch the PMM 3 pmm-server for monitoring and open it in a browser.
Install MongoDB, starting with a standalone server, and then convert it into a Replica Set with three nodes. Percona Server for MongoDB images are used in this article.
Configure the pmm-client for MongoDB to send metrics to the pmm-server.
Explore the PMM 3 dashboards.
We will use Docker Compose to define and run multiple containers efficiently through a single docker-compose.yaml file.
If you’re ready to dive into the world of Dockerized database monitoring and management, let’s get started!
Step Zero: Preparation
To get started, you need a terminal to run Docker commands and a text editor to modify the docker-compose.yaml file.
You also need Docker installed on your system. If Docker is not installed, follow these instructions to set it up:
Docker Desktop: This application includes both Docker and Docker Compose. It is available for multiple operating systems. This guide uses Docker Desktop on macOS with an Apple Silicon ARM processor. Download Docker Desktop
Docker and Docker Compose (separately): If preferred, install Docker and Docker Compose individually. Use the following links for guidance:
Command to Verify Installation:
Verify Docker Compose Installation: If you’re using Docker Desktop, Docker Compose is included. If you installed Docker Compose separately, you can verify the installation with:
docker-compose --versionThis should return the version of Docker Compose installed.
➜  community git:(main) ✗ docker-compose --version
Docker Compose version v2.21.0-desktop.1
Once Docker and Docker Compose are installed and verified, you are ready to move on to the next steps of deploying PMM 3 and MongoDB in Docker.
Project Directory
Create a directory where we’ll store the configuration and necessary files. For example, I created a directory named pmm-mongodb-setup and navigated into it.
mkdir pmm-mongodb-setup
cd pmm-mongodb-setup
Step One: Starting PMM 3 Using Docker Compose
To start with, we will launch PMM 3, specifically the pmm-server, which we will later access via a browser.
Create the Docker Compose Configuration File
First, create a file named docker-compose.yaml in your project directory. Then, copy and paste the following configuration into the file to set up PMM 3:
version: '3'

services:
  pmm-server:
    image: percona/pmm-server:3
    platform: "linux/amd64" # Specifies that Docker should use the image for the amd64 architecture, which is necessary if the container doesn't support ARM and your host system is ARM (e.g., Mac with Apple Silicon).
    container_name: pmm-server
    ports:
      - 8080:80
      - 443:8443
    healthcheck: # Defines a command to check the container's health and sets the timing for executions and retries.
      test: ["CMD-SHELL", "curl -k -f -L https://pmm-server:8443 > /dev/null 2>&1 || exit 1"]
      interval: 30s
      timeout: 10s
      retries: 5
Explanation:
We define the first
pmm-serverservice to use thepercona/pmm-server:3image
platform: This parameter ensures compatibility with ARM-based processors, such as my Mac with Apple Silicon, by instructing Docker to use the image for the amd64 architecture.
healthcheck: This parameter performs a check to confirm that the container has started successfully.
Start the PMM 3 Container
Save the docker-compose.yaml file, and then use the following command to start the PMM 3 container:
docker-compose up -dThis command will download the PMM 3 image if it is not already available locally and start the container in detached mode.
Expected result in the terminal:
➜  pmm-mongodb-setup docker-compose up -d
[+] Running 2/2
 ✔ Network pmm-mongodb-setup_default  Created   0.1s
 ✔ Container pmm-server               Started   0.9s
➜  pmm-mongodb-setup
Expected result in Docker Desktop: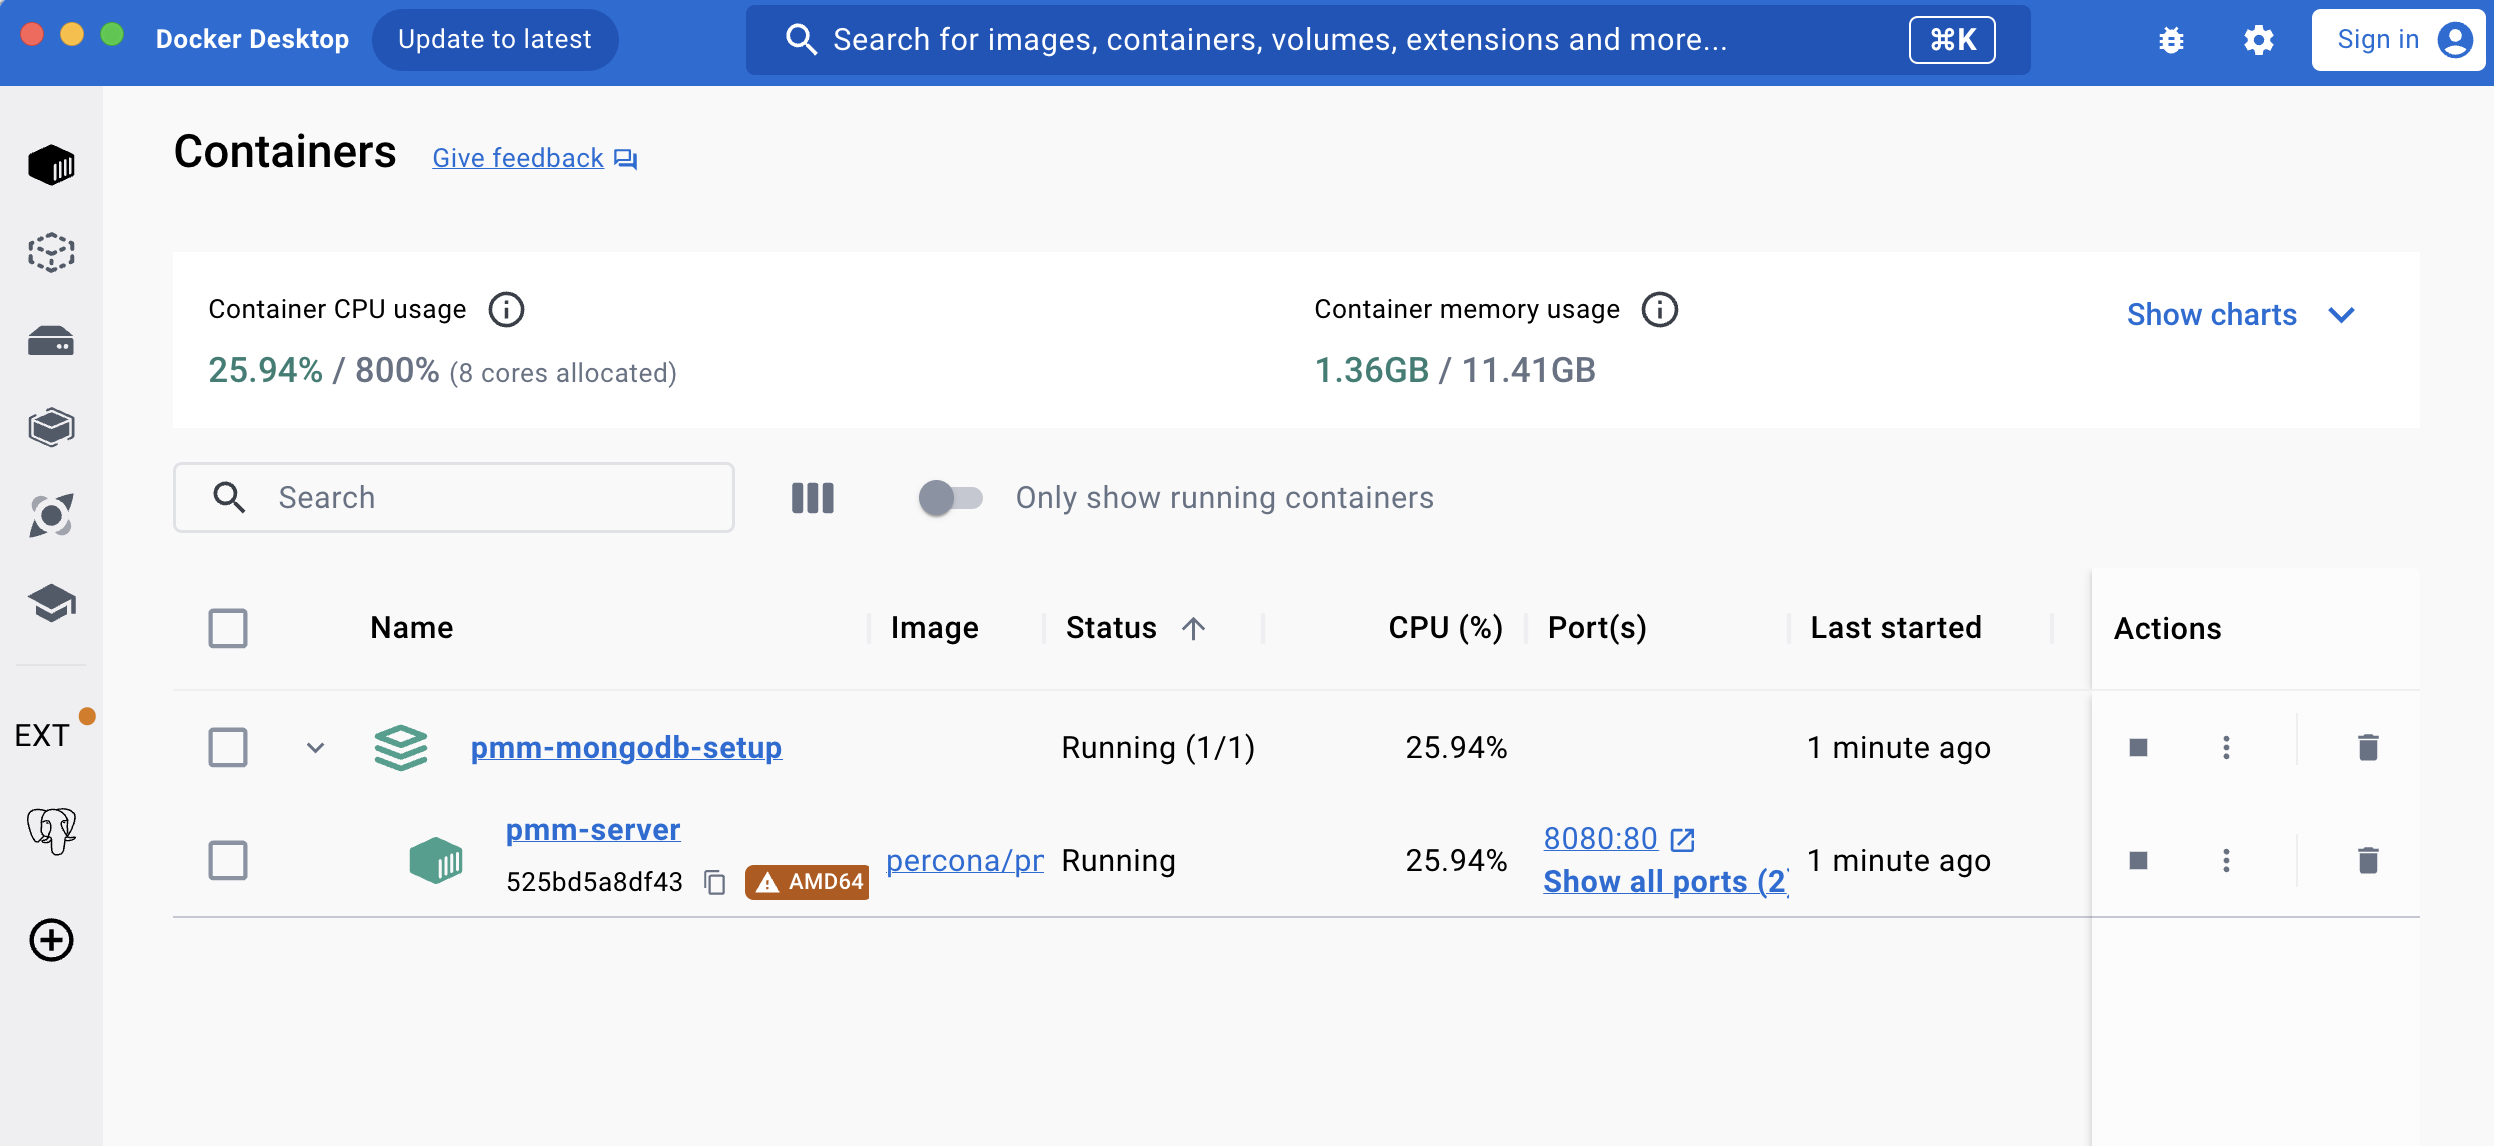
Open PMM in a browser
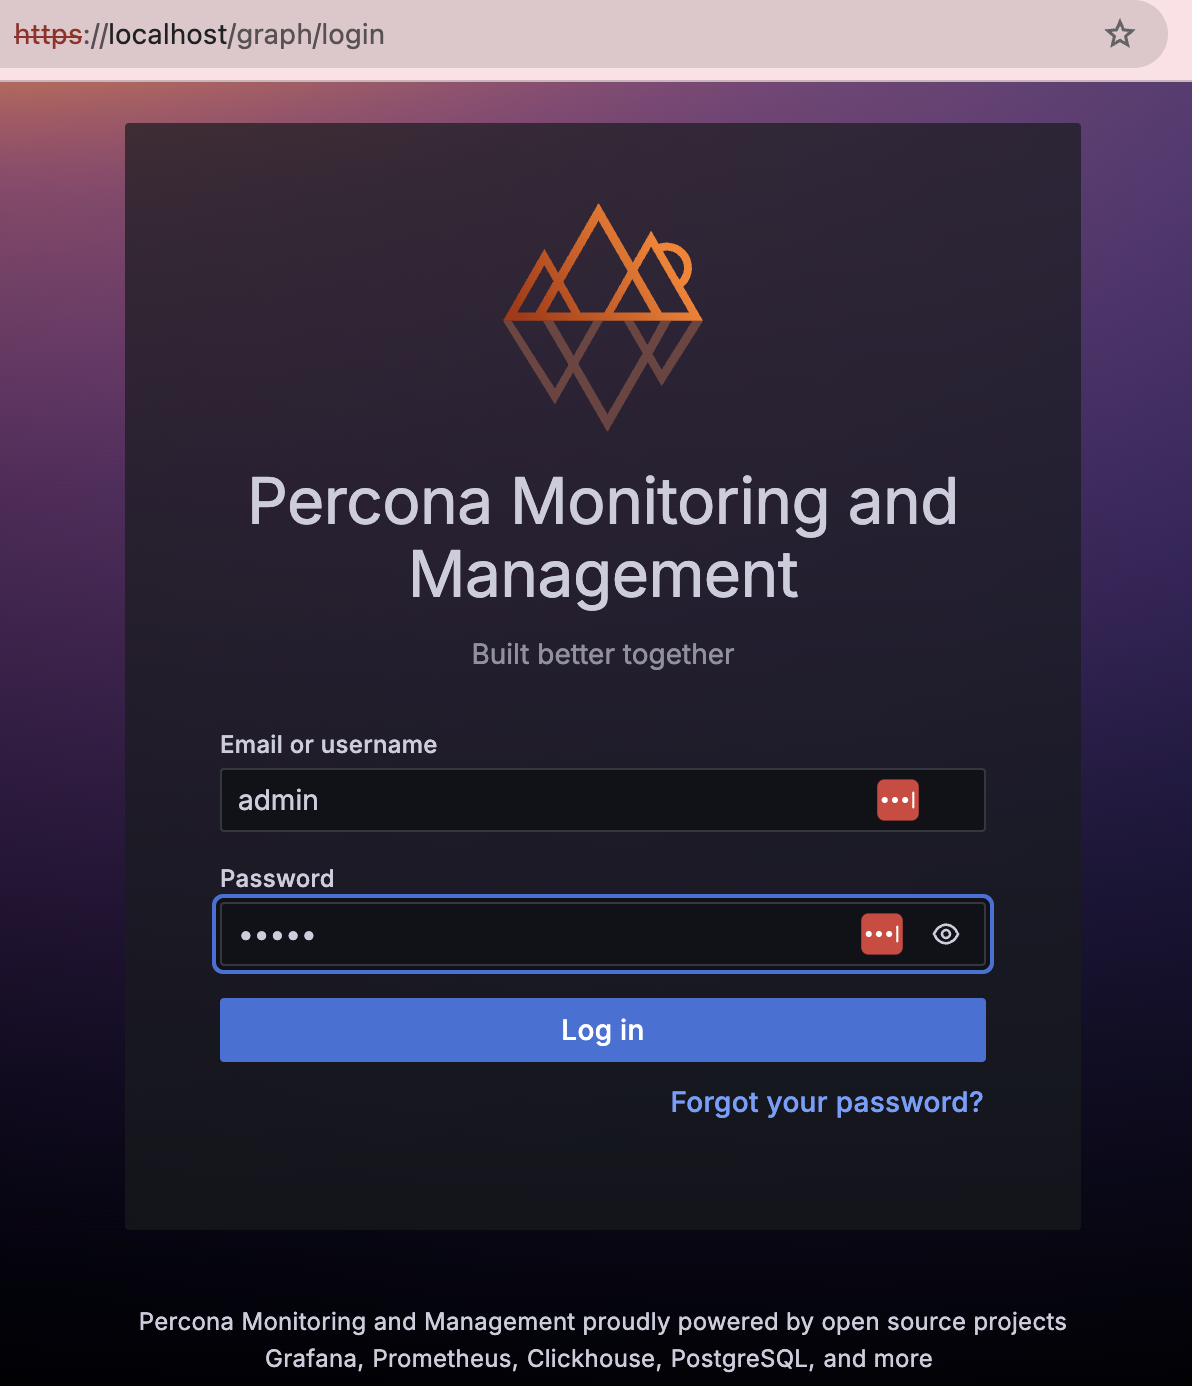
Now you can open PMM in your browser at http://localhost. Use admin/admin as the username and password to log in. When prompted to change the password, skip this step by clicking the Skip button. Since this is a test setup, we need a simple password for other containers.
Now, PMM 3 is successfully running using Docker Compose.
Step Two: Starting MongoDB
We start by launching a standalone MongoDB service. This simple configuration allows us to quickly understand how it operates before moving on to a more advanced setup with a Replica Set.
To keep the database data persistent, even after a restart, a volume is used for MongoDB data storage. Add the following configuration to the docker-compose.yaml file under the pmm-server service:
  mongodb:
    image: "percona/percona-server-mongodb:8.0-multi"
    volumes:
      - mongodb-data:/data/db
    environment:
      MONGO_INITDB_ROOT_USERNAME: databaseAdmin
      MONGO_INITDB_ROOT_PASSWORD: password
    ports:
      - "27017:27017"
    command: ["mongod", "--port", "27017", "--bind_ip_all", "--profile", "2", "--slowms", "200", "--rateLimit", "100"]
    healthcheck:
      test: ["CMD-SHELL", "mongosh --eval 'db.adminCommand(\"ping\")' --quiet"]
      interval: 30s
      timeout: 10s
      retries: 5

volumes:
  mongodb-data: # MongoDB data storage volume
Explanation:
environment: Configures the root user’s credentials (username and password).command: Sets additional parameters for MongoDB:
bind_ip_all: Allows external access to the database, for instance, through MongoDB Compass.profile: Enables profiling settings to support Query Analytics (QAN) in PMM.healthcheck: Ensures the container starts successfully by executing a health check command.volumes:: Creates the specified volume for MongoDB data storage. Defines a Docker volume to store MongoDB data persistently.
Launching the Configuration
Save the updated docker-compose.yaml file and launch the MongoDB service by running the following command:
docker-compose up -dDocker Compose checks the configuration and starts the MongoDB container.
➜  pmm-mongodb-setup docker-compose up -d
[+] Running 3/3
 ✔ Volume "pmm-mongodb-setup_mongodb-data"  Created   0.0s
 ✔ Container pmm-mongodb-setup-mongodb-1    Started   0.1s
 ✔ Container pmm-server                     Running   0.0s
➜  pmm-mongodb-setup
Verifying MongoDB in Docker Desktop:
Step Three: PMM Client
At this point, we have both the PMM Server, which is accessible in the browser, and MongoDB running. To transfer metrics from MongoDB to the PMM Server, a container with pmm-client needs to be started.
Add another service pmm-client to the docker-compose.yaml file, right after mongodb. Note that `volumes:`` must remain at the bottom of the file.
  pmm-client:
    image: percona/pmm-client:3
    container_name: pmm-client
    depends_on:
      pmm-server:
        condition: service_healthy
      mongodb:
        condition: service_healthy
    environment:
      PMM_AGENT_SERVER_ADDRESS: pmm-server:8443
      PMM_AGENT_SERVER_USERNAME: admin
      PMM_AGENT_SERVER_PASSWORD: admin
      PMM_AGENT_SERVER_INSECURE_TLS: 1
      PMM_AGENT_CONFIG_FILE: config/pmm-agent.yaml
      PMM_AGENT_SETUP: 1
      PMM_AGENT_SETUP_FORCE: 1
      PMM_AGENT_PRERUN_SCRIPT: >
        pmm-admin status --wait=10s &&
        pmm-admin add mongodb --username=databaseAdmin --password=password --host=mongodb --port=27017 --query-source=profiler
Explanation:
depends_on: Ensures that pmm-client starts only after pmm-server and mongodb have started successfully and passed the healthcheck.PMM_AGENT_PRERUN_SCRIPT: The pmm-admin add mongodb command adds the MongoDB service to PMM for monitoring.PMM_AGENT_SERVER_ADDRESS: Specifies the PMM Server address and uses port 8443.PMM_AGENT_SERVER_USERNAMEandPMM_AGENT_SERVER_PASSWORD: Update these values if you have changed the PMM login credentials.
Applying the Updated Configuration
Run the following command to apply the updated docker-compose.yaml configuration and start the pmm-client service:
docker-compose up -dAfter running the command, you should see the pmm-client container start successfully:
➜ pmm-mongodb-setup docker-compose up -d
[+] Running 3/3
✔ Container pmm-mongodb-setup-mongodb-1 Healthy 0.0s
✔ Container pmm-server Healthy 0.0s
✔ Container pmm-client Started 0.1s
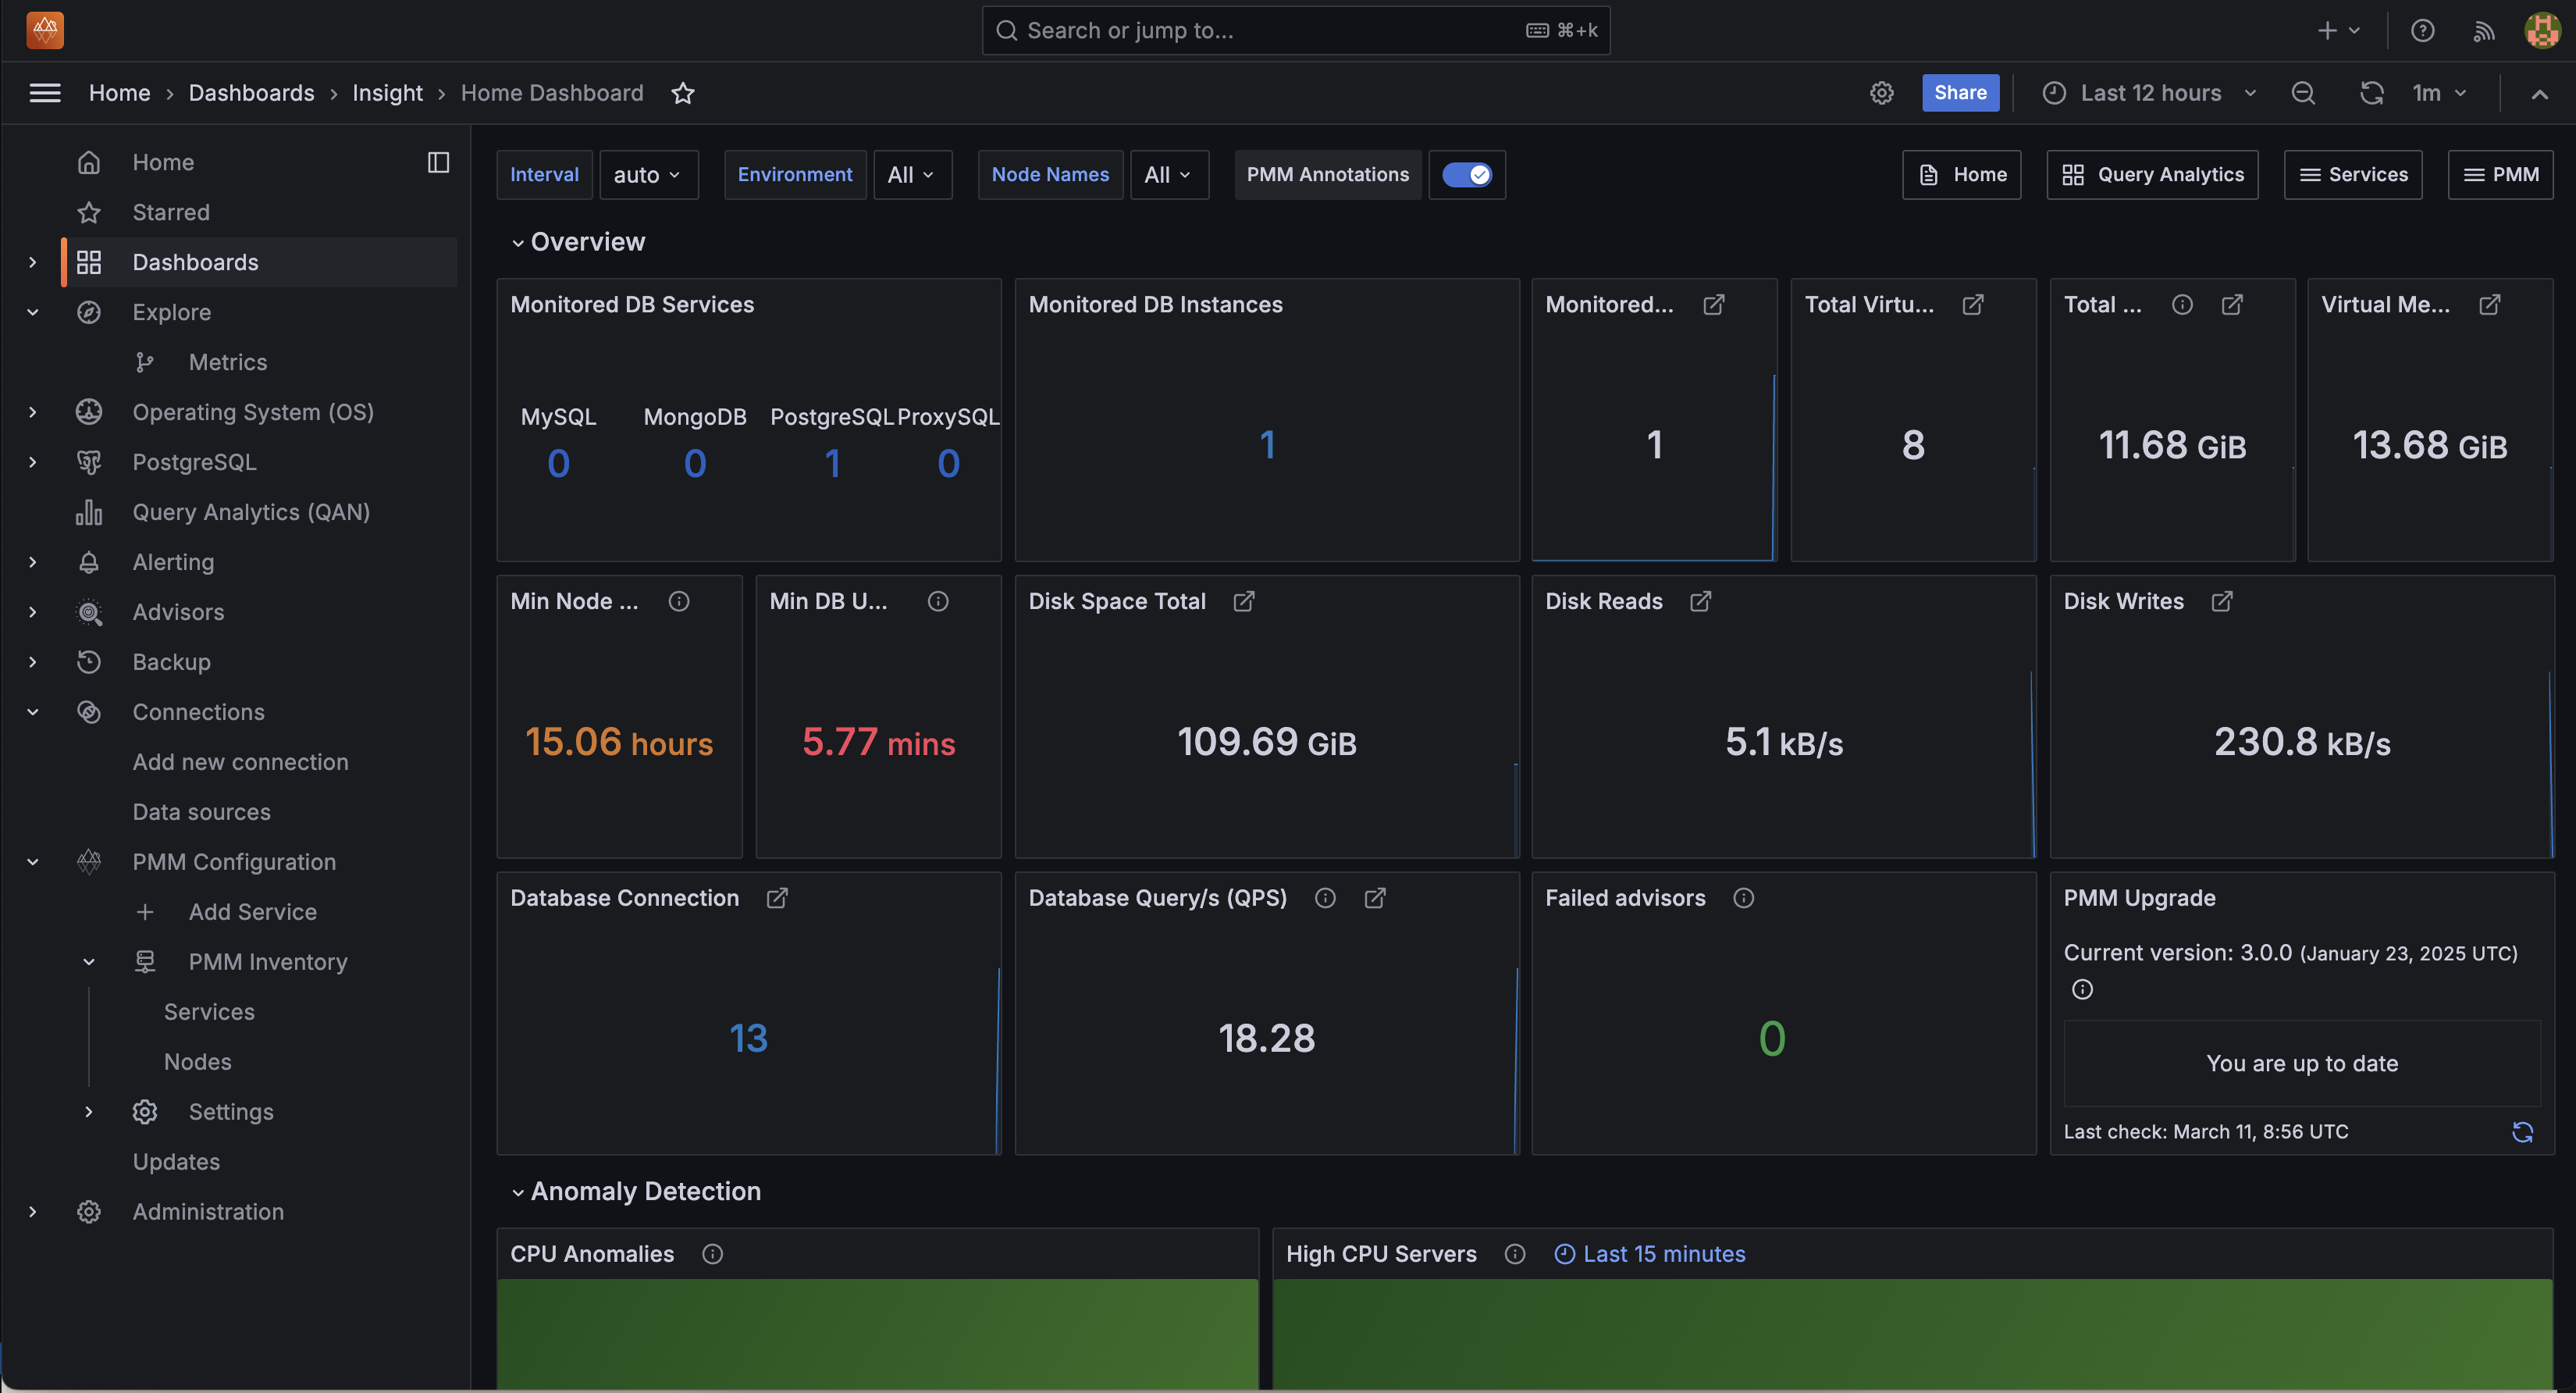
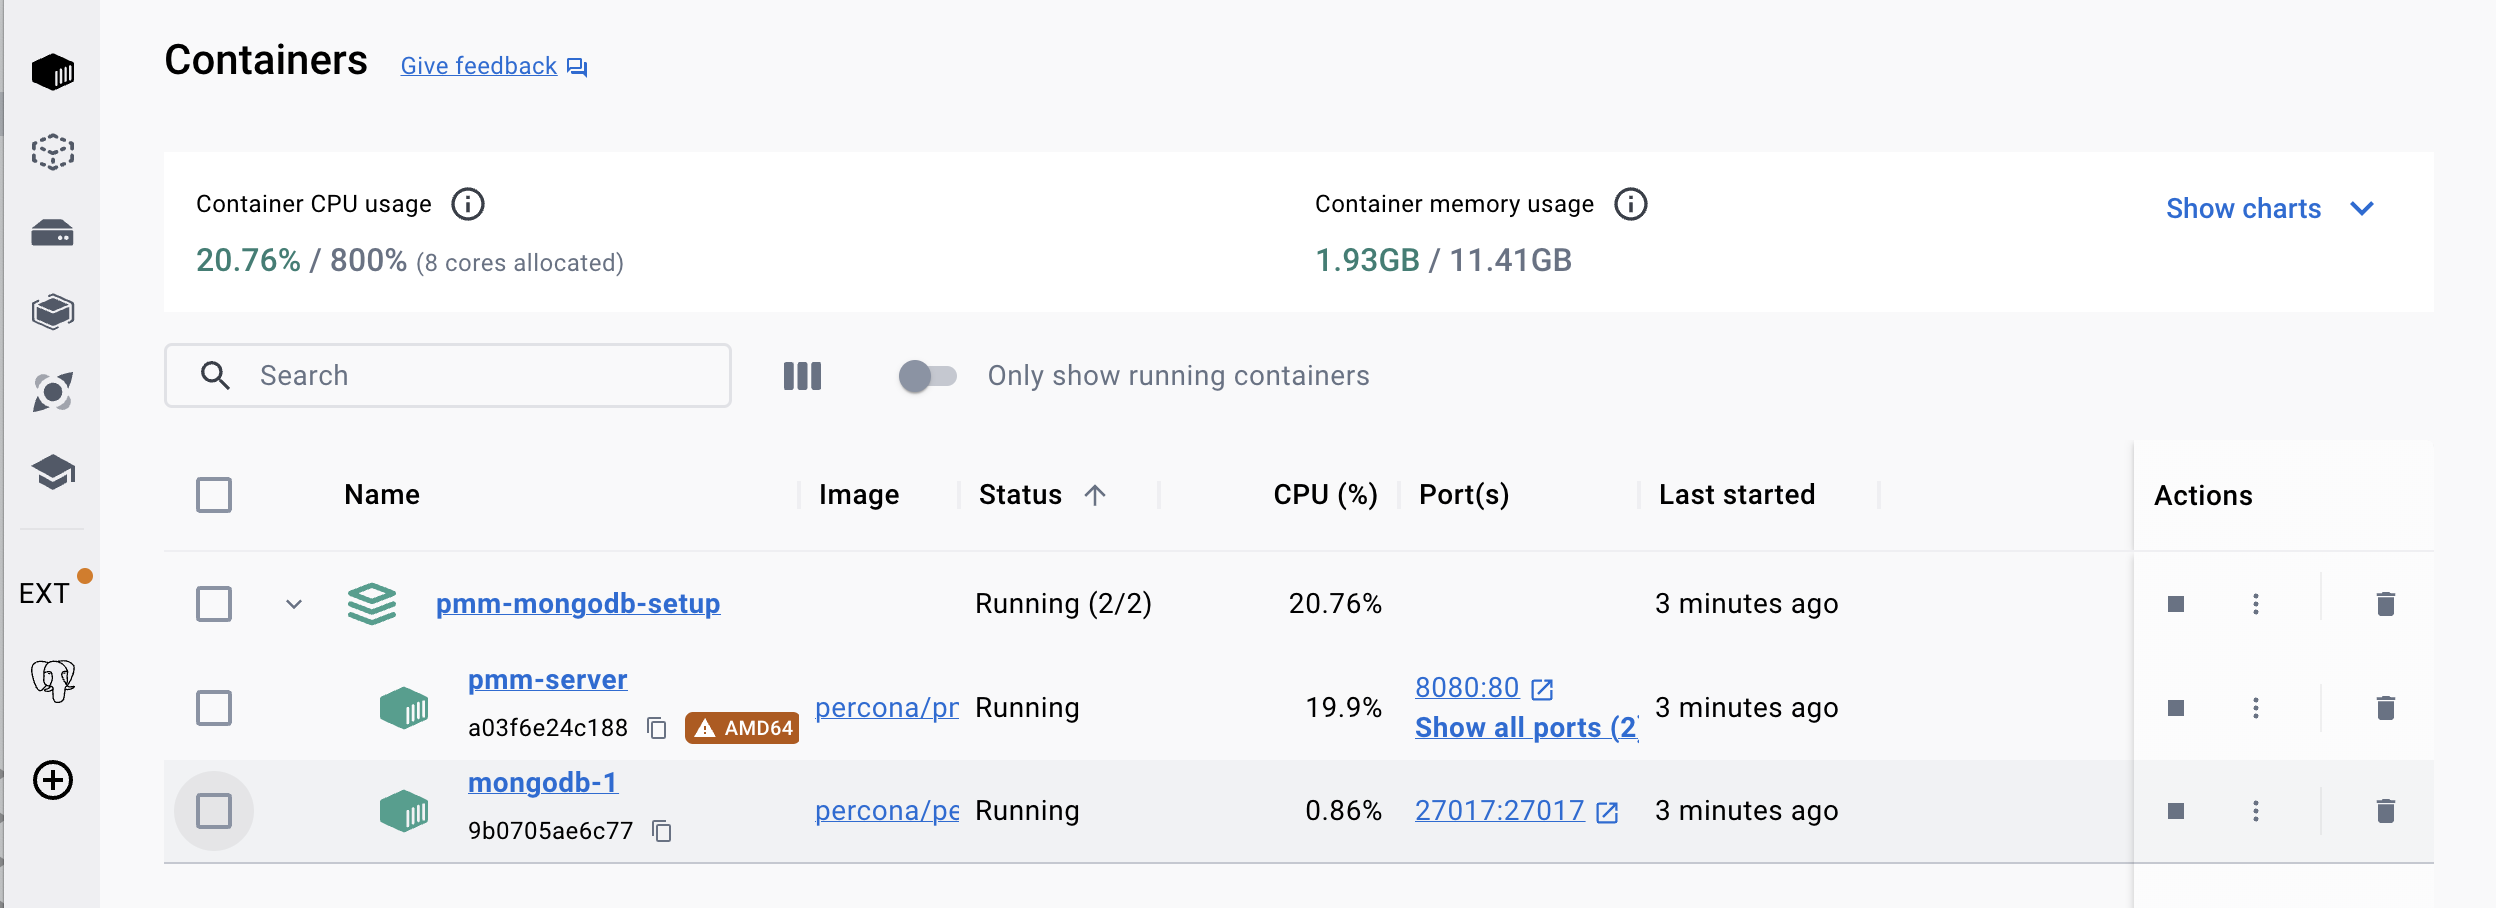
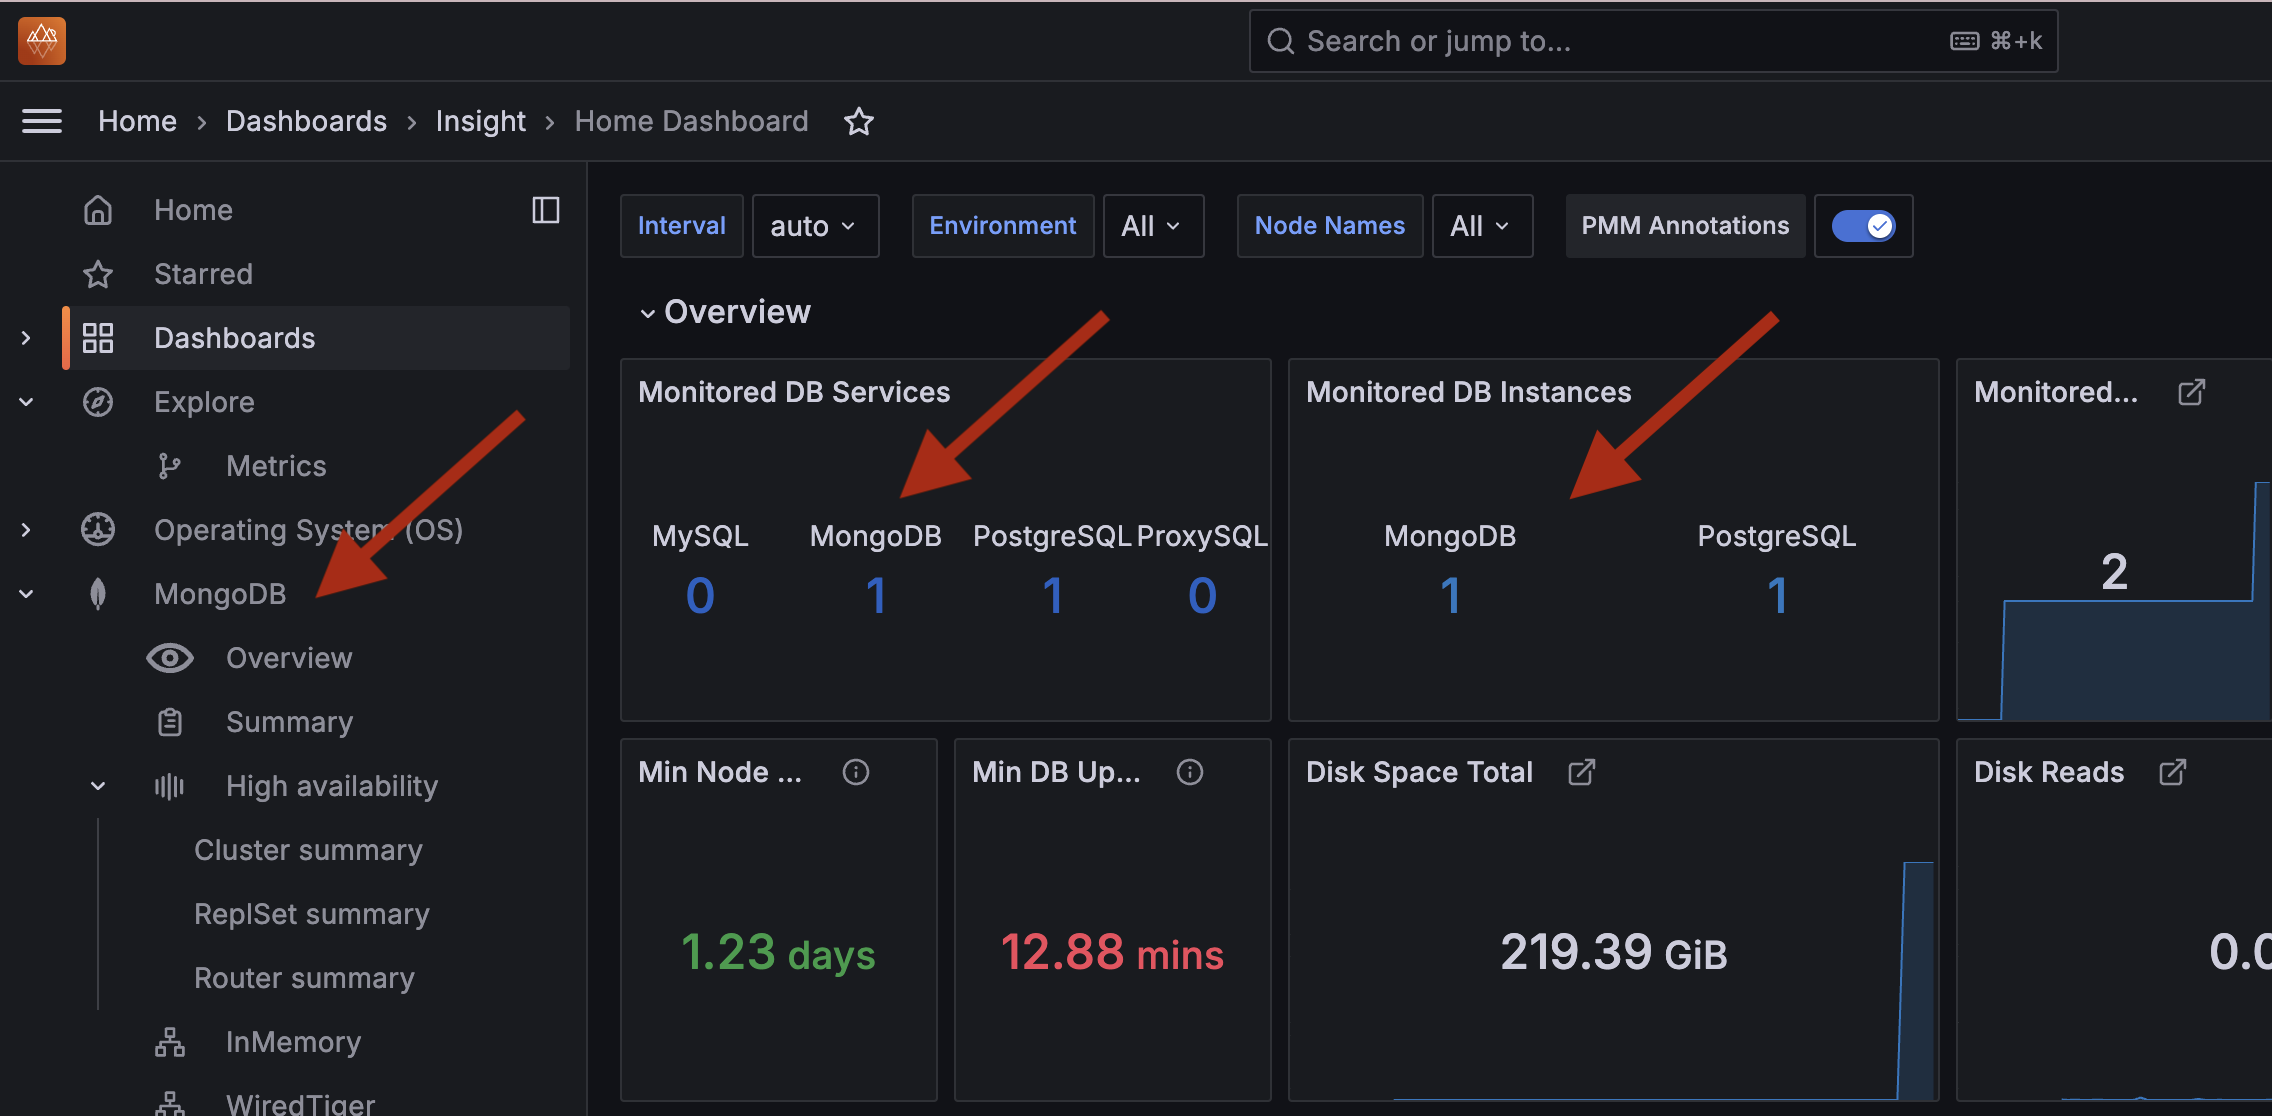
➜ pmm-mongodb-setupOpen PMM in your browser. On the homepage, you should now see MongoDB listed as a monitored service:
Step Four: Convert a Standalone MongoDB to a Replica Set
A single MongoDB instance works well for development and testing. At this point, you can already connect to the database from your application or tools such as MongoDB Compass and run various NoSQL queries.
However, the goal is to deploy a Replica Set consisting of three replicas, which is recommended for production and operational setups. For now, we set up the Replica Set on a single machine with a single docker-compose, which is intended for testing and development purposes only.
Both the mongodb and pmm-client services need to be updated.
Stopping All Services
First, stop all the currently running services:
docker-compose down Result:
➜  pmm-mongodb-setup docker-compose down
[+] Running 4/4
 ✔ Container pmm-client                   Removed    0.3s
 ✔ Container pmm-mongodb-setup-mongodb-1  Removed    0.4s
 ✔ Container pmm-server                   Removed    4.5s
 ✔ Network pmm-mongodb-setup_default      Removed
Generating a Key File
To run three MongoDB replicas that can securely communicate with each other, a key file is required.
Create a secrets folder next to the docker-compose.yaml file and generate the mongodb-keyfile:
mkdir secrets
openssl rand -base64 128 > secrets/mongodb-keyfile
chmod 600 secrets/mongodb-keyfile
In this case, the mongodb-keyfile will be generated inside the secrets folder. If your operating system does not support these commands, manually create the secrets folder and add a mongodb-keyfile with the following content:
rVLhIK2PhZKGxysjwMR4t1OmNppqdAzEs408hrbzg95D146mn9YENixId6pvIGCA
Cy9hc1k6OKKabbv7Rm347NwSFxbdPPx0/jnaO80U/a6/mv0XqSmEl8wdR91b4jIm
d98LobplwRs4b7g9cnLMUAIULr0WG+J36NtKIA6q4eE=
Add three mongodb services for Replica Set
Remove the existing mongodb service from the docker-compose.yaml file and replace it with three Replica Set services:
  mongodb-rs101:
    image: percona/percona-server-mongodb:8.0-multi
    container_name: mongodb-rs101
    ports:
      - "27017:27017"
    command: ["mongod", "--port", "27017", "--replSet", "rs", "--keyFile", "/etc/secrets/mongodb-keyfile", "--bind_ip_all", "--profile", "2", "--slowms", "200", "--rateLimit", "100"]
    environment:
      MONGO_INITDB_ROOT_USERNAME: databaseAdmin
      MONGO_INITDB_ROOT_PASSWORD: password
    volumes:
      - mongodb-data-101:/data/db
      - ./secrets:/etc/secrets:ro
    healthcheck:
      test: ["CMD-SHELL", "mongosh --host localhost --port 27017 --username databaseAdmin --password password --authenticationDatabase admin --eval 'rs.status().ok || 1'"]
      interval: 30s
      timeout: 10s
      retries: 5

  mongodb-rs102:
    image: percona/percona-server-mongodb:8.0-multi
    container_name: mongodb-rs102
    ports:
      - "28017:28017"
    command: ["mongod", "--port", "28017", "--replSet", "rs", "--keyFile", "/etc/secrets/mongodb-keyfile", "--bind_ip_all", "--profile", "2", "--slowms", "200", "--rateLimit", "100"]
    environment:
      MONGO_INITDB_ROOT_USERNAME: databaseAdmin
      MONGO_INITDB_ROOT_PASSWORD: password
    volumes:
      - mongodb-data-102:/data/db
      - ./secrets:/etc/secrets:ro
    healthcheck:
      test: ["CMD-SHELL", "mongosh --host localhost --port 28017 --username databaseAdmin --password password --authenticationDatabase admin --eval 'rs.status().ok || 1'"]
      interval: 30s
      timeout: 10s
      retries: 5

  mongodb-rs103:
    image: percona/percona-server-mongodb:8.0-multi
    container_name: mongodb-rs103
    ports:
      - "29017:29017"
    command: ["mongod", "--port", "29017", "--replSet", "rs", "--keyFile", "/etc/secrets/mongodb-keyfile", "--bind_ip_all", "--profile", "2", "--slowms", "200", "--rateLimit", "100"]
    environment:
      MONGO_INITDB_ROOT_USERNAME: databaseAdmin
      MONGO_INITDB_ROOT_PASSWORD: password
    volumes:
      - mongodb-data-103:/data/db
      - ./secrets:/etc/secrets:ro
    healthcheck:
      test: ["CMD-SHELL", "mongosh --host localhost --port 29017 --username databaseAdmin --password password --authenticationDatabase admin --eval 'rs.status().ok || 1'"]
      interval: 30s
      timeout: 10s
      retries: 5
Key Points:
./secrets:/etc/secrets:ro:Mounts the key file from your disk into the container.
ports:: Each replica runs on a separate port since they are hosted on the same machine.
command::
--keyFile: Enables replication and uses the key file for secure communication between replicas.
--replSet: Defines a Replica set parameter named rs.
healthcheck:: Ensures that pmm-client starts only after the Replica Set is initialized.
Adding Volumes
Define three separate volumes for data storage:
volumes:
  mongodb-data-101:
  mongodb-data-102:
  mongodb-data-103:
Initializing the Replica Set
Add another service to initialize the Replica Set (after mongodb-rs103):
  mongodb-rs-init:
    image: percona/percona-server-mongodb:8.0-multi
    container_name: rs-init
    depends_on:
      - mongodb-rs101
      - mongodb-rs102
      - mongodb-rs103
    entrypoint: [
      "sh", "-c",
      "until mongosh --host mongodb-rs101 --port 27017 --username databaseAdmin --password password --authenticationDatabase admin --eval 'print(\"waited for connection\")'; do sleep 5; done && \
      mongosh --host mongodb-rs101 --port 27017 --username databaseAdmin --password password --authenticationDatabase admin --eval 'config={\"_id\":\"rs\",\"members\":[{\"_id\":0,\"host\":\"mongodb-rs101:27017\"},{\"_id\":1,\"host\":\"mongodb-rs102:28017\"},{\"_id\":2,\"host\":\"mongodb-rs103:29017\"}],\"settings\":{\"keyFile\":\"/etc/secrets/mongodb-keyfile\"}};rs.initiate(config);'"
    ]
    volumes:
      - ./secrets:/etc/secrets:ro
This service connects to one of the replicas and initializes the Replica Set configuration.
Updating pmm-client
Finally, modify the pmm-client service to register all three Replica Set nodes:
  pmm-client:
    image: percona/pmm-client:3
    container_name: pmm-client
    depends_on:
      pmm-server:
        condition: service_healthy
      mongodb-rs101:
        condition: service_healthy
      mongodb-rs102:
        condition: service_healthy
      mongodb-rs103:
        condition: service_healthy
    environment:
      PMM_AGENT_SERVER_ADDRESS: pmm-server:8443
      PMM_AGENT_SERVER_USERNAME: admin
      PMM_AGENT_SERVER_PASSWORD: admin
      PMM_AGENT_SERVER_INSECURE_TLS: 1
      PMM_AGENT_CONFIG_FILE: config/pmm-agent.yaml
      PMM_AGENT_SETUP: 1
      PMM_AGENT_SETUP_FORCE: 1
      PMM_AGENT_PRERUN_SCRIPT: >
        pmm-admin status --wait=10s &&
        pmm-admin add mongodb --service-name=mongodb-rs101 --username=databaseAdmin --password=password --host=mongodb-rs101 --port=27017 --query-source=profiler &&
        pmm-admin add mongodb --service-name=mongodb-rs102 --username=databaseAdmin --password=password --host=mongodb-rs102 --port=28017 --query-source=profiler &&
        pmm-admin add mongodb --service-name=mongodb-rs103 --username=databaseAdmin --password=password --host=mongodb-rs103 --port=29017 --query-source=profiler
Explanation:
depends_on: Ensures pmm-client waits until all replicas and pmm-server are initialized.
PMM_AGENT_PRERUN_SCRIPT: Adds all three replicas to PMM monitoring with the pmm-admin add mongodb command.
Launching the Configuration
Start all services with:
docker-compose up -d Expected Output:
➜ pmm-mongodb-setup docker-compose up -d
[+] Running 10/10
✔ Network pmm-mongodb-setup_default Created 0.0s
✔ Volume "pmm-mongodb-setup_mongodb-data-101" Created 0.0s
✔ Volume "pmm-mongodb-setup_mongodb-data-102" Created 0.0s
✔ Volume "pmm-mongodb-setup_mongodb-data-103" Created 0.0s
✔ Container mongodb-rs103 Healthy 0.1s
✔ Container pmm-server Healthy 1.1s
✔ Container mongodb-rs101 Healthy 0.1s
✔ Container mongodb-rs102 Healthy 0.1s
✔ Container rs-init Started 0.1s
✔ Container pmm-client Started 0.0s
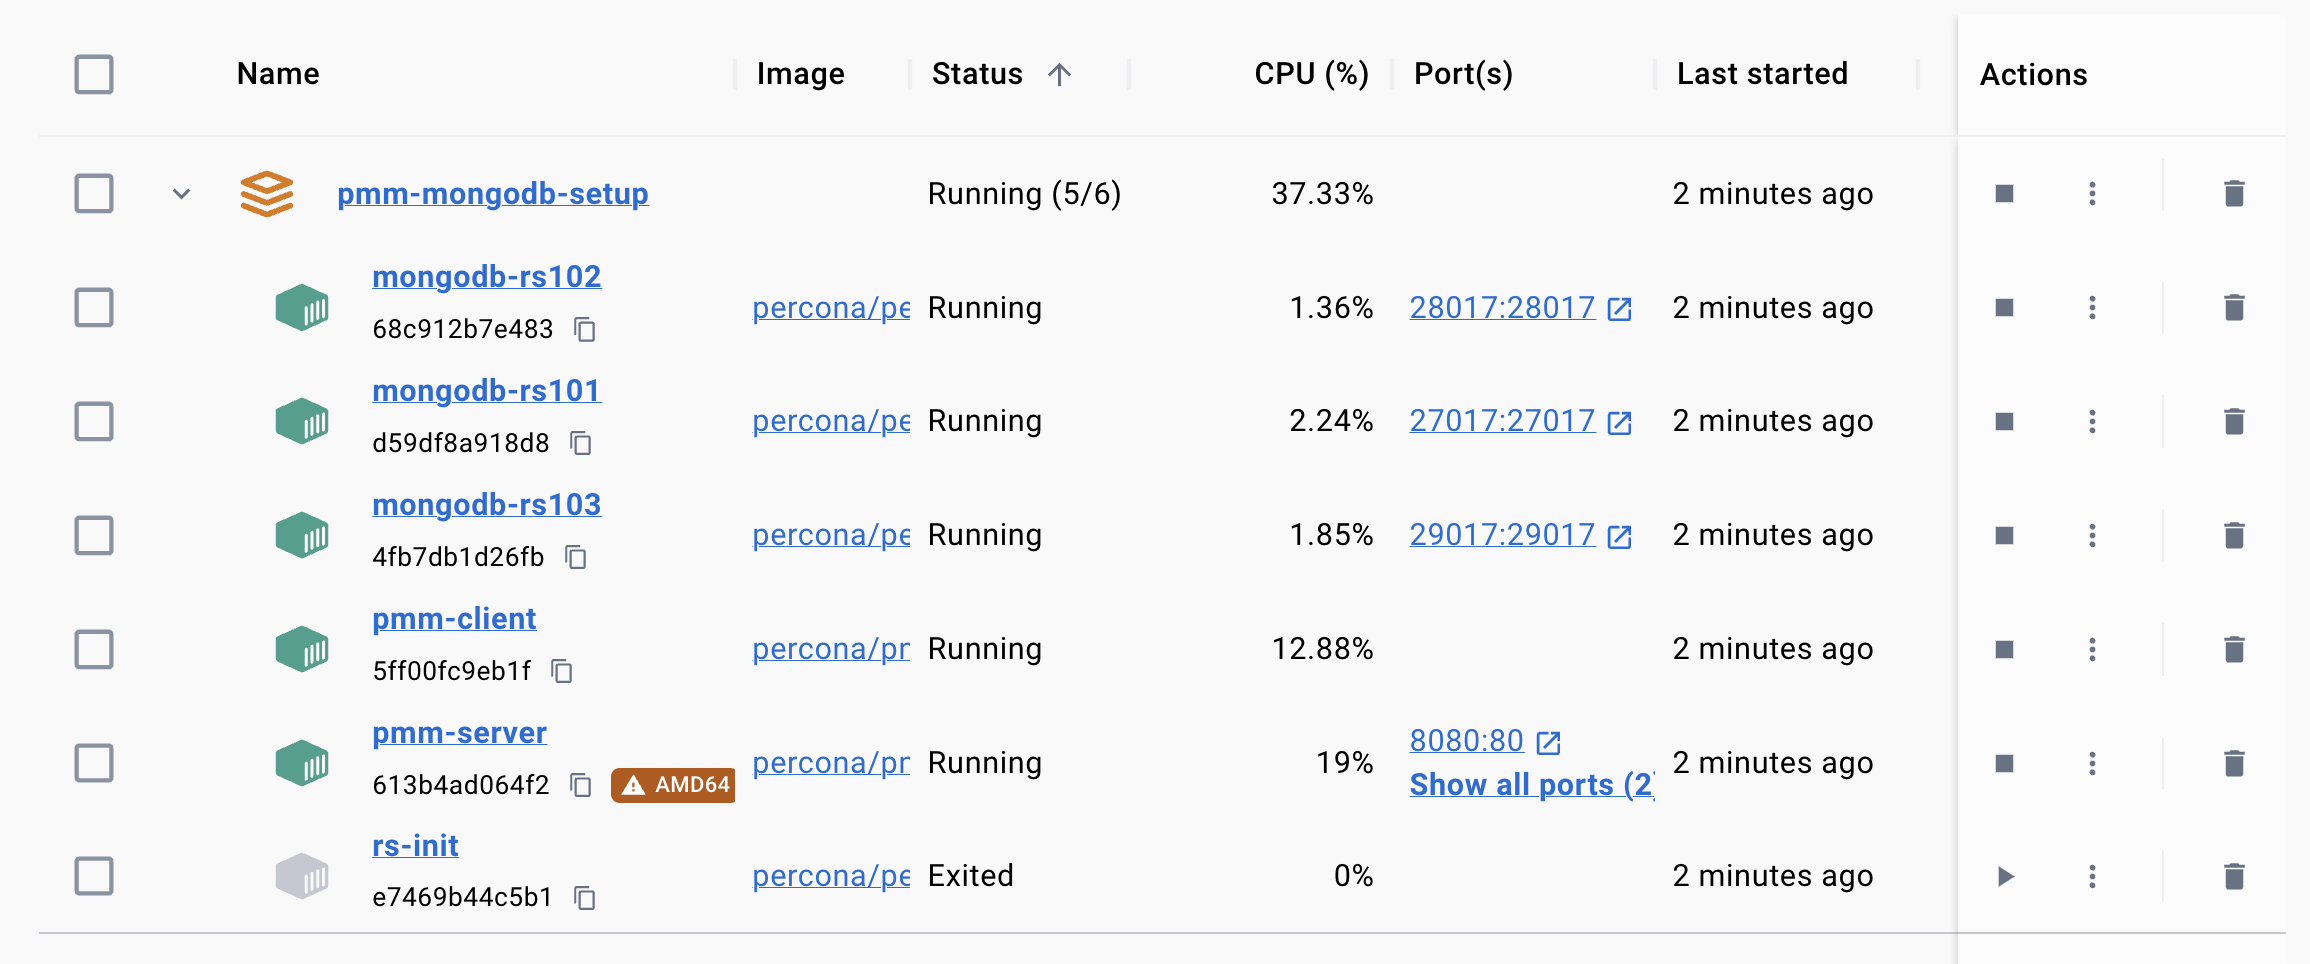
➜ pmm-mongodb-setupExpected Output in Docker Desktop:
Verifying in PMM
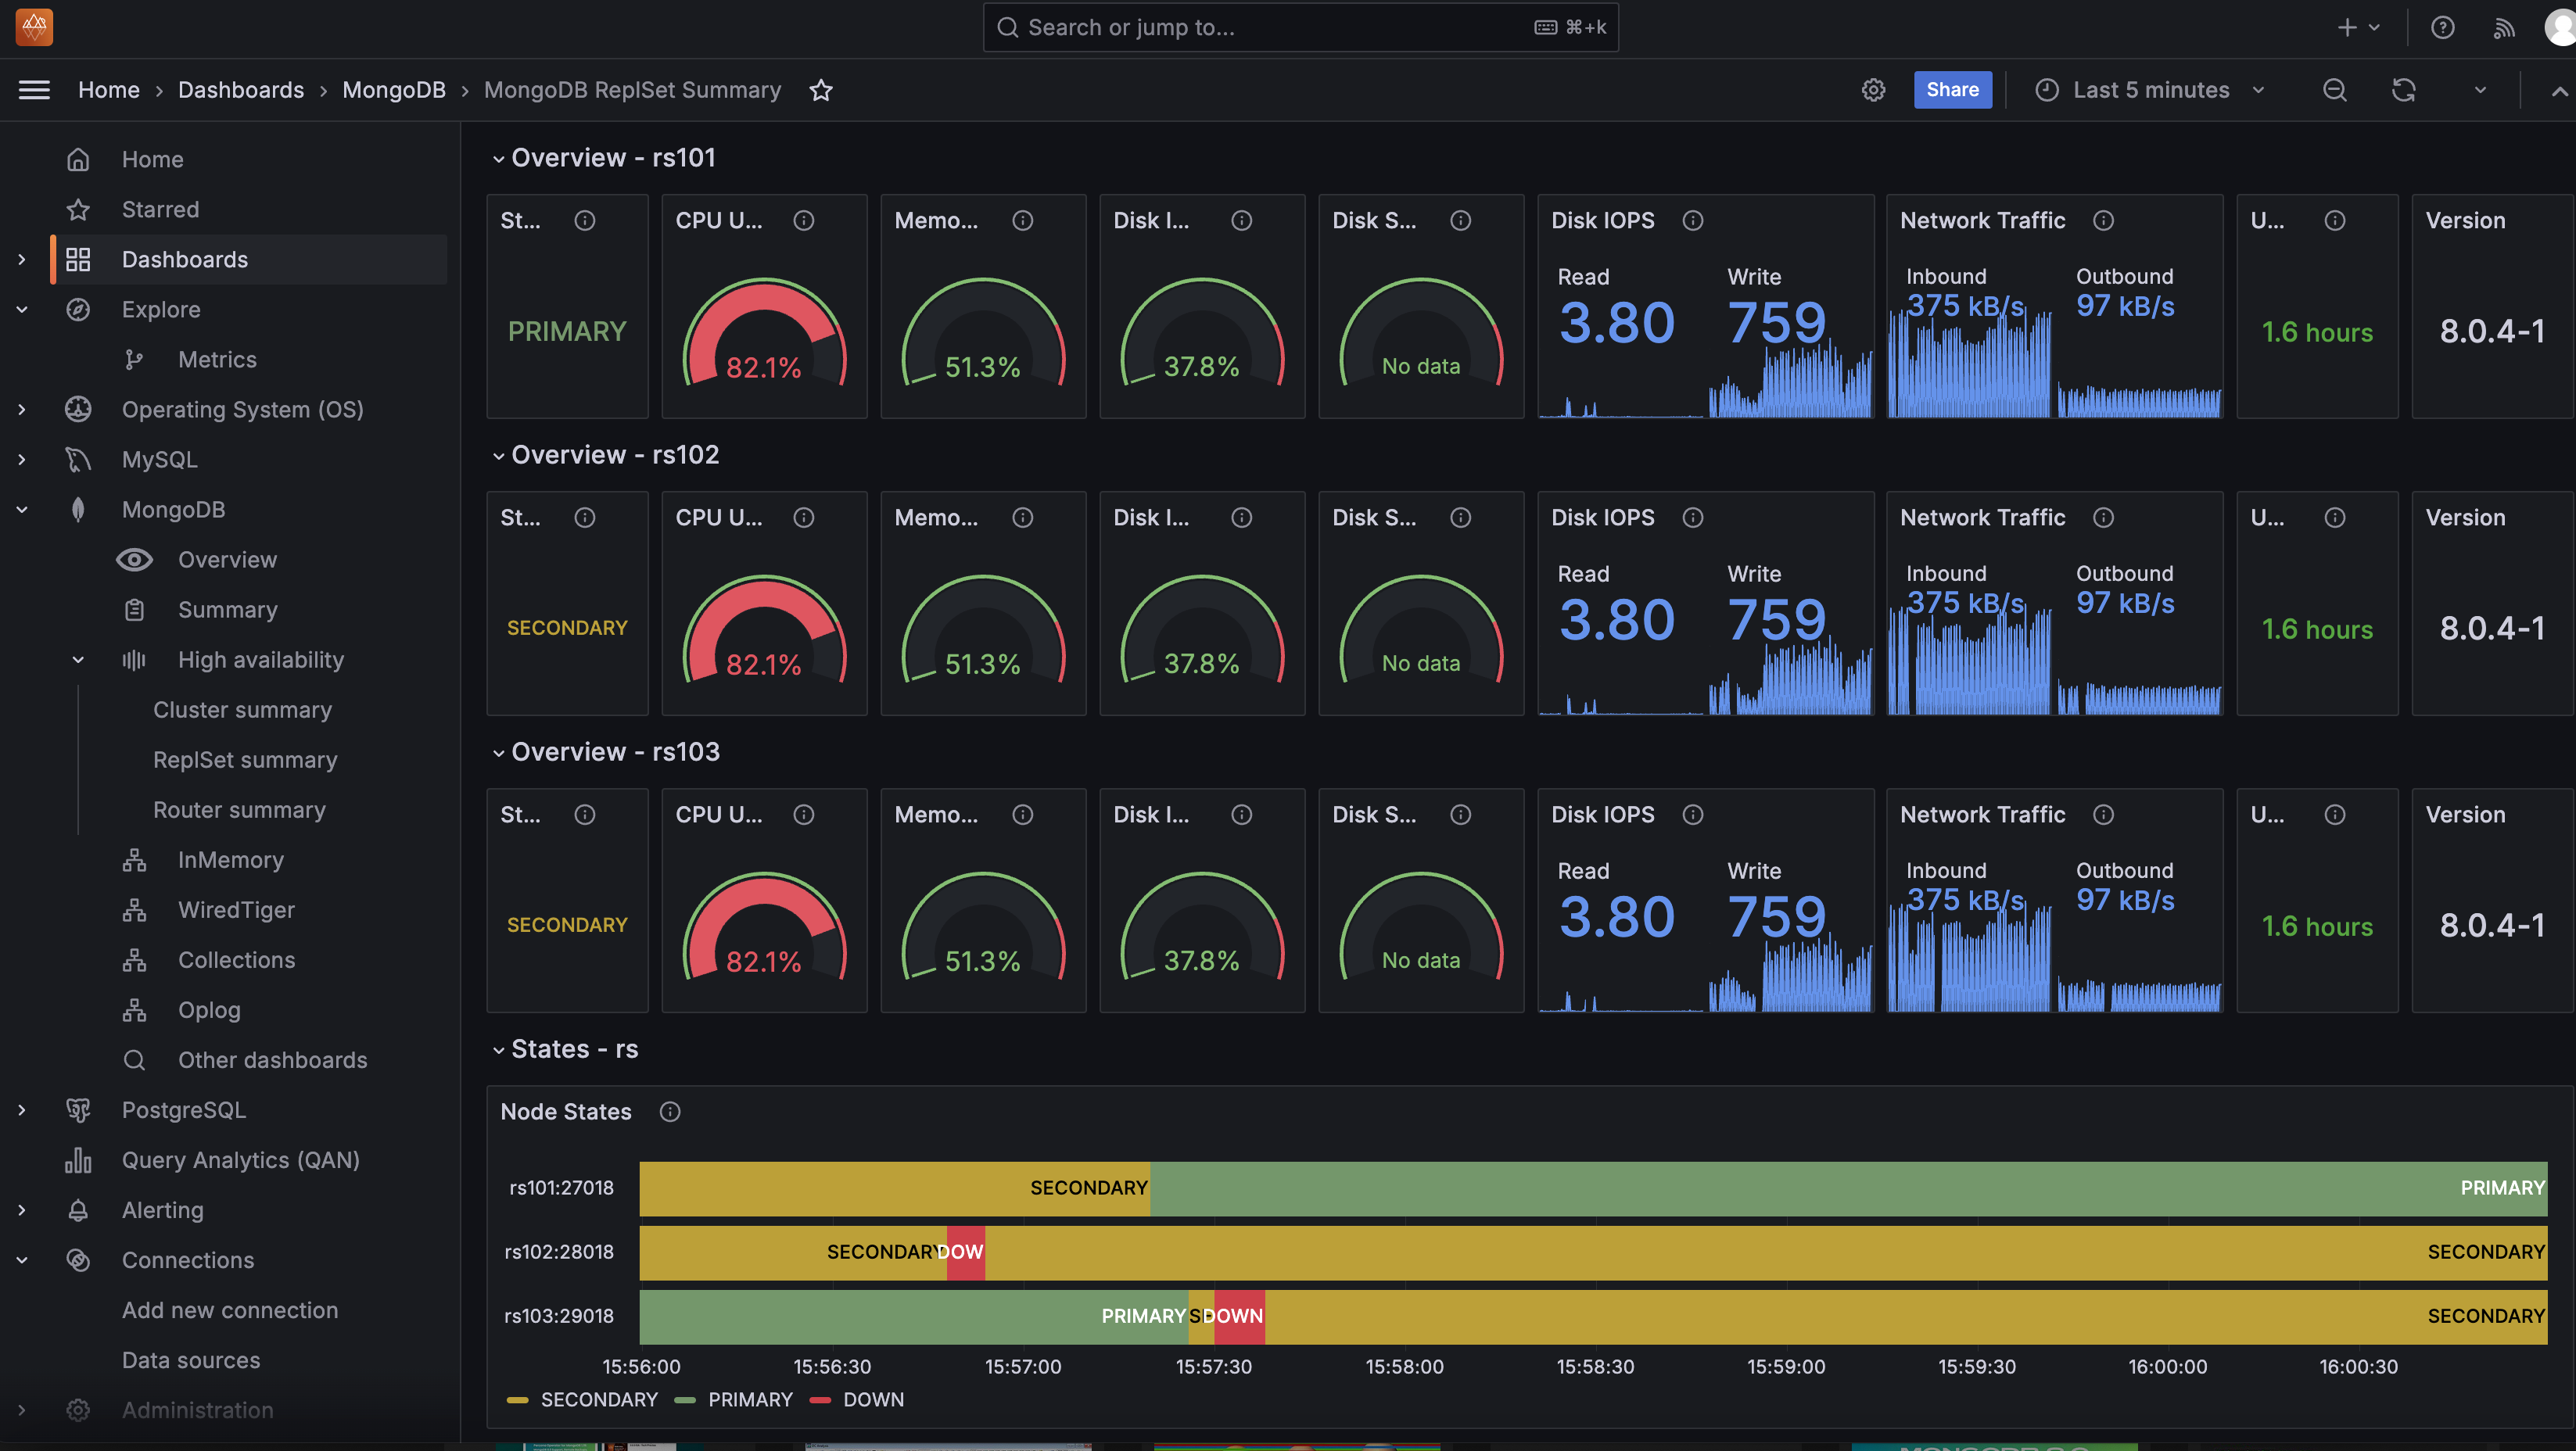
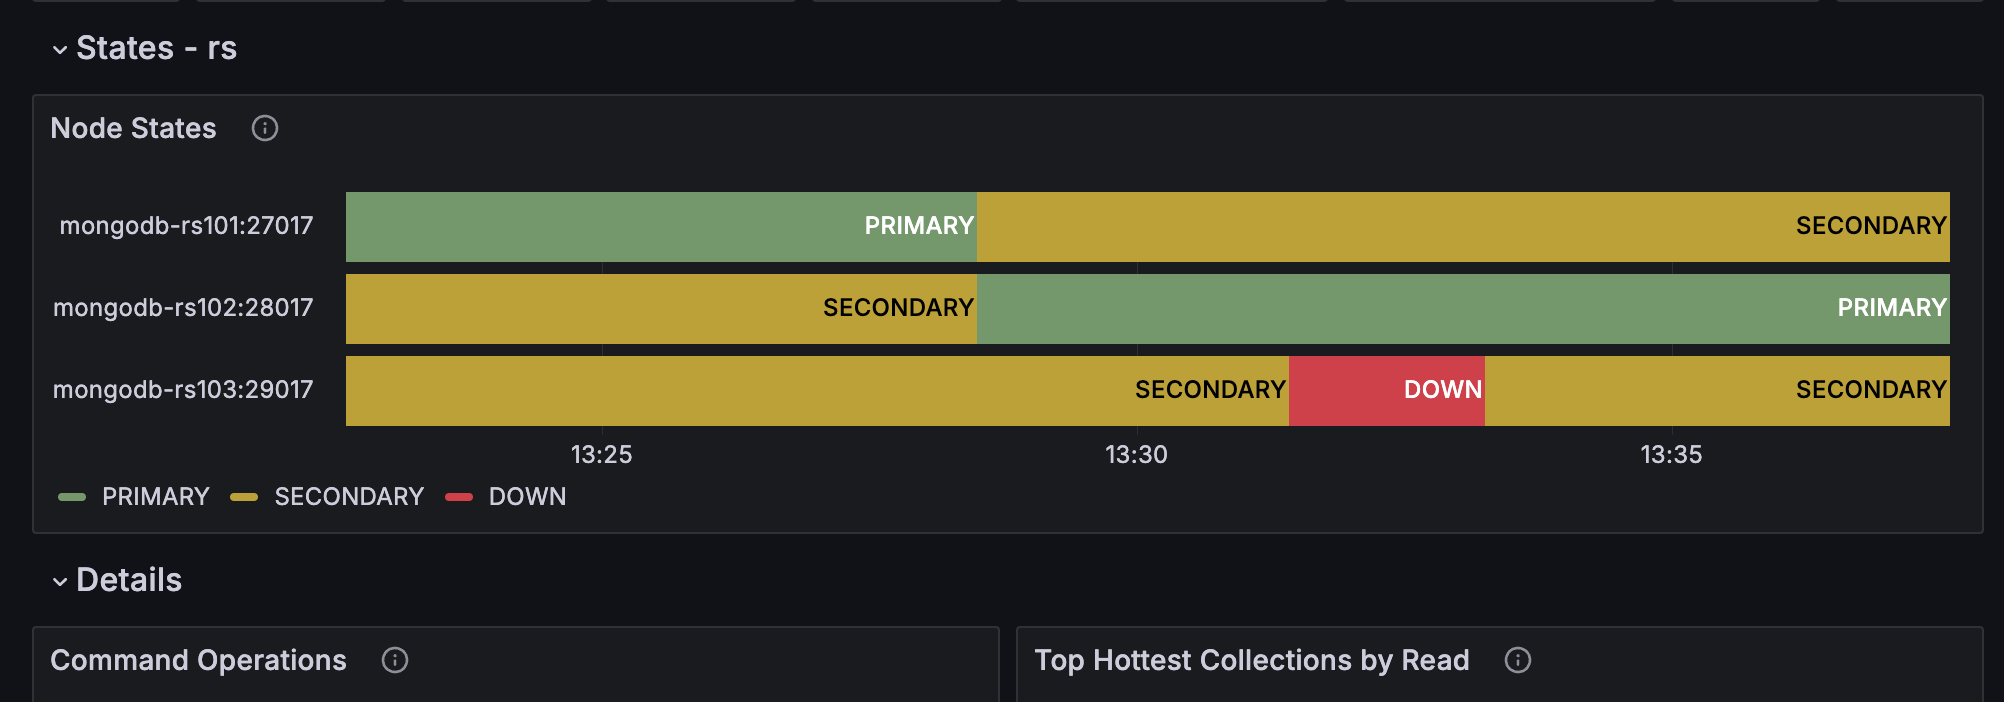
Open PMM and explore dashboards such as the MongoDB Replica Set Summary, which displays information about your replicas and various metrics:
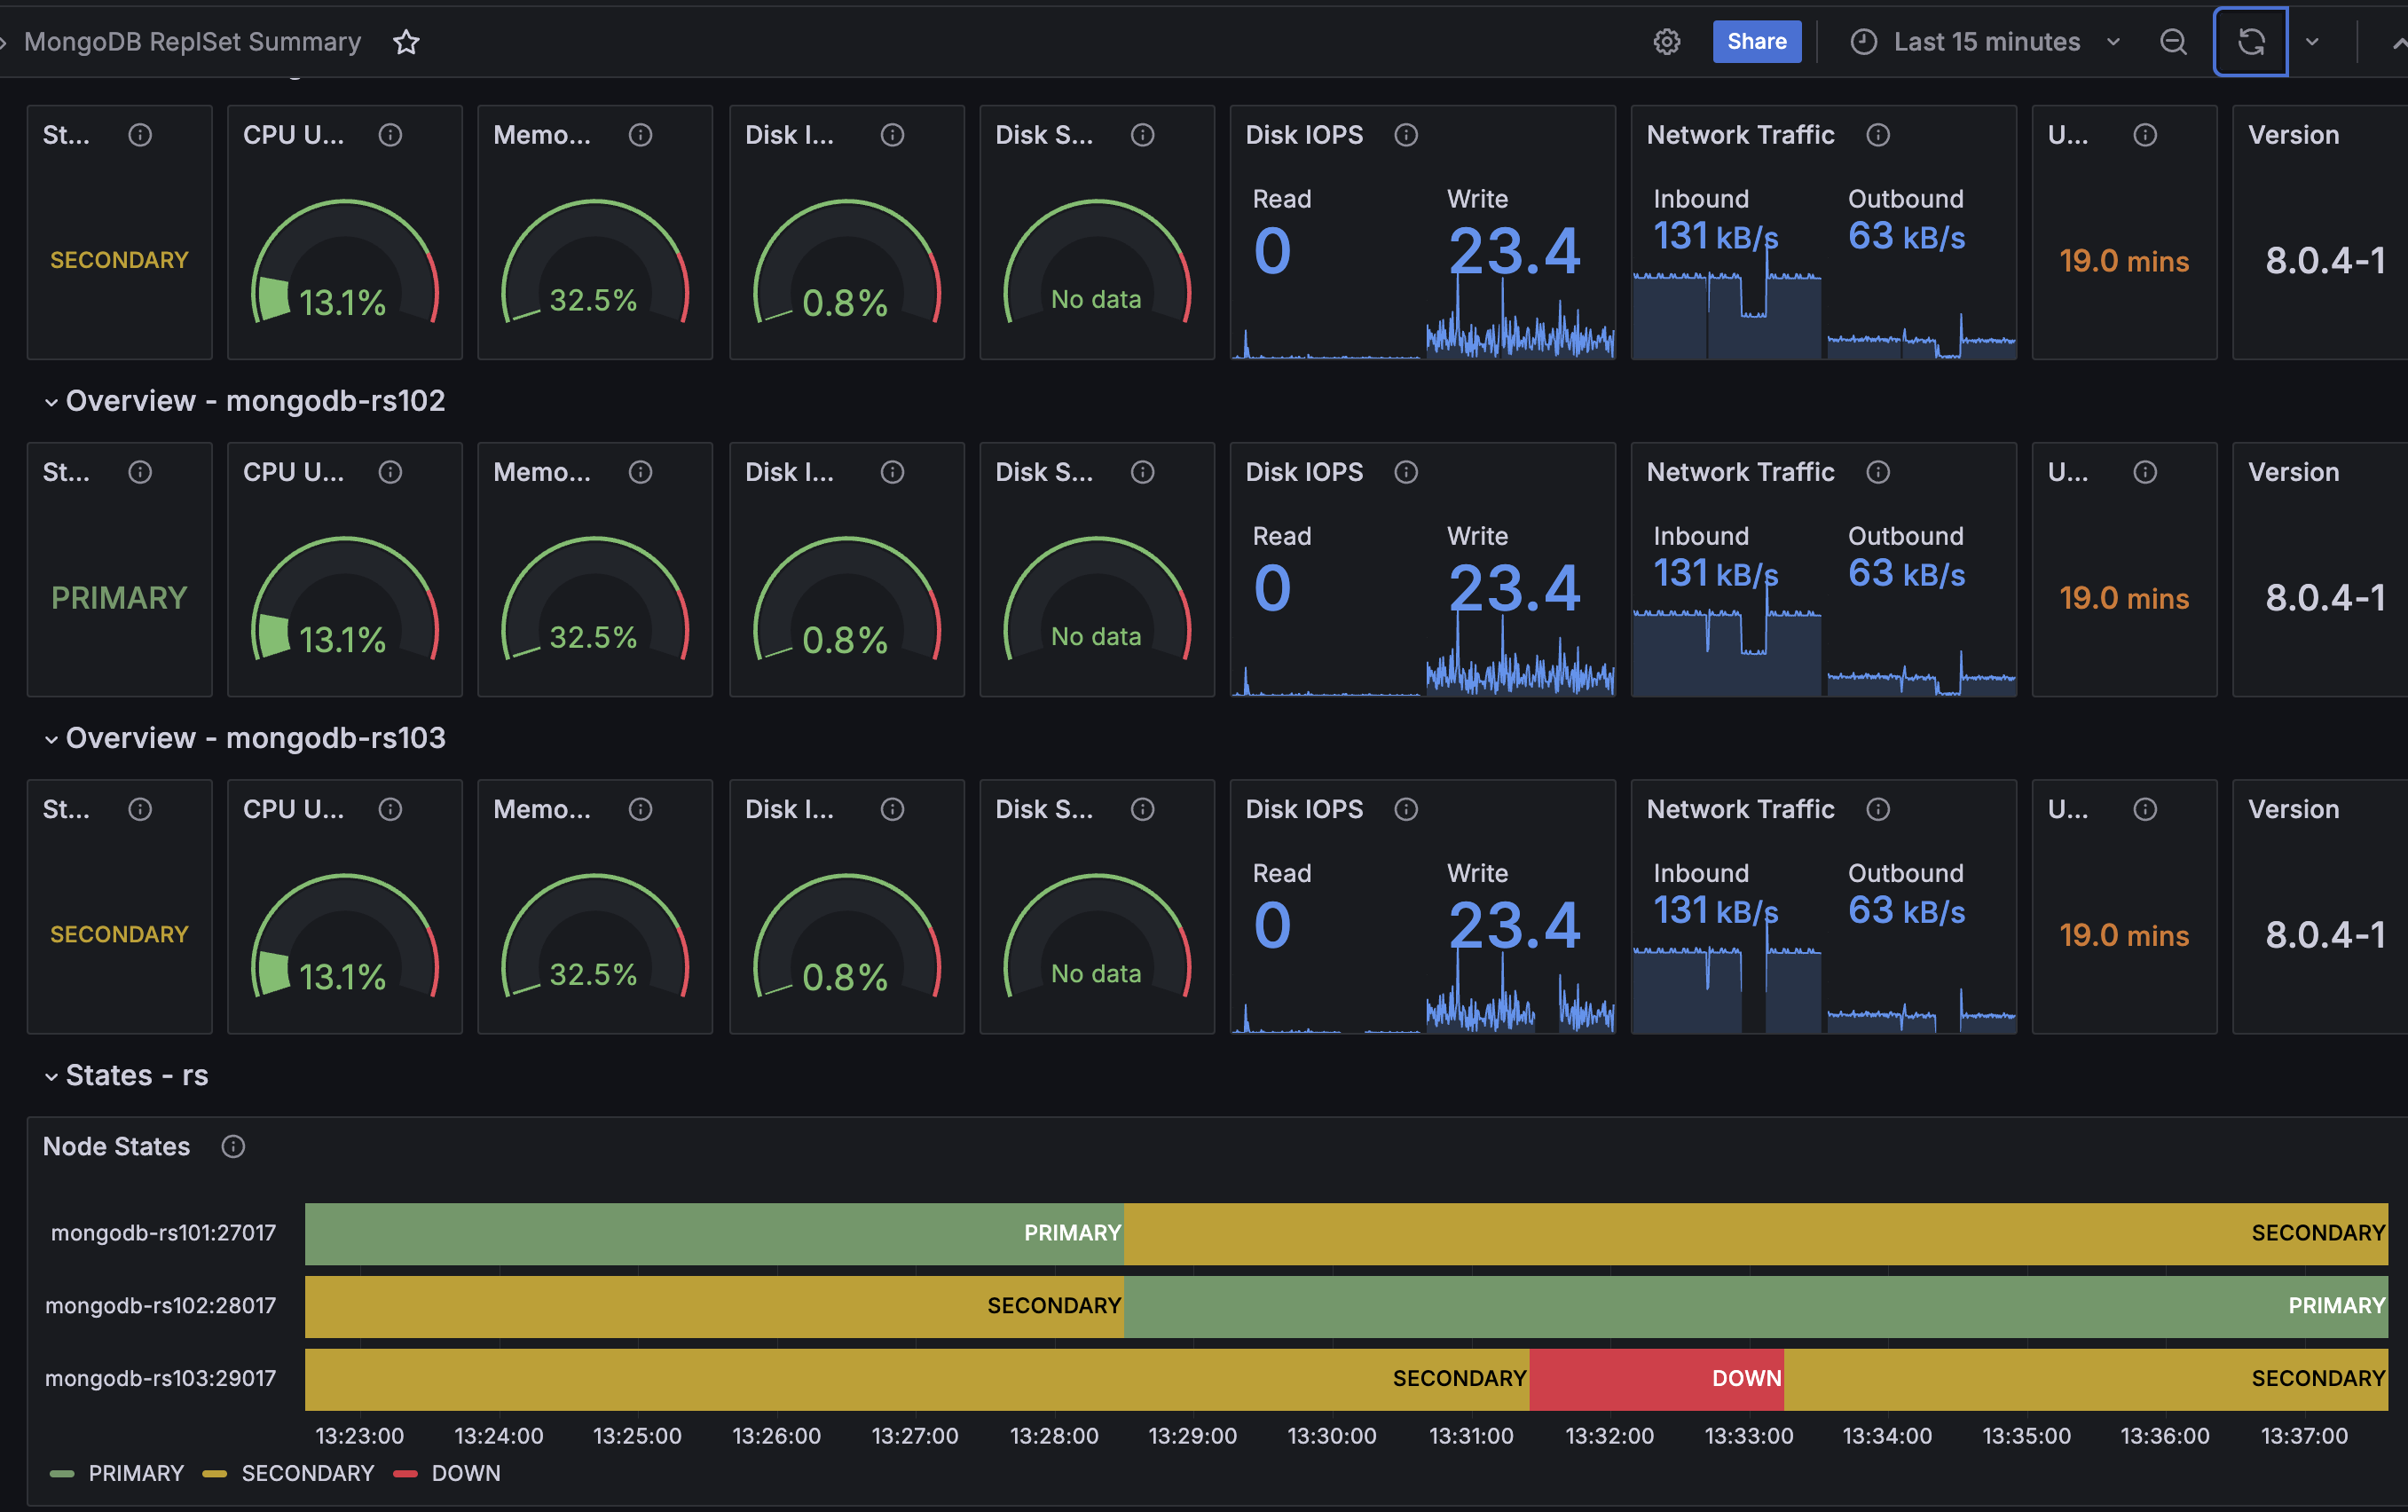
For example, I experimented by restarting one of the MongoDB services in Docker Desktop. The Replica Set switched the Primary replica, and when I simulated a failure by stopping a service, the monitoring dashboard reflected this event:
Connecting to MongoDB and Useful Commands
Connecting to MongoDB
There are several ways to connect to MongoDB depending on your setup and tools:
Using Docker Desktop
If you are using Docker Desktop, you can select a container and open the Exec tab. This opens a terminal within the container.
From there, you can connect to MongoDB using the mongosh shell with the following command:
shmongosh --host localhost --port 27017 -u databaseAdmin -p password --authenticationDatabase admin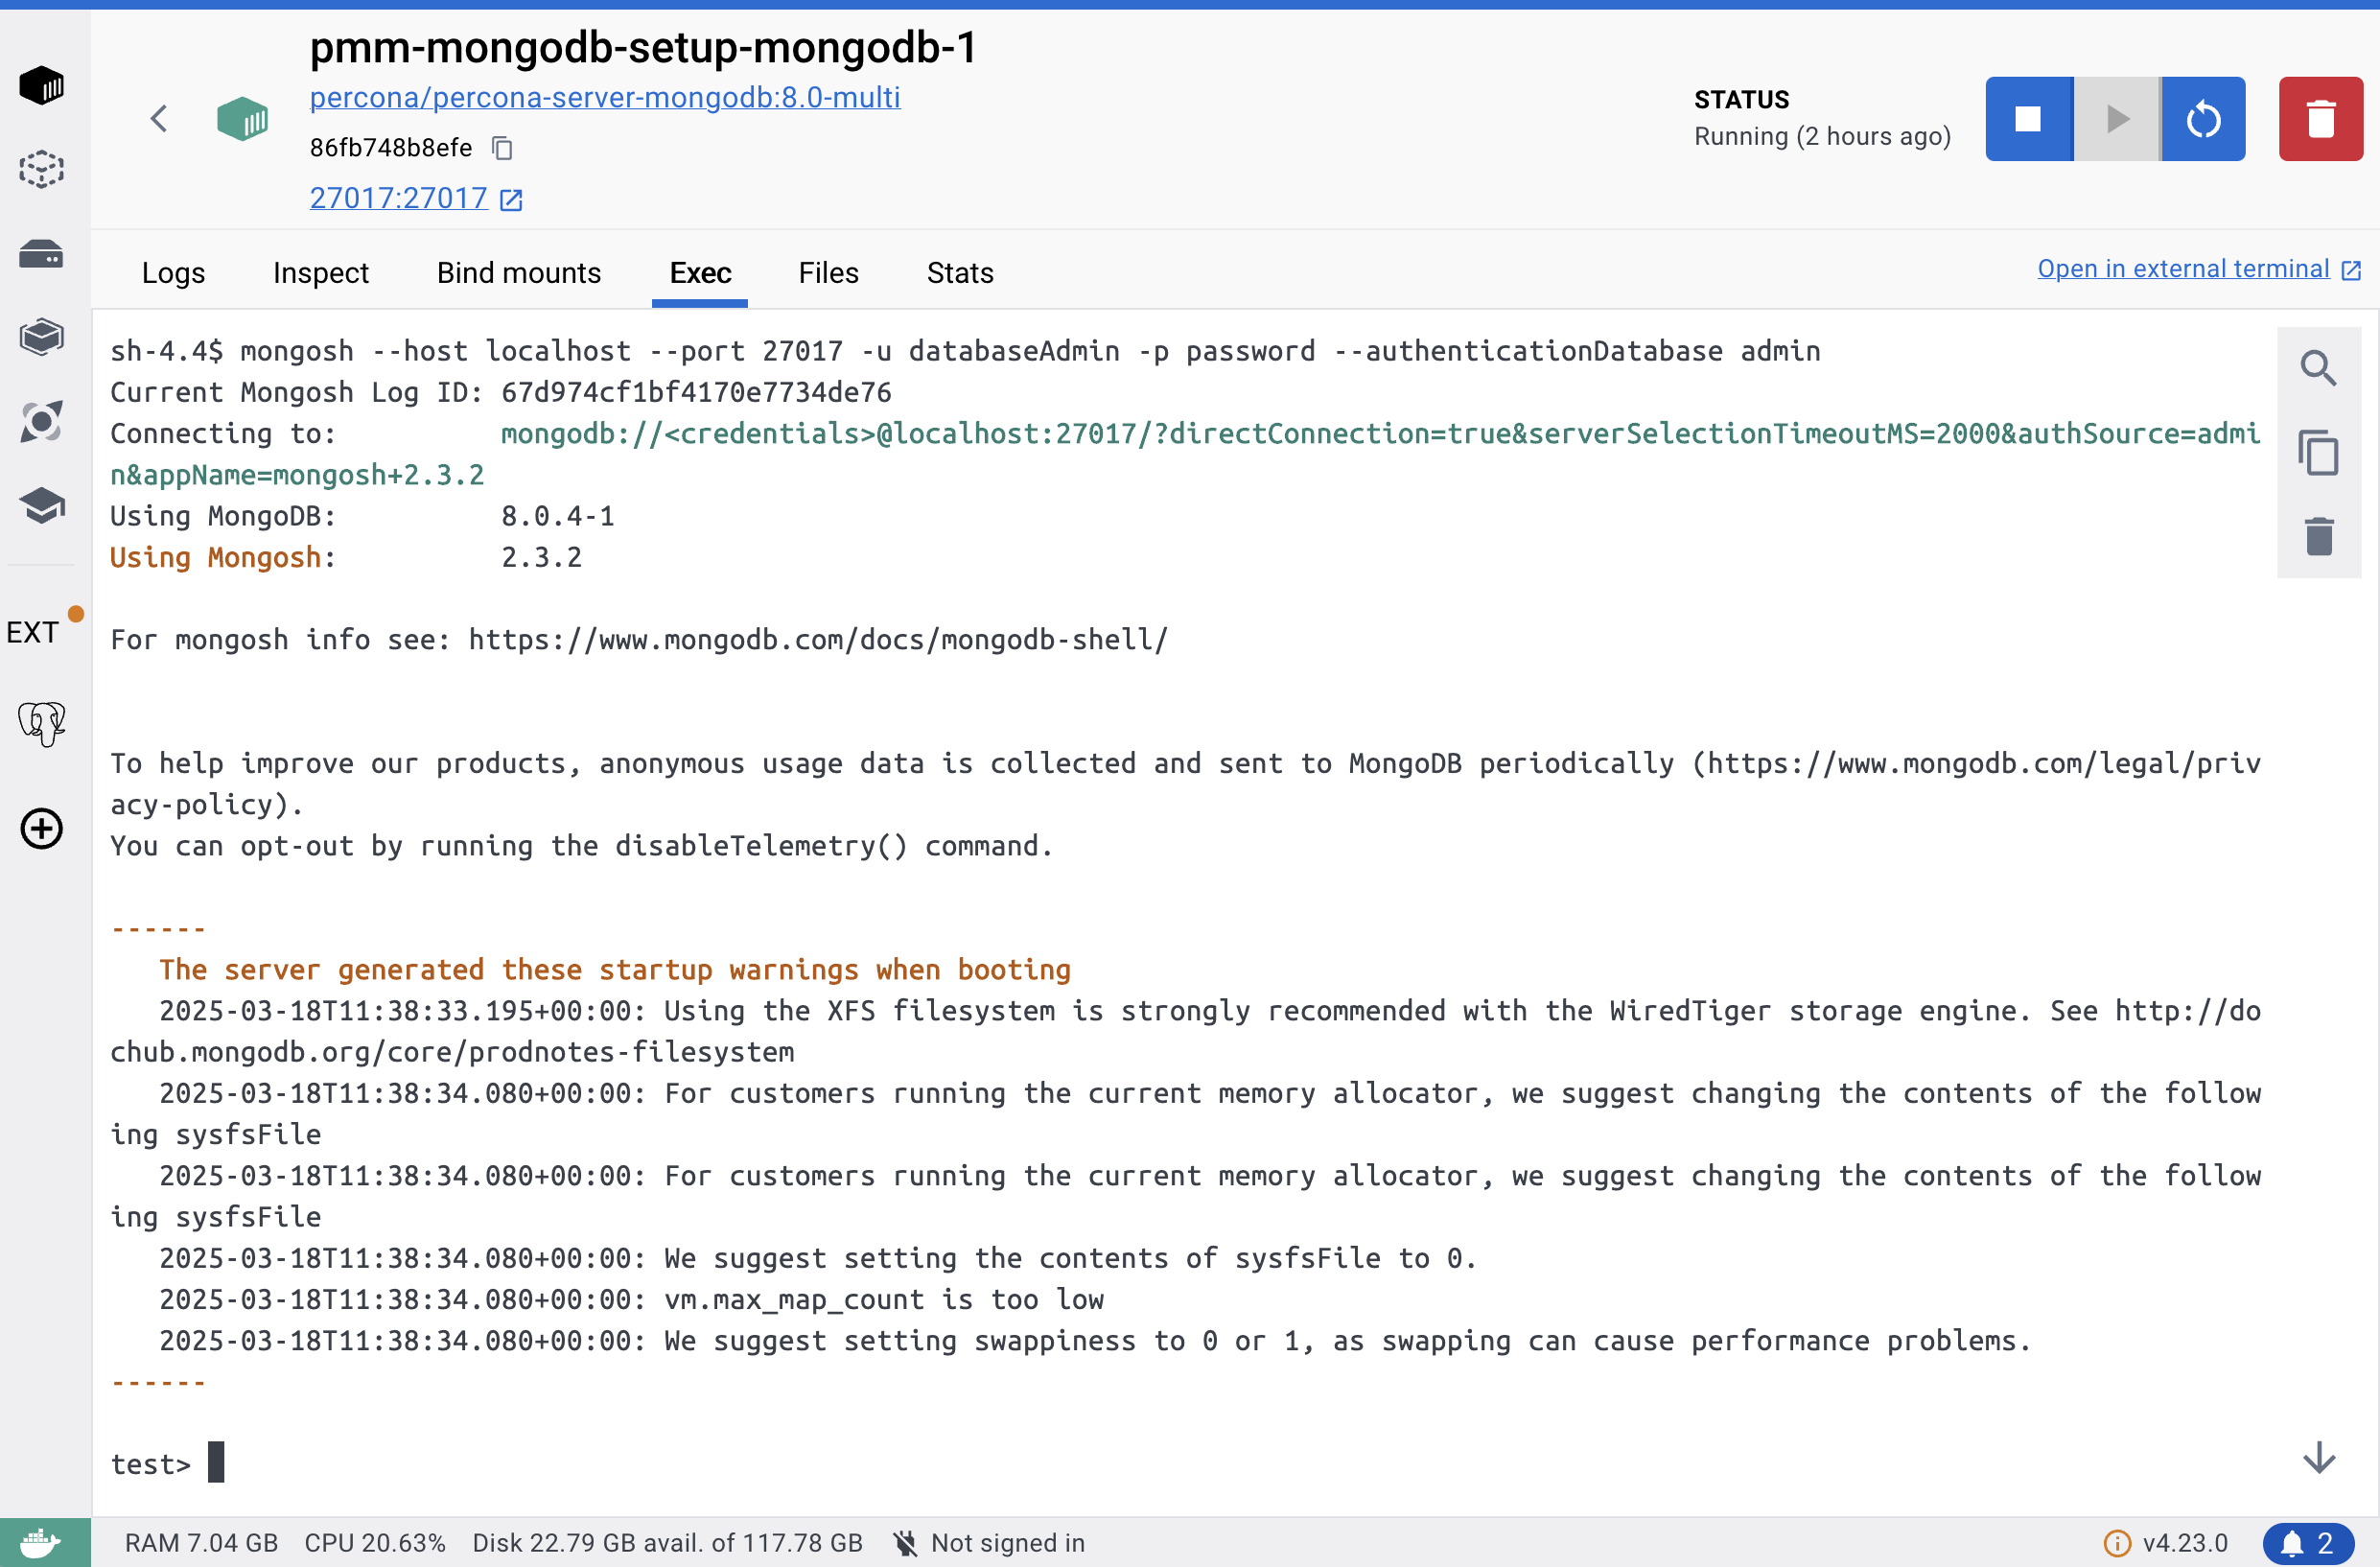
Using Docker CLI
If you’re running Docker without Docker Desktop, you can connect to the container using the following command:
bashdocker exec -it <container_name> bashwhen you connect to the container, connect to MongoDB
shmongosh --host localhost --port 27017 -u databaseAdmin -p password --authenticationDatabase adminConnecting from Applications or Tools
If you are connecting through an application or a tool like MongoDB Compass, you can use connection strings tailored to your setup:
Here are the MongoDB connection strings tailored for your use cases:
Standalone MongoDB: Connects directly to a single MongoDB instance.
shmongodb://databaseAdmin:password@localhost:27017Primary Node: Forces a direct connection to the primary node in the Replica Set using the directConnection=true option.
shmongodb://databaseAdmin:password@localhost:27017/?directConnection=trueFull Replica Set: Lists all Replica Set members and enables automatic failover using replicaSet=rs
shmongodb://databaseAdmin:password@localhost:27017,localhost:28017,localhost:29017/?replicaSet=rs
Useful Commands
Here are some helpful commands for managing and troubleshooting your MongoDB setup:
Check the status of the Replica Set. After connecting to MongoDB, use the following command to retrieve the status of the Replica Set:
shrs.status()Check MongoDB runtime configuration. Use this command to view the configuration options for the running MongoDB instance:
shdb.adminCommand({ getCmdLineOpts: 1 })
Conclusion
In this article, we explored deploying MongoDB using Docker and Docker Compose. We covered both a Single Instance MongoDB for simple setups and a MongoDB Replica Set for high availability, while integrating them with Percona Monitoring and Management (PMM) for monitoring.
Here are the final configurations you can download:
Thank you for reading! I look forward to your comments and questions. ∎


Discussion
We invite you to our forum for discussion. You are welcome to use the widget below.