
Creating a Kubernetes cluster on Amazon EKS with eksctl
Amazon Elastic Kubernetes Service (Amazon EKS) is a managed Kubernetes service that makes it easy for you to run Kubernetes on AWS and on-premises. Kubernetes is an open-source system for automating deployment, scaling, and management of containerized applications. Amazon EKS is certified Kubernetes-conformant, so existing applications that run on upstream Kubernetes are compatible with Amazon EKS.
Getting started guides available in the AWS documentation explain two different procedures for creating an EKS cluster. One using eksctl, a simple command line utility for creating and managing Kubernetes clusters on Amazon EKS, and the other one using the AWS Management Console and AWS CLI.
- Getting started with Amazon EKS - eksctl
- Getting started with Amazon EKS – AWS Management Console and AWS CLI
Through this article, you will learn how to use eksctl for creating a Kubernetes cluster on Amazon EKS.
eksctl is a simple CLI tool for creating and managing clusters on EKS - Amazon’s managed Kubernetes service for EC2. It is written in Go, uses CloudFormation, and was created by Weaveworks.
For using eksctl, you must:.
- Install kubectl.
- Install AWS IAM Authenticator for Kubernetes.
- Install AWS CLI.
- Create a user with minimal IAM policies.
After running eksctl, you will get a cluster with default configuration:
- Exciting auto-generated name
- Two m5.large worker nodes
- Use the official AWS EKS AMI
- Default us-west-2 region
- A dedicated VPC
Creating IAM user
Go to console.aws.amazon.com/iamv2, create a user group, named EKS, and attach the policies described in the minimal IAM policies section from the eksctl documentation.
These policies already exist, and you must attach them as they are.
- AmazonEC2FullAccess (AWS managed)
- AWSCloudFormationFullAccess (AWS managed)
In addition to previous policies, you must create:
EksAllAccess (click to expand)
{
    "Version": "2012-10-17",
    "Statement": [
        {
            "Effect": "Allow",
            "Action": "eks:*",
            "Resource": "*"
        },
        {
            "Action": [
                "ssm:GetParameter",
                "ssm:GetParameters"
            ],
            "Resource": [
                "arn:aws:ssm:*:<account_id>:parameter/aws/*",
                "arn:aws:ssm:*::parameter/aws/*"
            ],
            "Effect": "Allow"
        },
        {
             "Action": [
               "kms:CreateGrant",
               "kms:DescribeKey"
             ],
             "Resource": "*",
             "Effect": "Allow"
        },
        {
             "Action": [
               "logs:PutRetentionPolicy"
             ],
             "Resource": "*",
             "Effect": "Allow"
        }
    ]
}
IAMLimitedAccess (click to expand)
{
    "Version": "2012-10-17",
    "Statement": [
        {
            "Effect": "Allow",
            "Action": [
                "iam:CreateInstanceProfile",
                "iam:DeleteInstanceProfile",
                "iam:GetInstanceProfile",
                "iam:RemoveRoleFromInstanceProfile",
                "iam:GetRole",
                "iam:CreateRole",
                "iam:DeleteRole",
                "iam:AttachRolePolicy",
                "iam:PutRolePolicy",
                "iam:ListInstanceProfiles",
                "iam:AddRoleToInstanceProfile",
                "iam:ListInstanceProfilesForRole",
                "iam:PassRole",
                "iam:DetachRolePolicy",
                "iam:DeleteRolePolicy",
                "iam:GetRolePolicy",
                "iam:GetOpenIDConnectProvider",
                "iam:CreateOpenIDConnectProvider",
                "iam:DeleteOpenIDConnectProvider",
                "iam:TagOpenIDConnectProvider",
                "iam:ListAttachedRolePolicies",
                "iam:TagRole",
                "iam:GetPolicy",
                "iam:CreatePolicy",
                "iam:DeletePolicy",
                "iam:ListPolicyVersions"
            ],
            "Resource": [
                "arn:aws:iam::<account_id>:instance-profile/eksctl-*",
                "arn:aws:iam::<account_id>:role/eksctl-*",
                "arn:aws:iam::<account_id>:policy/eksctl-*",
                "arn:aws:iam::<account_id>:oidc-provider/*",
                "arn:aws:iam::<account_id>:role/aws-service-role/eks-nodegroup.amazonaws.com/AWSServiceRoleForAmazonEKSNodegroup",
                "arn:aws:iam::<account_id>:role/eksctl-managed-*"
            ]
        },
        {
            "Effect": "Allow",
            "Action": [
                "iam:GetRole"
            ],
            "Resource": [
                "arn:aws:iam::<account_id>:role/*"
            ]
        },
        {
            "Effect": "Allow",
            "Action": [
                "iam:CreateServiceLinkedRole"
            ],
            "Resource": "*",
            "Condition": {
                "StringEquals": {
                    "iam:AWSServiceName": [
                        "eks.amazonaws.com",
                        "eks-nodegroup.amazonaws.com",
                        "eks-fargate.amazonaws.com"
                    ]
                }
            }
        }
    ]
}
Replace <account_id>, in both policies, with your AWS account ID, you can find it in the upper right corner, in the navigation bar. For other ways of getting your account ID, go to Your AWS account ID and its alias in the docs.
Add a new user, named eksctl, to the group previously created.
Don’t forget to download or copy your credentials, Access Key ID and Secret Access Key, as you will need them for setting up authentication.
Installing AWS CLI
On Linux, download the installer:
$ curl "https://awscli.amazonaws.com/awscli-exe-linux-x86_64.zip" -o "awscliv2.zip"Unzip the installer:
$ unzip awscliv2.zipAnd run the installer:
$ sudo ./aws/installFor instructions on how to install AWS CLI on other operating systems, go to Installing or updating the latest version of the AWS CLI in the documentation.
After installing AWS CLI, run the following command for setting up authentication locally:
$ aws configure --profile eksctlIt will ask you for your AWS credentials and default region.
Installing AWS IAM Authenticator
On Linux, run the following command:
$ curl -o aws-iam-authenticator https://s3.us-west-2.amazonaws.com/amazon-eks/1.21.2/2021-07-05/bin/linux/amd64/aws-iam-authenticatorApply execute permissions to the binary:
$ chmod +x ./aws-iam-authenticatorCreate a folder in your $HOME directory and add it to the $PATH variable:
$ mkdir -p $HOME/bin && cp ./aws-iam-authenticator $HOME/bin/aws-iam-authenticator && export PATH=$PATH:$HOME/binAdd $HOME/bin to your .bashrc:
$ echo 'export PATH=$PATH:$HOME/bin' >> ~/.bashrcFor Mac and Windows, check Installing aws-iam-authenticator in the documentation.
Installing kubectl
NOTE: From the documentation - You must use a
kubectlversion that is within one minor version difference of your Amazon EKS cluster control plane. For example, a1.22kubectlclient works with Kubernetes1.21,1.22, and1.23clusters.
As of today, the latest version of Kubernetes used by eksctl is 1.21. Run the following command for installing the corresponding version of kubectl:
$ curl -o kubectl https://s3.us-west-2.amazonaws.com/amazon-eks/1.21.2/2021-07-05/bin/linux/amd64/kubectlApply execute permissions to the binary:
$ chmod +x ./kubectlCopy the binary to $HOME/bin:
$ cp ./kubectl $HOME/bin/kubectlIf you’re using another version of Kubernetes, check Installing or updating kubectl in the documentation, where you can also find instructions for other operating systems.
Installing eksctl and creating a Kubernetes cluster
Download the binary and copy it to /usr/local/bin:
$ curl --silent --location "https://github.com/weaveworks/eksctl/releases/latest/download/eksctl_$(uname -s)_amd64.tar.gz" | tar xz -C /tmp$ sudo mv /tmp/eksctl /usr/local/binOn Mac and Windows, you can install eksctl following the instructions in the GitHub repository.
Once installed, create a cluster with default configuration, and authenticate to AWS using IAM user created previously.
$ eksctl create cluster --profile eksctlNOTE: From the documentation - That command will create an EKS cluster in your default region (as specified by your AWS CLI configuration) with one managed nodegroup containing two m5.large nodes.
For a cluster with custom configuration, create a config file, named cluster.yaml, with the following content:
apiVersion: eksctl.io/v1alpha5
kind: ClusterConfig

metadata:
  name: basic-cluster
  region: eu-north-1

nodeGroups:
  - name: ng-1
    instanceType: m5.large
    desiredCapacity: 10
    volumeSize: 80
    ssh:
      allow: true # will use ~/.ssh/id_rsa.pub as the default ssh key
  - name: ng-2
    instanceType: m5.xlarge
    desiredCapacity: 2
    volumeSize: 100
    ssh:
      publicKeyPath: ~/.ssh/ec2_id_rsa.pub
Run eksctl to create the cluster as follows:
$ eksctl create cluster -f cluster.yaml --profile eksctlWhile running, eksctl will create the cluster and all the necessary resources.
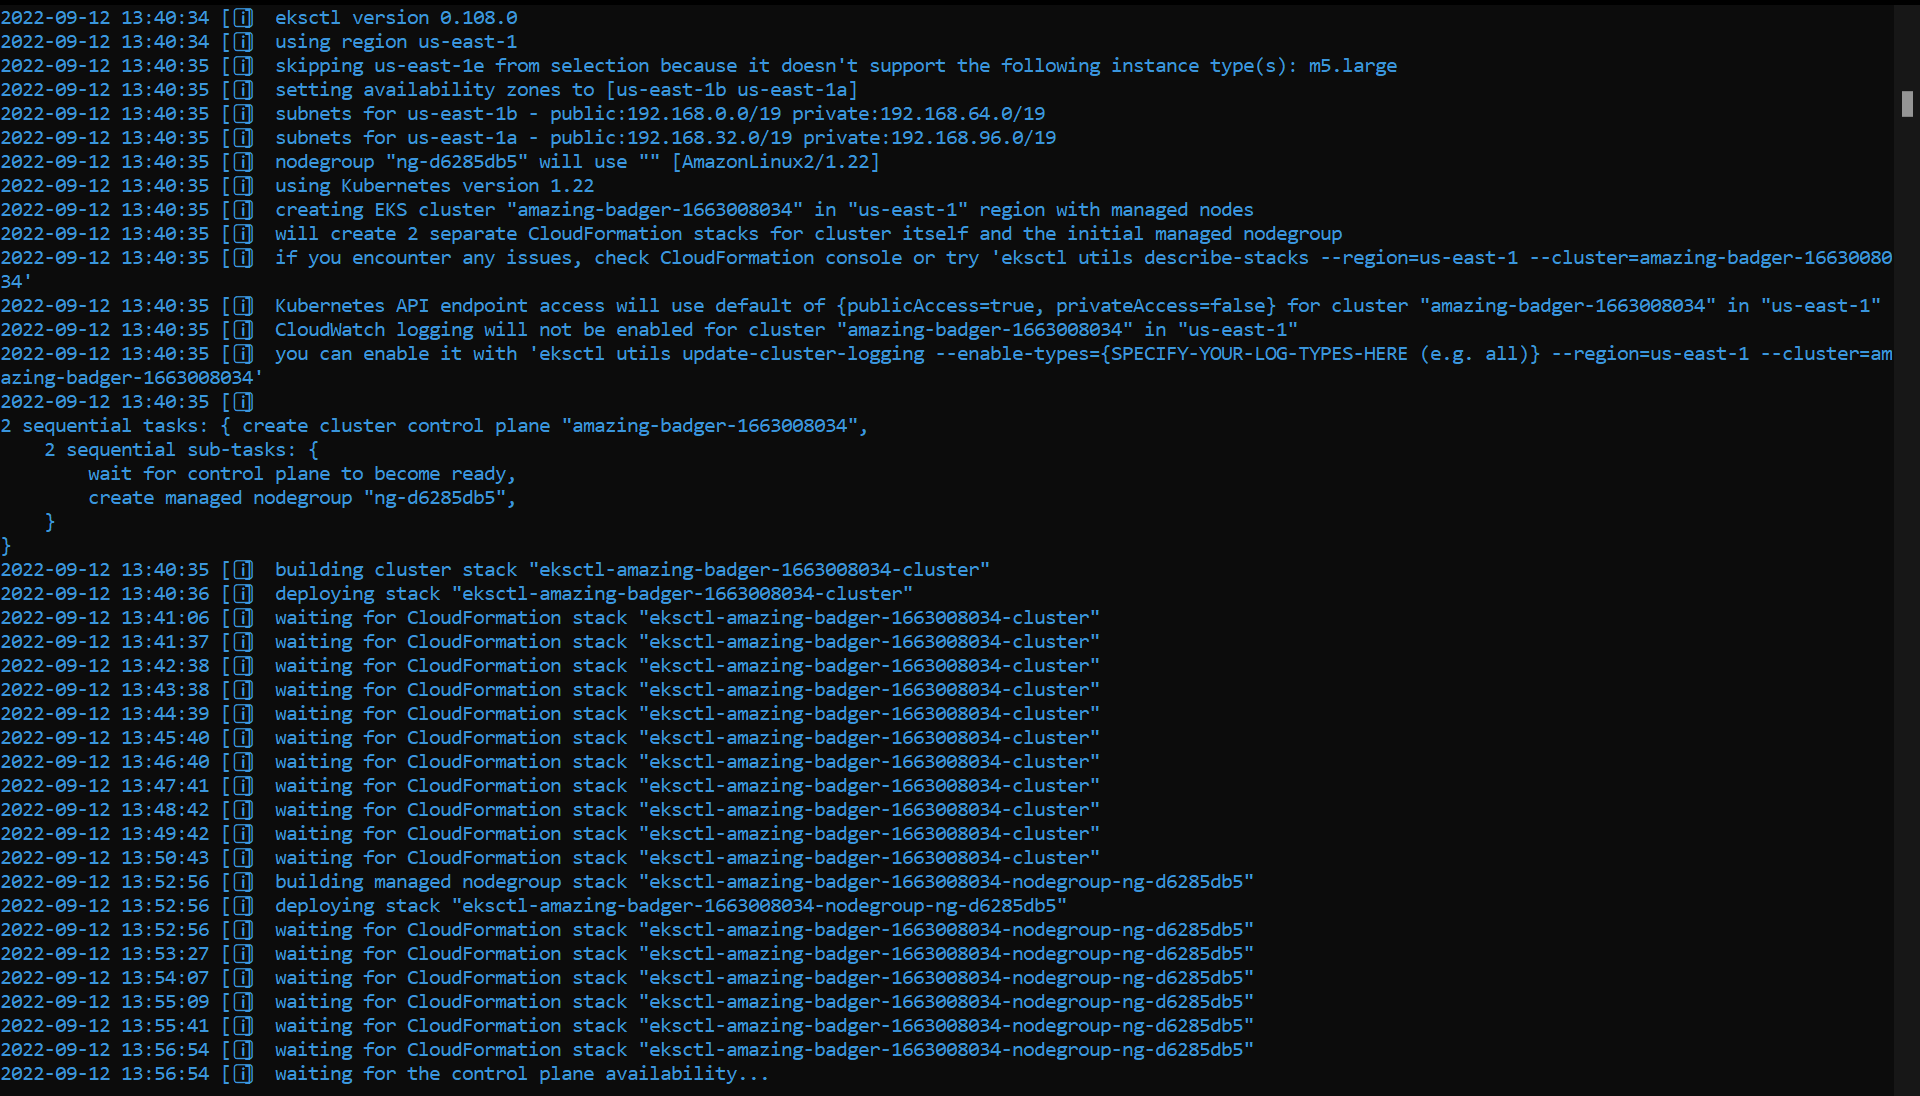
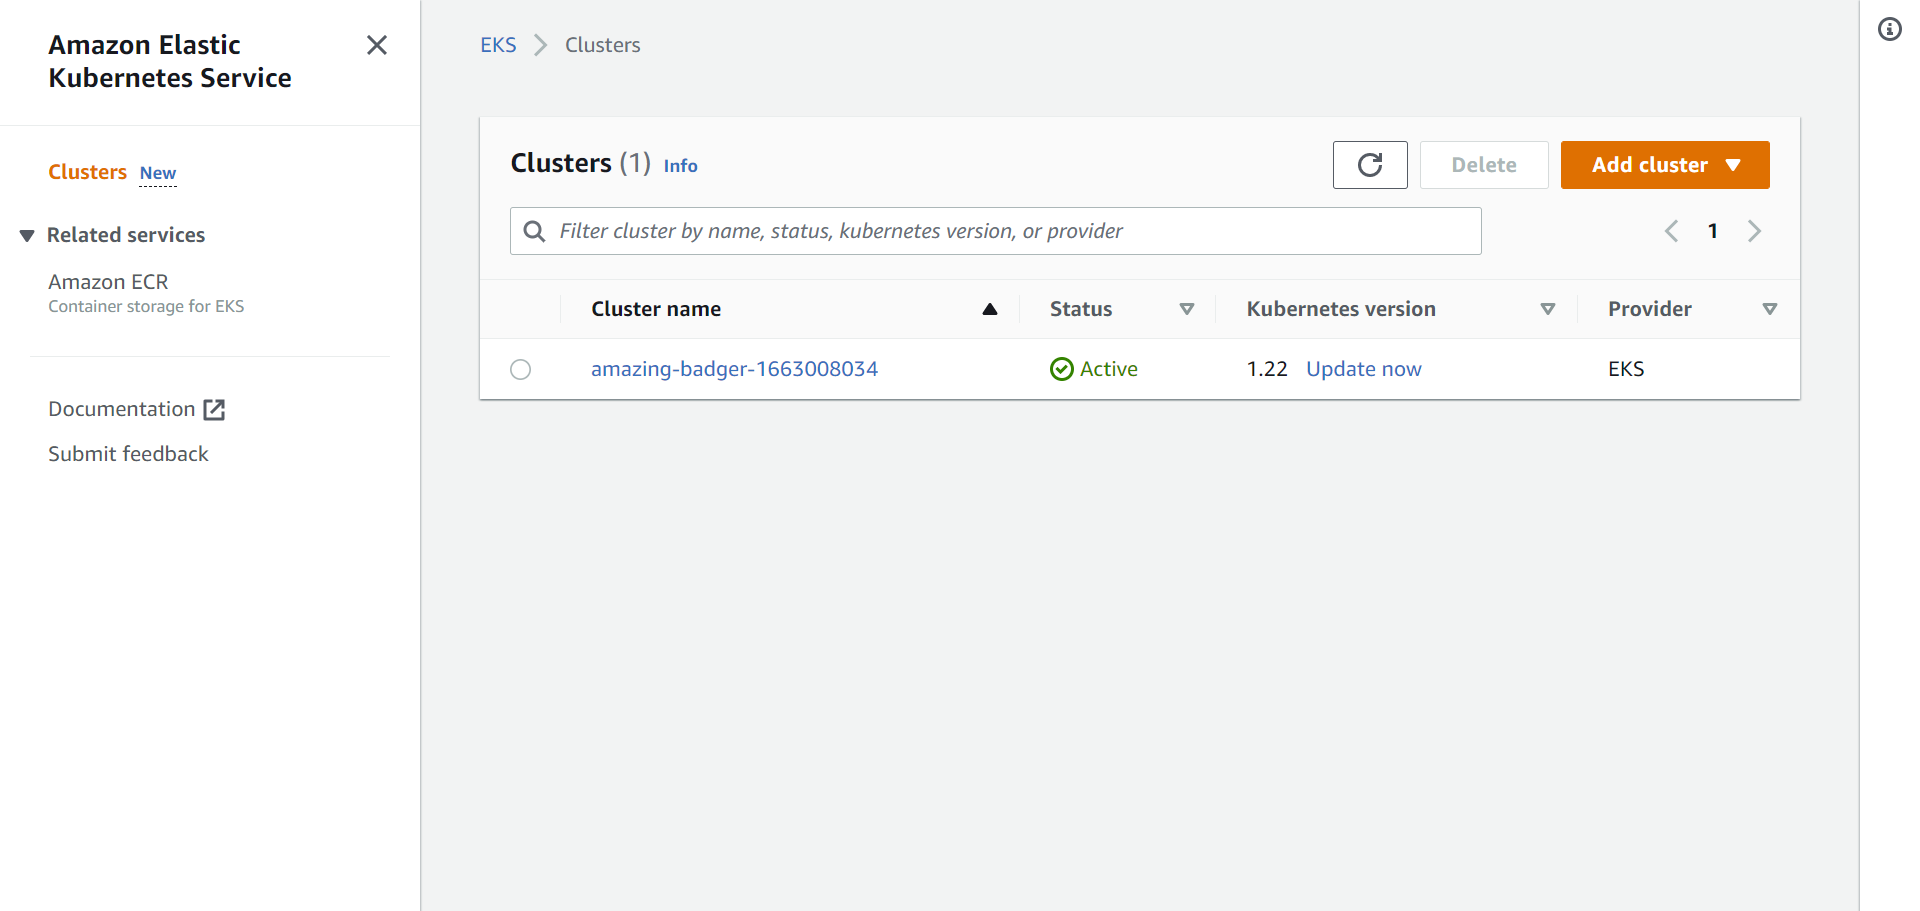
It will take a few minutes to complete. After the command is executed, you can go to us-east-1.console.aws.amazon.com/eks/home?region=us-east-1#/clusters to see the cluster.
Don’t forget to replace us-east-1 in the URL, if your default region is different.
Cluster credentials can be found in ~/.kube/config. Try kubectl get nodes to verify that this file is valid, as suggested by eksctl.
If, for any reason, you need to delete your cluster, just run:
$ eksctl delete cluster --name=ferocious-painting-1660755039 --profile eksctlReplacing name with corresponding value.
You’ve created your first Kubernetes cluster using eksctl. Check the documentation for more information on how to create and manage clusters. ∎

Discussion
We invite you to our forum for discussion. You are welcome to use the widget below.