Percona Toolkit + pt-table-checksum + pt-table-sync = Faster Replica Recovery
Asynchronous replication with MySQL is a tried and true technology. Add the use of GTID’s and you have a very stable solution.
The fundamental issue with async replication is that writes sent to the Replica are not guaranteed to be written. I have only seen a handful of times when writes did not get applied to the replica. Most of the time this happens is due to network packet drops or a replica crashes before new data is committed.
I can remember long nights of restoring backups of the primary to the replica’s. Not a painful process but time consuming.
Please take a few moments to review the full documentation of both tools before trying this example on live data: pt-table-checksum, pt-table-sync.
With pt-table-check and pt-table-sync provided by Percona Toolkit we can recover a replica without needed to do a restore. Keep in mind this approach might not work for all situations. We will go over one example below. We will also use dbdeployer to help us setup a testing sandbox.
Let’s start off by setting up a VM to play with. For this I will be using Virtualbox and Ubuntu 20.04LTS.
Prepare Ubuntu 20.04LTS
sudo apt install gnupg2 curl libaio-dev libncurses-dev mysql-client-core-8.0wget https://repo.percona.com/apt/percona-release_latest.$(lsb_release -sc)_all.debsudo dpkg -i percona-release_latest.$(lsb_release -sc)_all.debsudo percona-release enable tools releasesudo apt updatesudo apt install percona-toolkit sysbench
Install dbdeployer
mkdir $HOME/bin ; cd $HOME/bin ; source $HOME/.profilecurl -s https://raw.githubusercontent.com/datacharmer/dbdeployer/master/scripts/dbdeployer-install.sh | bash

ln -s dbdeployer-1.60.0.linux dbdeployer(symlink for less typing)dbdeployer init
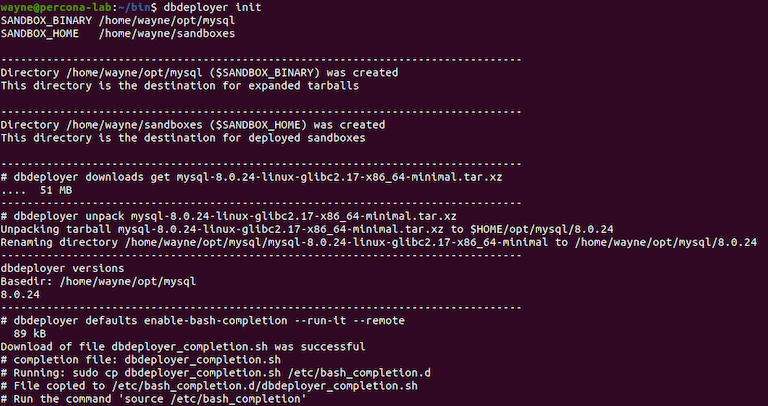
- Download Percona Server:
wget https://downloads.percona.com/downloads/Percona-Server-LATEST/Percona-Server-8.0.25-15/binary/tarball/Percona-Server-8.0.25-15-Linux.x86_64.glibc2.17-minimal.tar.gz

- Prepare Percona Server:
dbdeployer --prefix=ps unpack Percona-Server-8.0.23-14-Linux.x86_64.glibc2.17-minimal.tar.gz

- Deploy your cluster:
	dbdeployer deploy replication ps8.0.23 \
 	--gtid \
 	--custom-role-name=R_POWERFUL \
 	--custom-role-privileges='ALL PRIVILEGES' \
 	--custom-role-target='*.*' \
 	--custom-role-extra='WITH GRANT OPTION' \
 	--default-role=R_POWERFUL \
 	--bind-address=0.0.0.0 \
 	--remote-access='%' \
 	--native-auth-plugin \
 	--db-user=sbtest \
 	--db-password=sbtest!
Lets verify our Cluster: dbdeployer sandboxes --full-info

Change directories into you cluster directory: _$HOME/sandboxes/rsandboxps8.0.23_ and run the ./check_slaves script.
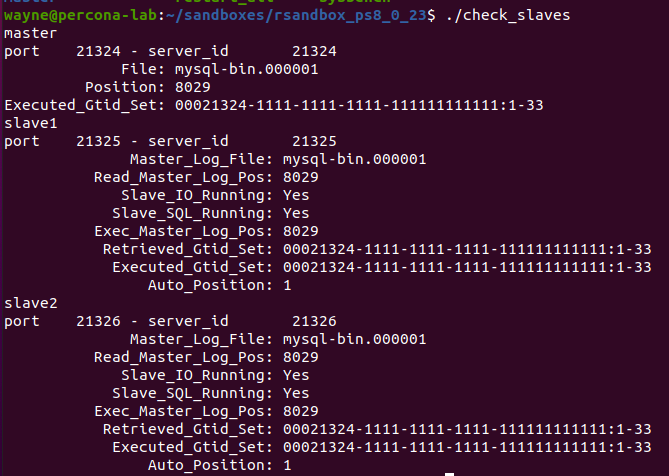
This will display information about your new cluster. Take time to make yourself familiar with the scripts in this directory.
Note: we will stay in the _$HOME/sandboxes/rsandboxps8.0.23_ for remainder of this post. * Please note that the location of your cluster might be different. *
Preparing Data for testing
Let’s move on and add some data to play with. While in your sandboxes/cluster directory run this command:
Connect you to the master: mysql --socket=/tmp/mysql_sandbox21325.sock --port=21325 -u sbtest -p
create database synctest;
use synctest;
create table names (id int not null auto_increment primary key, fname varchar(50), lname varchar(50));

insert into names (fname,lname) values ('Moe','Howard');
insert into names (fname,lname) values ('Larry','Howard');
insert into names (fname,lname) values ('Curly','Howard');
insert into names (fname,lname) values ('Shemp','Howard');
insert into names (fname,lname) values ('Joe','Howard');
insert into names (fname,lname) values ('James','Bond');
insert into names (fname,lname) values ('Doctor','No');
insert into names (fname,lname) values ('Gold','Finger');
insert into names (fname,lname) values ('Money','Penny');
insert into names (fname,lname) values ('Number','One');
insert into names (fname,lname) values ('Number','Two');
insert into names (fname,lname) values (‘Micky','Mouse');
Make sure you do a quick select * from percona.synctest;
You should see 12 rows of data. If you don’t double check your inserts.
Let’s connect to mysql and create a percona database and add the dsns table. We will need this database and table to hold our checksums and DSNS data.
create database percona;
use percona;

CREATE TABLE `dsns` (
  `id` int(11) NOT NULL AUTO_INCREMENT,
  `parent_id` int(11) DEFAULT NULL,
  `dsn` varchar(255) NOT NULL,
  PRIMARY KEY (`id`)
);

insert into dsns (id,parent_id,dsn) values (1,1,"h=percona-lab,u=sbtest,p=sbtest!,P=21325");
insert into dsns (id,parent_id,dsn) values (2,2,"h=percona-lab,u=sbtest,p=sbtest!,P=21326");
Remember to populate this data based on your cluster
Quit out of your master sandbox.
Now we are ready to move on to the pt-table-checksum tool.
pt-table-checksum --user=sbtest --socket=/tmp/mysql_sandbox21324.sock --port=21234 --ask-pass --no-check-binlog-format

Notice we had errors: (I cropped out the rest of the output since it does not show a good run of pt-table-checksum.) pt-table-checksum could not find the slaves. Lets run the command a second time, but this time lets tell it the the –recursion-method:
pt-table-checksum --user=sbtest --socket=/tmp/mysql_sandbox21324.sock --port=21234 --ask-pass --no-check-binlog-format --recursion-method=dsn=D=percona,t=dsns
Success!!! This time pt-table-checksum was able to find the replicas.
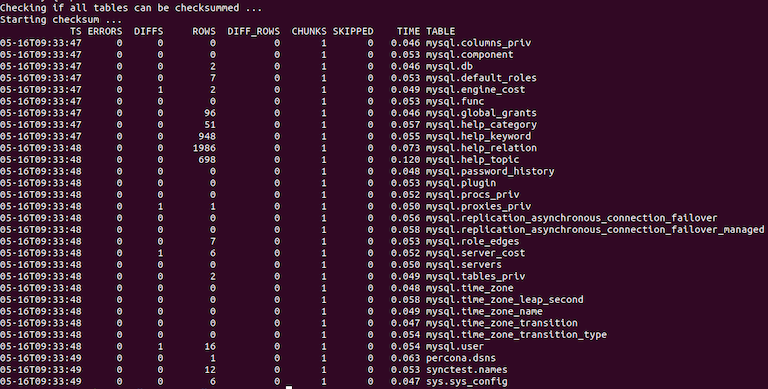
Note: there a couple mysql tables that are different between the master and replicas. This is normal.
Now lets remove data from both replicas.
Connect to the 1st replica:
mysql --socket=/tmp/mysql_sandbox21325.sock --port=21325 -u sbtest -p
Change into the synctest database. Do a select on the synctest.names table and you should see 12 rows of data. Remove one row of data.
delete from names where id = 7;quit out of slave1.
Connect to the 2nd replica.
mysql --socket=/tmp/mysql_sandbox21326.sock --port=21326 -u sbtest -p
Change into the synctest database. Do a select on the names table and you should see 12 rows of data. Remove one row of data.
delete from names where id = 8;quit out of slave2.
Now we know that our cluster is out of sync, but let’s use the tool to verify. This time on checksum we will ignore mysql and sys databases.
pt-table-checksum --user=sbtest --socket=/tmp/mysql_sandbox21324.sock --port=21234 --ask-pass --no-check-binlog-format —recursion-method=dsn=D=percona,t=dsns -- ignore-databases=mysql,sys

Note: that pt-table-checksum is shows a DIFFS of 1 and DIFF_ROWS of 1. This reflects that we have 1 row of data missing from one our both of the slaves.
Go back to slave2 and remove another row of data. Run Checksum again.
delete from names where id = 9;
This time we are seeing DIFF_ROWS of 2. This would now reflect that we have 2 rows missing on at least of one the slaves. Let’s fix this mess we created. Before we do that let’s look at the data on both slaves. As we can see they are not in-sync with the master.
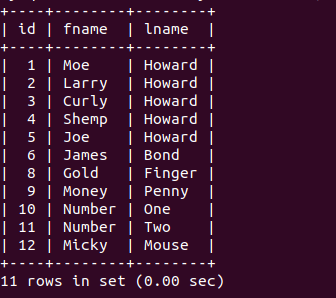
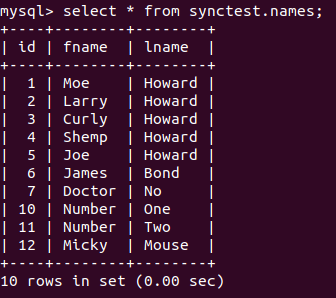
Now let’s sync the slaves to the master.
Replication Safety is very important. Please take a moment to read the replication safety section of the pt-table-sync tool.
pt-table-sync --execute h=percona-lab,P=21324,u=sbtest,p=sbtest! h=percona-lab,P=21325,u=sbtest,p=sbtest! h=percona-lab,P=21326,u=sbtest,p=sbtest! --no-check-slave --ignore-databases=mysql,sys
This will run in a couple seconds. When done lets checksum the cluster again.
Your cluster is now repaired.

This is just an example of what the two tools can do, they may not meet your every need.
If you look to use this to repair a production databases, please make sure have have good backups on hand to fall back on if needed.
Whats next?
I really only scratched the surface of these tools, dbdeployer, percona-toolkit.
For more information on both tools please check out the the links below:

Discussion
We invite you to our forum for discussion. You are welcome to use the widget below.